Hole 11 at Seminole Golf Club
- Par
- 4
- Yardage
- 420 yds
- Hazards
- 9 bunkers · Water
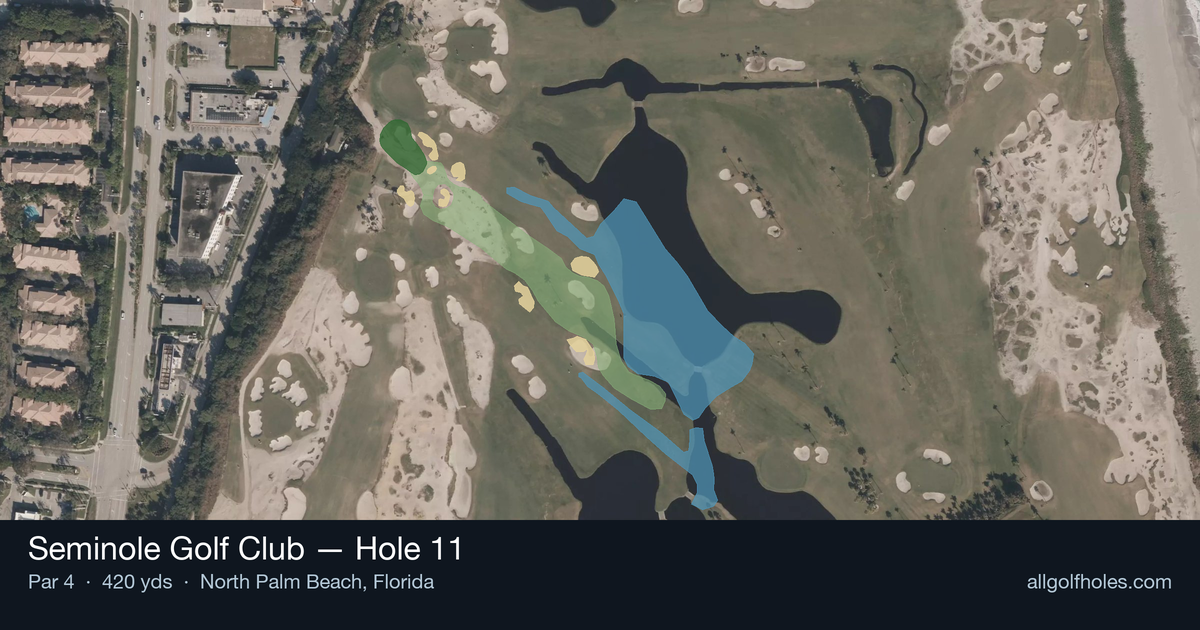
Aerial source not provided
Green size: 46 yds deep × 30 yds wide
Scorecard yardage is for Championship tees. The aerial shows its labeled reference position; distance rings measure to the green.
Championship tees · Par 4 · 420 yards
The plan for No. 11
The 11th hole at Seminole Golf Club presents a deceptively straightforward par 4 that epitomizes the course's reputation for strategic excellence. At 420 yards, this straight-away hole may appear uncomplicated on the scorecard, but its subtle challenges demand precision and course management skills that separate skilled players from the field. The tee shot offers a generous fairway target, allowing players to find their preferred angle for the crucial approach shot. However, the hole's true test lies in the second shot to a small, well-protected green complex. The compact putting surface requires accurate distance control and proper club selection, as short-sided positions can quickly turn routine pars into bogeys or worse. What makes this hole memorable is its embodiment of Seminole's architectural philosophy—rewarding thoughtful play while punishing careless execution. The absence of dramatic hazards forces golfers to focus on fundamentals: driving accuracy, approach precision, and green-reading skills that define championship golf at this legendary North Palm Beach venue.
Off the tee
The tee shot strategy centers on finding the optimal position in the landing zone, typically around the 250-yard mark. With the straight layout, your target line should favor the center-right portion of the fairway, which provides the best angle for your approach shot. Club selection should prioritize accuracy over distance - many players will benefit from hitting 3-wood or hybrid to ensure they stay in play. The firm conditions at Seminole mean balls will run considerably, so factor in extra roll when choosing your club. Avoid the temptation to grip down and swing hard with driver unless you're supremely confident in your accuracy.
Approach & recovery
The approach shot into this small green is where the hole reveals its true character. From a well-positioned drive, you'll typically face a mid-iron to long-iron depending on conditions and pin position. The key is committing to your club selection and swinging with confidence - the firm green won't hold tentative shots. Aim for the center of the green regardless of pin position, as the small target leaves little margin for error. The green's size makes distance control crucial; being above the hole on this putting surface can lead to difficult two-putts.
On the green
Seminole's 11th green, like most at this classic course, features subtle breaks that can be deceiving. The firm, fast conditions mean putts will break more than they appear, especially in windy conditions. Focus on lag putting to the correct tier or section of the green rather than being overly aggressive with birdie attempts. Common pin positions will test your ability to judge speed, as putts that roll past the hole often face challenging return putts. ## RISK VS REWARD While this hole lacks dramatic risk/reward options, the scoring opportunity lies in precise execution rather than aggressive play. The reward for hitting quality shots is a legitimate birdie chance, but the risk of missing the small green or leaving yourself in poor position is significant. The smart play is conservative club selection off the tee followed by an aggressive, committed approach shot to the green's center. ## DIFFERENT SKILL LEVELS **High-handicap players** should prioritize keeping the ball in play above all else. Consider hitting 3-wood or hybrid off the tee to ensure you're hitting from the fairway. On the approach, take one extra club and aim for the middle of the green, accepting par as a good score on this challenging hole. **Low-handicap players** can be more aggressive with driver off the tee if their accuracy is sound, but should still respect the small green on the approach. These players can attack certain pin positions, but should have a clear strategy for each shot rather than simply trying to overpower the hole. The key is understanding that even scratch players often make par here and move on. This hole exemplifies Seminole's philosophy of strategic golf - rewarding smart course management and precise execution while punishing careless play through subtle but effective design elements.
Watch for
- Mapped sand (greenside) roughly 406 yards from the tee reference.
- Mapped sand (greenside) roughly 394 yards from the tee reference.
- Mapped sand (greenside) roughly 398 yards from the tee reference.
- Mapped sand (crossing) roughly 372 yards from the tee reference.
- Mapped sand (greenside) roughly 376 yards from the tee reference.
Hole 11 Green Complex
Mapped green boundary
Green size: 6,594 sq ft
Course coverage
Tournament and creator videos about Seminole Golf Club — shared course coverage, not hole-specific clips.
Featured by these creators
Creator videos about this course
YouTube creators who filmed or featured Seminole Golf Club. · Stats as of Oct 12, 2026 · 5d ago
Restoring Donald Ross's Seminole Golf Club
How did Hole 11 play?
How did this hole play today?
Frequently asked questions
Yardage reference: Championship tees · 420 yards.
What's the best strategy off the tee?
↓
For this 420-yard par 4, most players will hit driver to set up a comfortable approach.
How difficult is hole 11?
↓
This hole is a moderate challenge for most golfers. Key challenges include: water in play.
What hazards should I watch out for on hole 11?
↓
Key hazards include: water at 128.7 yards. Plan your shots to avoid these trouble spots.
How big is the green on hole 11?
↓
The green is fairly large with multiple pin positions. Lag putting becomes important on longer putts.