Hole 2 at Shoal Creek Golf Club
- Par
- 4
- Yardage
- 415 yds
- Stroke index
- 5
- Hazards
- 2 bunkers
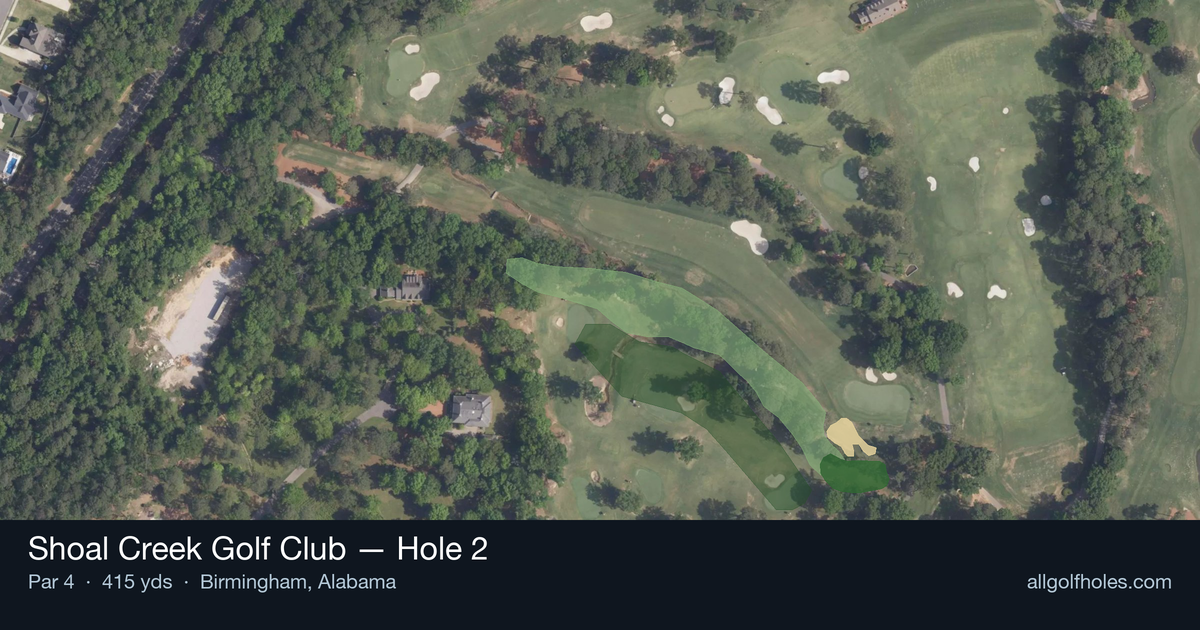
Aerial source not provided
Green size: 46 yds deep × 29 yds wide
Scorecard yardage is for Championship tees. The aerial shows its labeled reference position; distance rings measure to the green.
Championship tees · Par 4 · 415 yards
The plan for No. 2
Shoal Creek Golf Club hole 2 presents a deceptively challenging 390-yard par 4 that demands precision over power. This straight-away layout features a generous fairway that invites an aggressive tee shot, but the real test lies in the approach to a small, well-protected green complex. Without major hazards cluttering the hole, golfers must rely on course management and accuracy to score well on this fifth-handicap challenge. The absence of water or bunkers shifts focus entirely to the green, where pin placement becomes crucial for approach shot strategy. The compact putting surface rewards those who can dial in their yardages and club selection, while punishing wayward approaches with difficult recovery shots. At this storied Alabama venue, known for hosting major championships, hole 2 exemplifies how strategic design can create memorable challenges through subtlety rather than intimidation.
Off the tee
The tee shot strategy centers on positioning rather than distance. With the hole measuring 390 yards, most players can reach the green in regulation without needing maximum distance off the tee. Focus on finding the center of the fairway with a controlled swing, as accuracy trumps power here. For longer hitters, consider taking one club less than driver to ensure you stay in the short grass and maintain control. A 3-wood or driving iron might be the perfect play, leaving you with a comfortable mid-iron approach. The straight layout means you can aim directly at your target without worrying about doglegs, but this also means any wayward shots will likely find trouble in the rough or trees.
Approach & recovery
The approach shot is where this hole reveals its true character. The small green demands pinpoint accuracy, making club selection and target line crucial. Aim for the center of the green regardless of pin position, as the compact putting surface leaves little margin for error. Pay close attention to wind conditions and green firmness, as these factors become magnified on smaller targets. A well-struck mid-iron from the optimal fairway position should give you the best chance at hitting and holding this green. Avoid the temptation to attack pins cut close to edges – the conservative play to the middle will often yield better results.
On the green
Though the green shape is unknown, the small size suggests that most putts will be relatively short, making pace control paramount. Focus on getting your first putt close rather than being overly aggressive with birdie attempts. Three-putts from this small surface would be particularly costly, so err on the side of caution with your lag putting. Study the general slope and grain direction during your approach to better read the subtle breaks that can affect even short putts on smaller greens. ## RISK VS REWARD This hole presents a classic risk/reward scenario disguised as a straightforward par 4. The aggressive play is to attack the pin with your approach shot, potentially setting up birdie opportunities. However, the small green means that missing your target can result in difficult up-and-downs. The reward for precise play is significant – this should be a birdie hole for skilled players. But the risk of short-siding yourself or leaving challenging recovery shots makes the conservative approach to the center of the green often the smarter play, especially in competitive situations. ## DIFFERENT SKILL LEVELS **High Handicappers:** Focus entirely on course management and hitting fairways and greens. Use whatever club gives you the most confidence off the tee, even if it's a hybrid or long iron. On the approach, aim for the largest part of the green and take your par happily. This hole can be a confidence builder if played conservatively. **Low Handicappers:** This is a prime scoring opportunity that you should expect to birdie. Be aggressive with your target line off the tee to set up the best approach angle. With your approach, you can be more aggressive with pin hunting, but still respect the small green size. Consider this hole a must-birdie opportunity in your round strategy. The absence of major hazards makes this hole more about precision and execution than navigation, rewarding players who can consistently hit their targets under pressure.
Hole 2 Green Complex
Mapped green boundary
Green size: 6,172 sq ft
How did Hole 2 play?
How did this hole play today?
Frequently asked questions
Yardage reference: Championship tees · 415 yards.
How difficult is hole 2?
↓
This hole is a good scoring opportunity for most golfers.
How big is the green on hole 2?
↓
The green is fairly large with multiple pin positions. The green is wider than it is deep, rewarding shots that find the correct tier. Lag putting becomes important on longer putts.
What's a good score on hole 2?
↓
This hole is a medium-length test where par is a solid result. A straightforward par 4 where course management pays off.