Hole 16 at TPC San Antonio (Oaks Course)
- Par
- 3
- Yardage
- 183 yds
- Stroke index
- 18
- Hazards
- 6 bunkers · Water
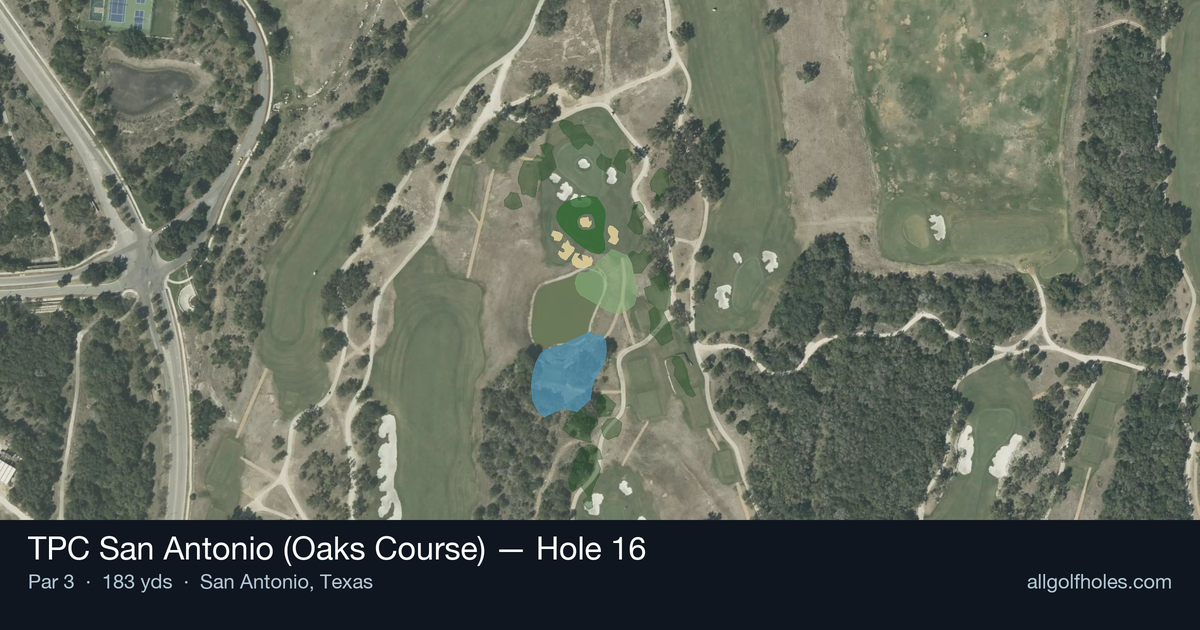
Aerial source not provided
Green size: 45 yds deep × 36 yds wide
Scorecard yardage is for Championship tees. The aerial shows its labeled reference position; distance rings measure to the green.
Championship tees · Par 3 · 183 yards
The plan for No. 16
The 18th handicap hole at TPC San Antonio (Oaks Course) proves that simplicity can be deceptive on this championship venue that hosts PGA Tour professionals. This 183-yard par 3 presents a straightforward tee shot to a small, well-protected green complex that demands precision over power. With no significant hazards cluttering the visual, golfers might be tempted to attack the pin, but the compact green leaves little margin for error. The straight layout allows players to focus entirely on distance control and accuracy, making club selection critical in San Antonio's often windy conditions. What makes this hole memorable is its honest test of iron play - there's nowhere to hide a poorly struck shot. The small target rewards committed swings and punishes tentative attempts, embodying the strategic design principles that make TPC San Antonio (Oaks Course) a respected tournament venue.
Off the tee
Club selection is paramount on this 183-yard par 3. Most players will be choosing between a 6-iron and 8-iron depending on conditions, pin position, and personal distances. Aim for the center of the green regardless of pin position – the small target makes pin-hunting a risky proposition. Take one extra club and swing smoothly rather than forcing a shorter iron. Wind conditions play a significant role at this distance, so factor in any crosswinds or headwinds when making your selection. Focus on a balanced finish and trust your yardages rather than trying to guide the ball to the target.
Approach & recovery
Since this is a par 3, your tee shot IS your approach shot. The key is committing fully to your club selection and target line. With no significant hazards to navigate around, you can be aggressive with your target – but remember that "aggressive" on a small green means center-cut, not pin-seeking. Pay attention to the green's subtle undulations and how they might affect your ball's landing and roll. A shot that lands softly in the center gives you the best chance for a makeable birdie putt while virtually eliminating the risk of a damaging bogey or worse.
On the green
The small green size means every putt is potentially makeable, but it also means precision is crucial. Study the green's slope carefully during your approach – subtle breaks can be deceiving on smaller putting surfaces. Most putts will be relatively straight, but don't assume anything. The green's compact size means pace control becomes even more critical; a putt that's slightly off-line but has good speed has a better chance than a perfectly read putt hit too firmly. Focus on getting your first putt close rather than being overly aggressive with longer birdie attempts. ## RISK VS REWARD The primary risk/reward decision comes in club selection and target choice. The reward for precise iron play is a legitimate birdie opportunity on what should be a scoring hole. The risk lies in short-siding yourself or leaving difficult two-putts by being too aggressive with pin positions. Smart players will take the center of the green and accept a potential 20-25 foot birdie putt rather than risk missing the green entirely by attacking tight pins. The absence of major hazards actually increases the importance of staying on the putting surface. ## DIFFERENT SKILL LEVELS **High-handicap players** should focus entirely on finding the green with their most reliable mid-iron. Don't worry about pin position – aim for the fattest part of the green and be thrilled with a par. Consider taking an extra club to ensure you don't come up short, as missing long is often more forgiving than missing short on most par 3s. **Low-handicap players** can be more aggressive with pin positions, especially when the flag is in the center portion of the green. However, even skilled players should resist the temptation to attack pins that are close to green edges. Use the hole's straightforward nature to work on iron fundamentals and distance control. This is an excellent hole for building confidence in your mid-iron game while maintaining realistic scoring expectations.
Watch for
- Course conditioning and mapped hazards may affect line selection; confirm from the aerial.
Hole 16 Green Complex
Mapped green boundary
Green size: 6,961 sq ft
Course coverage
Tournament and creator videos about TPC San Antonio (Oaks Course) — shared course coverage, not hole-specific clips.
Tournament coverage
Valero Texas Open highlights
Valero Texas Open | Final Round Highlights
2025
How did Hole 16 play?
How did this hole play today?
Frequently asked questions
Yardage reference: Championship tees · 183 yards.
What club should I use on this par 3?
↓
At 183 yards, most golfers will need a long iron or hybrid (5-iron to 6-iron) to reach this green. Adjust for elevation, wind, and pin position.
How difficult is hole 16?
↓
This hole is a moderate challenge for most golfers. Key challenges include: water in play.
What hazards should I watch out for on hole 16?
↓
Key hazards include: water at 93.7 yards. Plan your shots to avoid these trouble spots.
How big is the green on hole 16?
↓
The green is fairly large with multiple pin positions. Lag putting becomes important on longer putts.