Hole 10 at TPC San Antonio (Oaks Course)
- Par
- 4
- Yardage
- 447 yds
- Stroke index
- 4
- Hazards
- 4 bunkers
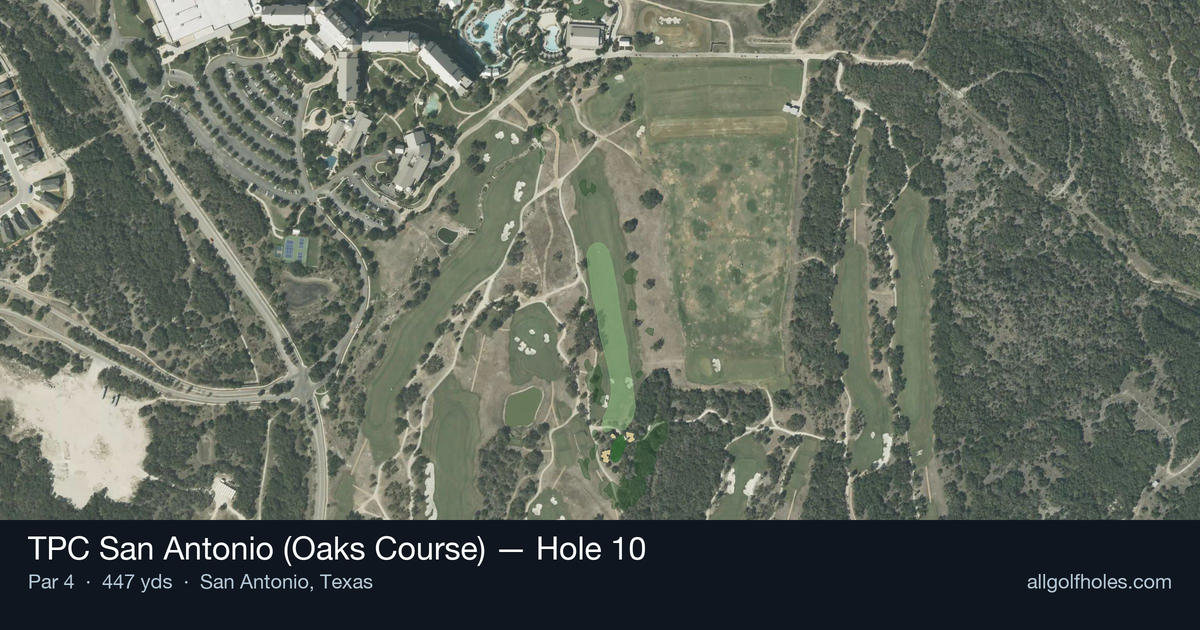
Aerial source not provided
Green size: 37 yds deep × 25 yds wide
Scorecard yardage is for Championship tees. The aerial shows its labeled reference position; distance rings measure to the green.
Championship tees · Par 4 · 447 yards
The plan for No. 10
The tenth hole at TPC San Antonio (Oaks Course) presents a deceptively challenging par 4 that demands both power and precision from the championship tees at 447 yards. This straight-away hole may appear straightforward, but its true test lies in the approach shot to a small, well-protected green complex. The generous fairway invites an aggressive tee shot, rewarding length with a more manageable angle into the green. However, the compact putting surface requires surgical precision on the approach, as anything offline will leave a difficult recovery. With minimal hazards to navigate, success hinges on club selection and commitment to your line. This hole exemplifies how strategic architecture can create challenge through subtlety rather than obvious danger.
Off the tee
Your primary objective from the tee is to find the fairway while maximizing distance to leave the shortest possible approach shot. With no hazards to navigate, you can be aggressive with your club selection - driver is typically the right choice for most players to help manage the hole's length. Focus on a smooth, controlled swing that prioritizes finding the center of the fairway. The straight layout allows you to aim directly at your target without worrying about dogleg positioning, but don't let this simplicity lead to careless execution.
Approach & recovery
The approach shot is where this hole shows its teeth. With a small green as your target, precision becomes paramount after what was likely a long iron or hybrid for most golfers. Club selection should favor taking enough club to comfortably reach the green rather than trying to finesse a shot that comes up short. Study the pin position carefully - with limited green real estate, even a well-struck shot can leave you with a challenging putt if you're on the wrong portion of the putting surface. Aim for the center of the green when in doubt, as short-siding yourself on a small target can lead to difficult up-and-down situations.
On the green
The small green size means every putt matters significantly on this hole. Speed control becomes crucial as you have less room to work with on both lag putts and shorter attempts. Focus on getting your first putt close to the hole rather than being overly aggressive, as three-putts can quickly derail your score on this compact putting surface. Pay attention to any subtle slopes or grain patterns that might affect ball roll, as the smaller target amplifies the impact of any misread. ## RISK VS REWARD While this hole lacks traditional hazards, the risk/reward calculation centers on aggression versus control. The reward for finding the fairway with a long, accurate drive is a shorter approach shot to the small green. However, the risk of missing the fairway and facing a longer approach from the rough can make the green's size even more problematic. Conservative players might consider a 3-wood or hybrid off the tee to ensure fairway position, accepting a longer approach in exchange for better lie and angle. ## DIFFERENT SKILL LEVELS **High-Handicap Players:** Focus on fairway position over distance. Consider using a fairway wood or hybrid off the tee if your driver accuracy is inconsistent. On the approach, take one extra club and aim for the center of the green, accepting a longer putt rather than risking a miss that could lead to a difficult chip shot. **Low-Handicap Players:** This hole rewards your ability to execute under pressure. Use driver aggressively to minimize the approach distance, then trust your iron play to attack pins when conditions allow. The small green rewards precise distance control, so use this as an opportunity to demonstrate your scoring ability on what should be a manageable par 4. The 10th hole at TPC San Antonio's Oaks Course exemplifies how a hole without obvious trouble can still demand respect and careful execution from every golfer.
Watch for
- Course conditioning and mapped hazards may affect line selection; confirm from the aerial.
Hole 10 Green Complex
Mapped green boundary
Green size: 3,877 sq ft
Course coverage
Tournament and creator videos about TPC San Antonio (Oaks Course) — shared course coverage, not hole-specific clips.
Tournament coverage
Valero Texas Open highlights
Valero Texas Open | Final Round Highlights
2025
How did Hole 10 play?
How did this hole play today?
Frequently asked questions
Yardage reference: Championship tees · 447 yards.
What's the best strategy off the tee?
↓
For this 447-yard par 4, most players will hit driver to set up a comfortable approach.
How difficult is hole 10?
↓
This hole is a moderate challenge for most golfers. Key challenges include: small green.
How big is the green on hole 10?
↓
The green is small and requires precision. The green is deeper than wide, so club selection is crucial. Expect challenging pin positions with limited room for error.
What's a good score on hole 10?
↓
This hole is a demanding hole where bogey is not unusual. This longer par 4 will test most golfers. Focus on position over distance.