Hole 15 at TPC San Antonio (Oaks Course)
- Par
- 4
- Yardage
- 464 yds
- Stroke index
- 2
- Hazards
- 7 bunkers
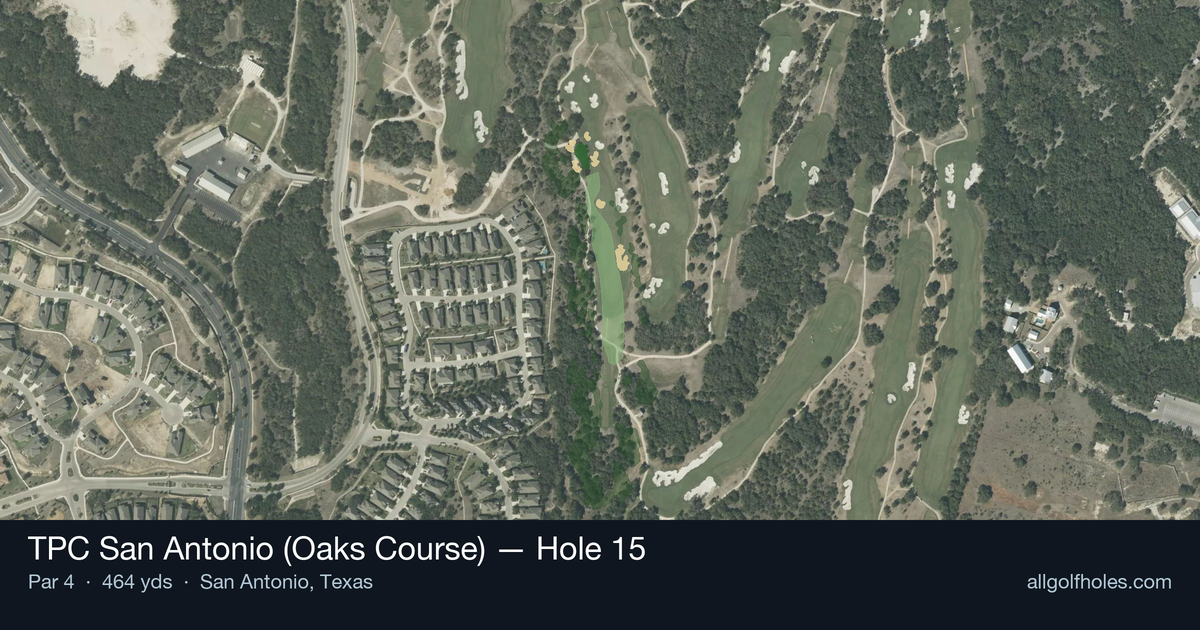
Aerial source not provided
Green size: 37 yds deep × 20 yds wide
Scorecard yardage is for Championship tees. The aerial shows its labeled reference position; distance rings measure to the green.
Championship tees · Par 4 · 464 yards
The plan for No. 15
The signature hole at TPC San Antonio (Oaks Course), this 464-yard par 4 stands as the second-most challenging test on the championship layout that has hosted PGA Tour events. Despite appearing straightforward from the tee, this deceptively demanding hole requires precision and course management to score well. The generous fairway invites an aggressive tee shot, but the real challenge emerges on the approach to a small, well-protected green complex. With minimal hazards to distract, golfers must focus on distance control and pin placement, as the compact putting surface offers little margin for error. This strategic par 4 exemplifies the subtle difficulty that makes TPC San Antonio's Oaks Course a true championship test.
Off the tee
The tee shot strategy centers on maximizing distance while maintaining accuracy down the center of the fairway. With no major hazards to navigate, aggressive players can take dead aim at the flag and let their driver work. The target line should favor the center-left portion of the fairway, providing the best angle for the approach shot. Club selection becomes crucial - longer hitters can confidently use driver to get as close to the green as possible, while players who struggle with distance might consider a 3-wood or hybrid for better accuracy, accepting that they'll face a longer approach shot. The key is avoiding any wayward shots that leave you in rough or awkward lies.
Approach & recovery
The approach shot represents the hole's primary challenge, as players will likely face anything from a mid-iron to a fairway wood depending on their driving distance. The small green demands pinpoint accuracy, making club selection and commitment to your target essential. Focus on the center of the green regardless of pin position - the small target leaves little room for error, and aggressive pin-hunting often leads to trouble. Take one extra club if you're between selections, as coming up short on a long par 4 is particularly costly. Pay attention to wind conditions, which can significantly impact club selection on this lengthy hole.
On the green
The small green size means putting becomes relatively straightforward once you're on the surface, but getting there in regulation is the real challenge. Focus on lag putting to avoid three-putts, as making par from this distance is already an accomplishment for most players. When you do find the green in regulation, be aggressive with birdie putts - opportunities on this difficult hole don't come often, and the smaller surface typically means fewer severe breaks to navigate. ## RISK VS REWARD This hole offers a clear risk/reward scenario with tee shot aggression. Playing conservatively with a 3-wood or long iron off the tee virtually guarantees a long approach shot, making par more difficult but reducing the chance of a big number. Aggressive driving with a driver maximizes your chances of reaching the green in regulation but increases the penalty for wayward shots. The approach shot offers little risk/reward decision-making - the small green demands accuracy over aggression, making center-of-the-green the smart play regardless of your scoring situation. ## DIFFERENT SKILL LEVELS **High-Handicap Players:** Focus on course management and realistic expectations. Consider using a 3-wood or hybrid off the tee for better accuracy, accepting that you'll face a longer approach. Aim for the center of the green with your approach and be satisfied with bogey - this hole's difficulty makes it a good candidate for strategic damage control. **Low-Handicap Players:** This hole rewards good driving and precise iron play. Use driver aggressively to minimize the approach distance, then commit fully to your target on the approach shot. The small green demands the precision that better players possess, making this a potential birdie opportunity despite its length and difficulty rating. The 15th hole at TPC San Antonio exemplifies how length and a demanding target can create difficulty without relying on hazards, making it a true test of fundamental golf skills and smart course management.
Watch for
- Course conditioning and mapped hazards may affect line selection; confirm from the aerial.
Hole 15 Green Complex
Mapped green boundary
Green size: 3,292 sq ft
Course coverage
Tournament and creator videos about TPC San Antonio (Oaks Course) — shared course coverage, not hole-specific clips.
Tournament coverage
Valero Texas Open highlights
Valero Texas Open | Final Round Highlights
2025
How did Hole 15 play?
How did this hole play today?
Frequently asked questions
Yardage reference: Championship tees · 464 yards.
What's the best strategy off the tee?
↓
For this 464-yard par 4, most players will hit driver to set up a comfortable approach.
How difficult is hole 15?
↓
This hole is a moderate challenge for most golfers. Key challenges include: long par 4, small green.
How big is the green on hole 15?
↓
The green is small and requires precision. The green is deeper than wide, so club selection is crucial. Expect challenging pin positions with limited room for error.
What's a good score on hole 15?
↓
This hole is one of the tougher holes where par feels like birdie. A challenging par 4. Accept that bogey happens and avoid big numbers.