Hole 11 at TPC San Antonio (Oaks Course)
- Par
- 4
- Yardage
- 405 yds
- Stroke index
- 12
- Hazards
- 5 bunkers
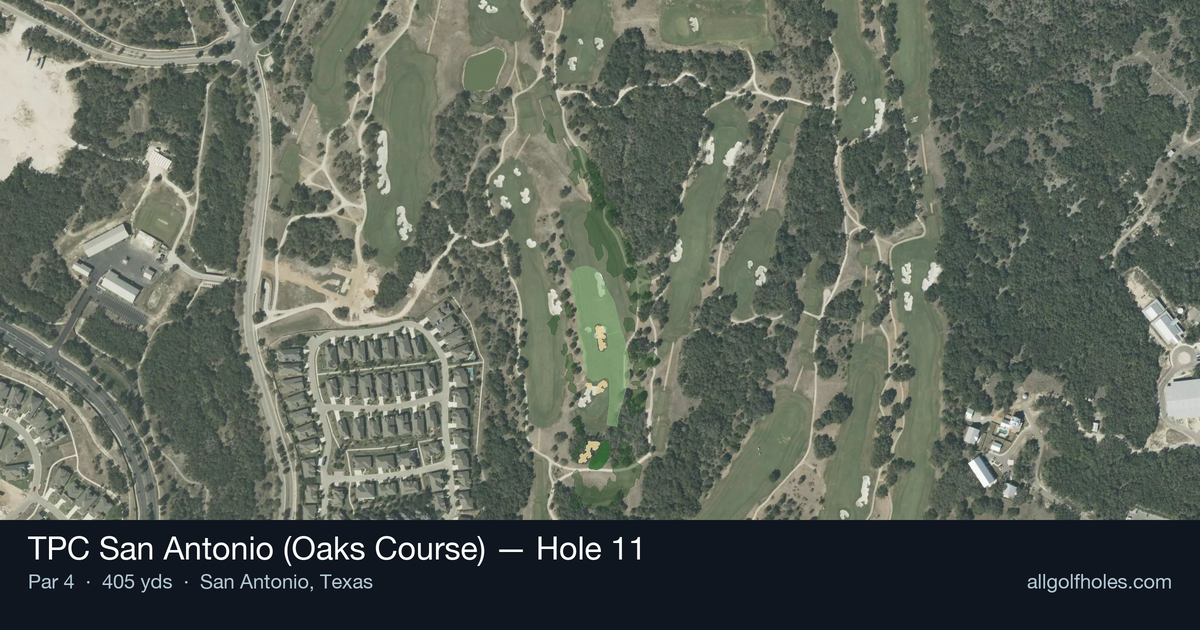
Aerial source not provided
Green size: 35 yds deep × 33 yds wide
Scorecard yardage is for Championship tees. The aerial shows its labeled reference position; distance rings measure to the green.
Championship tees · Par 4 · 405 yards
The plan for No. 11
The 11th hole at TPC San Antonio (Oaks Course) presents a deceptively straightforward par 4 that rewards precision over power. At 405 yards, this straight-away hole features a generous fairway that invites aggressive tee shots, but the real challenge lies in the approach to a small, well-protected green complex. Without significant hazards cluttering the landscape, golfers can focus purely on course management and shot execution. The compact green demands accurate iron play, as missing the target leaves challenging up-and-down opportunities. This hole exemplifies the strategic design philosophy of TPC courses, where subtle contours and green size create scoring opportunities for those who execute properly while punishing wayward shots with difficult recovery positions.
Off the tee
The straight layout allows for an aggressive tee shot strategy, as there are no significant hazards to avoid off the tee. Most golfers should favor their driver here, aiming down the center of the fairway to maximize distance and leave the shortest possible approach. The key is finding the optimal landing zone that provides a comfortable approach distance - typically somewhere in the 150-200 yard range for most players. Consider the wind conditions and pin position when selecting your target line. If the pin is tucked on one side of the small green, positioning your tee shot slightly to that side of the fairway can open up a better approach angle. However, with the forgiving nature of this tee shot, the center of the fairway remains the safest and most reliable target.
Approach & recovery
The approach shot is where this hole shows its teeth. The small green size makes precision absolutely critical - missing the putting surface will likely result in a challenging up-and-down. Club selection should prioritize accuracy over distance, even if it means taking one more club to ensure solid contact. Pay close attention to pin position, as the small green offers limited bailout areas. When the pin is positioned toward the edges, consider aiming for the center of the green to give yourself the largest margin for error. The straight hole layout means you'll typically have a direct line to the pin, so focus on committing to your yardage and making a smooth, controlled swing.
On the green
With a small putting surface, lag putting becomes especially important to avoid three-putts. The green's compact size means that even modest approach shots that find the putting surface should leave relatively manageable putting distances. Focus on getting your first putt close rather than being overly aggressive with longer putts. Read the green carefully, as subtle breaks can be magnified on smaller surfaces. Take note of the overall slope and grain direction, and don't underestimate seemingly straight putts - they often have more movement than initially apparent. ## RISK VS REWARD This hole offers a clear risk/reward scenario: the lack of major hazards encourages aggressive play, but the small green punishes imprecise execution. The reward for accurate shots is significant - birdie opportunities abound for players who can find the green in regulation. However, the risk of short-siding yourself or missing the green entirely can quickly turn a scoring opportunity into a bogey or worse. The safest play is to prioritize the center of the green on your approach, accepting a potentially longer putt in exchange for avoiding the difficulty of chipping to a small target. ## DIFFERENT SKILL LEVELS **High-Handicap Players:** Focus on course management over aggression. Use whatever club gives you the most confidence off the tee, even if it's not your driver. On the approach, take one extra club and aim for the center of the green, prioritizing finding the putting surface over getting close to the pin. This conservative strategy maximizes your chances of making par while avoiding big numbers. **Low-Handicap Players:** This hole presents an excellent birdie opportunity. Be aggressive with your driver to get as close as possible, then use the short approach to attack pins and create scoring chances. Your superior ball-striking ability allows you to target specific areas of the small green, but still respect the precision required - even skilled players can struggle with recovery shots around small greens. The key for all skill levels is recognizing that this hole rewards patience and precision over power, making it a perfect opportunity to demonstrate sound golf strategy and execution.
Watch for
- Course conditioning and mapped hazards may affect line selection; confirm from the aerial.
Hole 11 Green Complex
Mapped green boundary
Green size: 4,097 sq ft
Course coverage
Tournament and creator videos about TPC San Antonio (Oaks Course) — shared course coverage, not hole-specific clips.
Tournament coverage
Valero Texas Open highlights
Valero Texas Open | Final Round Highlights
2025
How did Hole 11 play?
How did this hole play today?
Frequently asked questions
Yardage reference: Championship tees · 405 yards.
What's the best strategy off the tee?
↓
For this 405-yard par 4, most players will hit driver to set up a comfortable approach.
How difficult is hole 11?
↓
This hole is a moderate challenge for most golfers. Key challenges include: small green.
How big is the green on hole 11?
↓
The green is small and requires precision. The green is deeper than wide, so club selection is crucial. Expect challenging pin positions with limited room for error.