Hole 4 at TPC Craig Ranch
- Par
- 3
- Yardage
- 219 yds
- Stroke index
- 13
- Hazards
- 1 bunker · Water
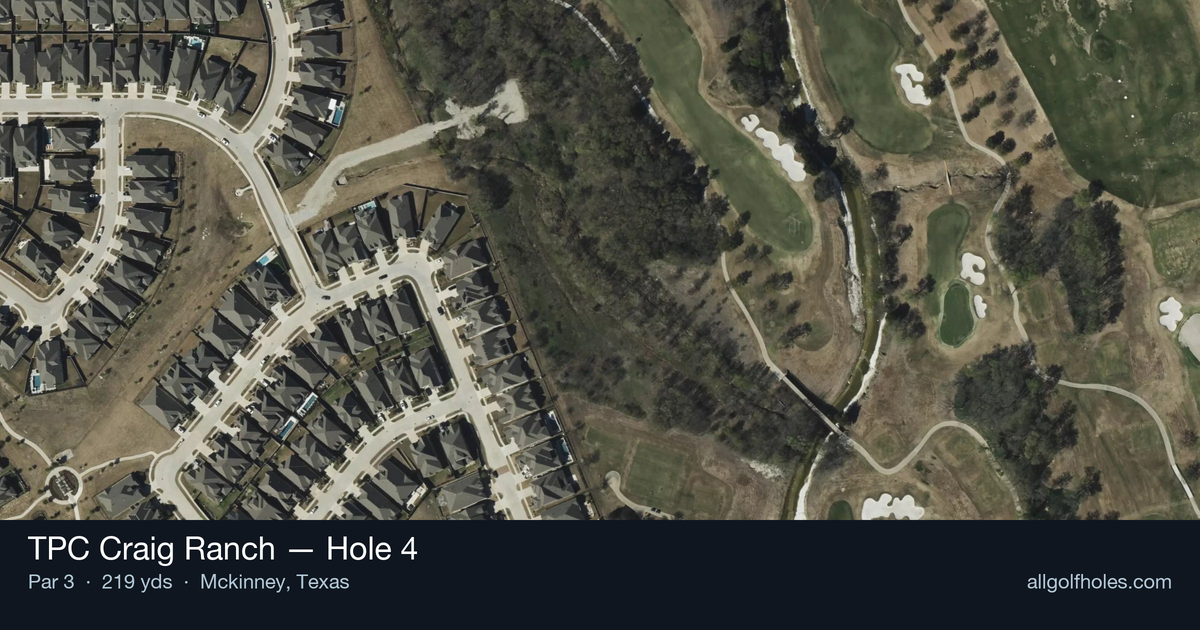
Aerial source not provided
Green size: 29 yds deep × 30 yds wide
Scorecard yardage is for Championship tees. The aerial shows its labeled reference position; distance rings measure to the green.
Championship tees · Par 3 · 219 yards
The plan for No. 4
TPC Craig Ranch hole 4 presents a deceptively challenging par 3 that demands precision over power at 219 yards. This Tom Weiskopf design epitomizes strategic golf architecture, where club selection and accuracy reign supreme. The tee shot plays to a compact green that requires golfers to commit fully to their yardage and wind calculations. Without significant hazards to intimidate, the hole's true defense lies in its demand for pure ball-striking and distance control. The small target creates natural pressure, especially when pin positions are tucked. This straightforward yet demanding one-shotter perfectly exemplifies the championship-caliber design that has earned TPC Craig Ranch acclaim from tour professionals and amateurs alike, rewarding those who execute with confidence while punishing indecision.
Off the tee
Your tee shot strategy should prioritize finding the center of the green rather than attacking specific pin positions. Club selection will typically range from a long iron to a hybrid depending on conditions and your personal yardages. Aim for the heart of the green to give yourself the largest margin for error on this small target. Take one extra club if there's any doubt, as coming up short on a par 3 often leads to more difficult recovery shots. Pay close attention to wind direction and strength, as the 219-yard distance makes this hole particularly susceptible to wind influence. Consider the pin position in your target selection - if the flag is tucked in a corner, still aim for the center and let your putting handle the rest.
Approach & recovery
Since this is a par 3, your tee shot serves as your approach shot. Focus on a smooth, controlled swing rather than trying to overpower the shot. The small green size means precision is paramount - a well-struck shot to the center of the green will always leave you with a reasonable birdie putt. Monitor your ball flight carefully and commit fully to your club selection. If conditions are firm, consider how the ball will react upon landing, potentially taking less club to account for extra roll.
On the green
The small green size means most putts will be relatively short, but don't underestimate the importance of lag putting to the correct quadrant. With limited green real estate, pin positions can create challenging reads even from close range. Focus on getting your first putt close rather than being overly aggressive, as three-putting from anywhere on this small surface would be particularly costly. Pay attention to any subtle breaks and grain direction, as these factors become magnified on a compact putting surface. ## RISK VS REWARD This hole offers limited risk/reward scenarios given its straightforward design and lack of major hazards. The primary "reward" comes from executing a quality tee shot that gives you a legitimate birdie opportunity. The "risk" lies in missing the small green entirely, which could lead to difficult up-and-down situations. Conservative play targeting the center of the green is typically the smart percentage play, especially when the pin is in a challenging position. ## DIFFERENT SKILL LEVELS **High-handicap players** should focus on making solid contact and finding the green, regardless of pin position. Take enough club to comfortably reach the center of the green and don't be afraid to aim for the fat part of the putting surface. A two-putt par is an excellent result that keeps momentum positive. **Low-handicap players** can be more aggressive with pin-seeking when conditions allow, but should still respect the small target. Consider how different pin positions affect your angle of approach and potential recovery options. This hole presents a legitimate birdie opportunity that better players should look to capitalize on while avoiding the temptation to be overly precise with marginal pins. The 4th hole at TPC Craig Ranch rewards solid course management and execution over spectacular shots, making it an ideal opportunity to build confidence and maintain scoring momentum in your round.
Watch for
- Course conditioning and mapped hazards may affect line selection; confirm from the aerial.
Hole 4 Green Complex
Mapped green boundary
Green size: 4,444 sq ft
Course coverage
Tournament and creator videos about TPC Craig Ranch — shared course coverage, not hole-specific clips.
Tournament coverage
CJ CUP Byron Nelson highlights
THE CJ CUP Byron Nelson | Final Round Highlights
2025
Featured by these creators
Creator videos about this course
YouTube creators who filmed or featured TPC Craig Ranch. · Stats as of Oct 12, 2026 · 5d ago
A new-look TPC Craig Ranch, LIV’s cost cutting, & U.S. Open qualifying starts | The Shotgun Start
How did Hole 4 play?
How did this hole play today?
Frequently asked questions
Yardage reference: Championship tees · 219 yards.
What club should I use on this par 3?
↓
At 219 yards, most golfers will need a fairway wood or hybrid to reach this green. Adjust for elevation, wind, and pin position.
How difficult is hole 4?
↓
This hole is one of the tougher holes on the course for most golfers. Key challenges include: long par 3, water in play, small green.
What hazards should I watch out for on hole 4?
↓
Key hazards include: 1 greenside bunker; water at 139.1 yards. Plan your shots to avoid these trouble spots.
How big is the green on hole 4?
↓
The green is small and requires precision. Expect challenging pin positions with limited room for error.
What's a good score on hole 4?
↓
This hole is a challenging par where bogey is acceptable. This longer par 3 will test your long iron or hybrid game. Par is a good score.