Hole 12 at Muirfield Village Golf Club
- Par
- 3
- Yardage
- 180 yds
- Stroke index
- 16
- Hazards
- 2 bunkers · Water
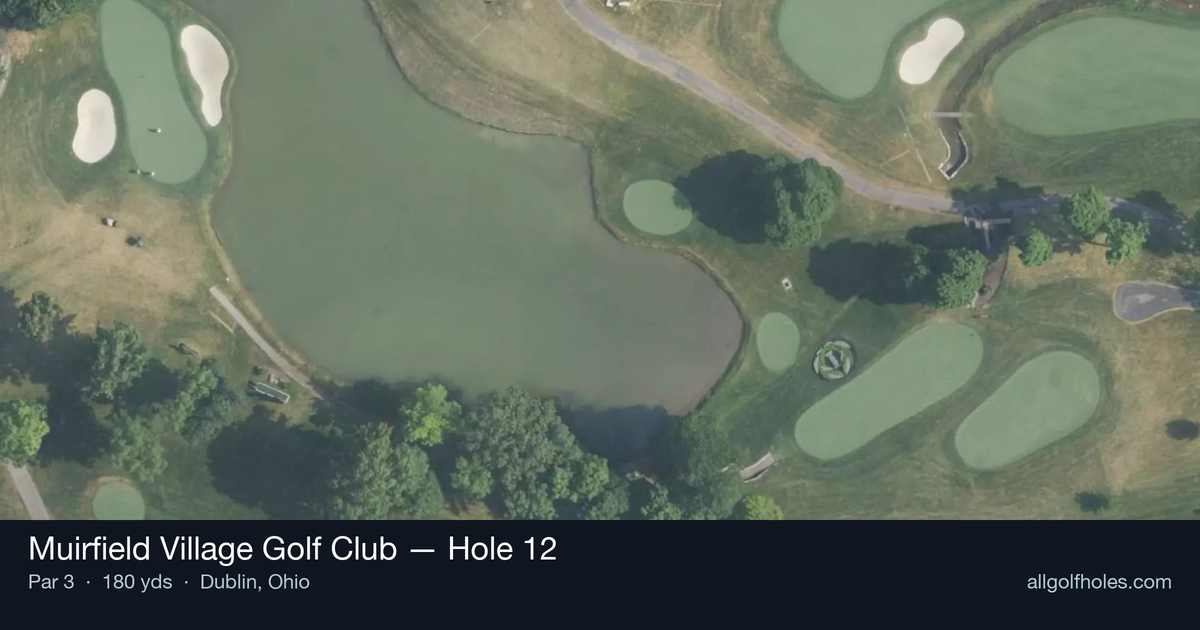
Aerial source not provided
Green size: 27 yds deep × 29 yds wide
Scorecard yardage is for Championship tees. The aerial shows its labeled reference position; distance rings measure to the green.
Championship tees · Par 3 · 180 yards
The plan for No. 12
The signature "Golden Bear" at Muirfield Village Golf Club hole 12 stands as one of the course's most iconic par 3 challenges. This 180-yard test demands precision with your tee shot to a small, well-protected green that punishes anything less than committed swings. The hole showcases Jack Nicklaus's masterful design philosophy, where the contrast between vibrant emerald fairways and azure Ohio skies creates a stunning visual backdrop. Club selection becomes critical here, as the compact green complex offers little margin for error on approach shots. Wind conditions can dramatically influence play, making this deceptively straightforward par 3 a memorable examination of accuracy and course management that has tested professionals and amateurs alike for decades.
Off the tee
Since this is a par-3, your tee shot is your approach shot, making club selection paramount. With the hole playing 180 yards to a small green, most golfers will need a mid-iron to long-iron depending on conditions and pin position. Focus on smooth tempo rather than forcing distance - the small green demands precision over power. Aim for the center of the green when the pin is tucked, as the compact target leaves little margin for error. Take one extra club and swing easy to ensure solid contact, as coming up short on a par-3 often leads to difficult recovery shots. Pay close attention to wind direction and speed, as they can dramatically affect club selection on this exposed hole.
Approach & recovery
Your approach strategy centers on pin position and green conditions. When the flag is in the center or front portion of the green, attack with confidence using your calculated yardage. For back pins on this small green, consider aiming slightly short of the flag to avoid long putts or potential trouble beyond the putting surface. The key is committing to your club selection - indecision leads to poor contact and missed greens. Trust your yardage, pick your target line, and execute with confidence. The relatively open surroundings mean recovery shots are possible, but keeping the ball on the green should be your primary objective.
On the green
The small green size means putting strategy focuses on speed control and reading subtle breaks. Longer putts become challenging due to the limited real estate, making your approach shot accuracy even more crucial. Study the green's contours carefully during your approach - small greens often have more pronounced slopes than they appear from the tee. Focus on getting your first putt close rather than being overly aggressive with birdie attempts. Two-putt pars are excellent scores on this hole, and avoiding three-putts should be your priority when facing longer putts on this compact surface. ## RISK VS REWARD The risk/reward calculation here is subtle but important. The temptation might be to attack every pin position on this seemingly benign par-3, but the small green punishes overly aggressive play. The reward for precise iron play is a legitimate birdie opportunity, while the risk of missing the small target can lead to difficult recovery shots and potential bogeys. Conservative play targeting the green's center offers the best risk/reward ratio, especially when pins are tucked in challenging positions. The hole's handicap rating of 16 suggests it should be a scoring opportunity, but only for those who respect the precision required. ## DIFFERENT SKILL LEVELS **High-Handicap Players:** Focus entirely on finding the green rather than attacking pin positions. Use enough club to comfortably reach the putting surface, and aim for the center regardless of flag location. A bogey here isn't devastating given the hole's handicap rating, so prioritize avoiding big numbers by keeping the ball in play. **Low-Handicap Players:** You can be more aggressive with pin hunting, but still respect the small target. Use precise yardages and consider pin position in your club selection. This hole offers a genuine birdie opportunity for skilled players who execute properly, making it crucial for building momentum in your round. The "Golden Bear" 12th hole exemplifies strategic golf design - simple in concept but demanding in execution. Success here comes from smart decision-making, precise club selection, and committed execution rather than raw power or complex shot-making.
Hole 12 Green Complex
Mapped green boundary
Green size: 3,102 sq ft
Course coverage
Tournament and creator videos about Muirfield Village Golf Club — shared course coverage, not hole-specific clips.
Tournament coverage
The Memorial Tournament highlights
the Memorial Tournament | Final Round Highlights
2025
How did Hole 12 play?
How did this hole play today?
Frequently asked questions
Yardage reference: Championship tees · 180 yards.
What club should I use on this par 3?
↓
At 180 yards, most golfers will need a long iron or hybrid (5-iron to 6-iron) to reach this green. Adjust for elevation, wind, and pin position.
How difficult is hole 12?
↓
This hole is one of the tougher holes on the course for most golfers. Key challenges include: water in play, small green.
What hazards should I watch out for on hole 12?
↓
Key hazards include: 2 greenside bunkers; water at 127.0 yards. Plan your shots to avoid these trouble spots.
How big is the green on hole 12?
↓
The green is small and requires precision. The green is deeper than wide, so club selection is crucial. Expect challenging pin positions with limited room for error.