Hole 13 at Muirfield Village Golf Club
- Par
- 4
- Yardage
- 455 yds
- Stroke index
- 14
- Hazards
- 3 bunkers
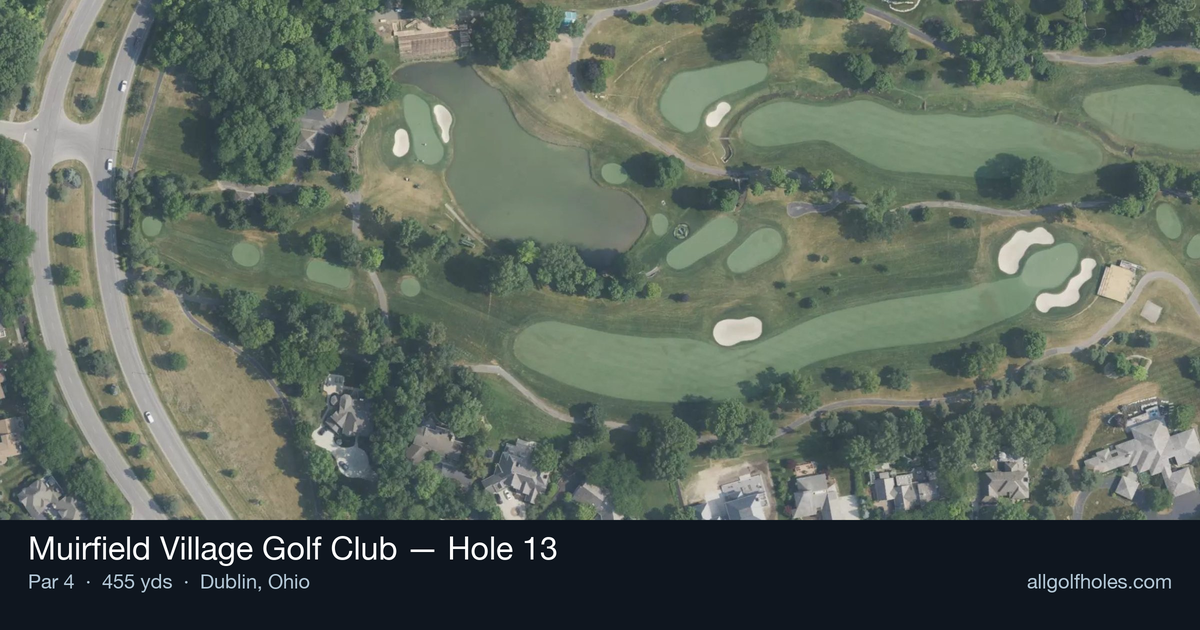
Aerial source not provided
Green size: 26 yds deep × 22 yds wide
Scorecard yardage is for Championship tees. The aerial shows its labeled reference position; distance rings measure to the green.
Championship tees · Par 4 · 455 yards
The plan for No. 13
The 13th hole at Muirfield Village Golf Club presents a deceptively challenging par 4 that exemplifies Jack Nicklaus's strategic design philosophy at his beloved "Jack's Place." This 455-yard test features a straight layout that demands precision over power, with the Golden Bear's signature attention to detail evident in every aspect. The tee shot requires careful placement on a generous fairway that narrows as it approaches the landing area, setting up a crucial approach shot to a small, well-protected green complex. Without significant hazards to intimidate, this hole relies on subtle contouring and strategic bunkering to challenge golfers of all skill levels. The relatively modest handicap rating of 14 can be misleading, as the compact green demands accuracy and proper club selection on the approach shot, making this a true test of golf strategy and execution.
Off the tee
The tee shot strategy centers on finding the optimal position for your approach. With a straight layout and no major hazards, focus on hitting the center of the fairway rather than trying to gain every possible yard. A well-struck driver or 3-wood should leave you in the ideal landing zone, typically around 250-280 yards from the tee depending on your distance. The key consideration is setting up the best angle into that small green. Position your drive slightly left of center if possible, as this often provides a more favorable approach angle. Avoid the temptation to bomb driver if accuracy suffers - a smooth, controlled swing that finds the short grass is infinitely better than extra distance from the rough.
Approach & recovery
The approach shot is where this hole reveals its teeth. The small green demands pinpoint accuracy with your target line, making club selection critical. Depending on your tee shot position, you'll likely face anything from a mid-iron to a long-iron for your second shot. Take one extra club and swing smoothly rather than forcing a shorter iron. The small green offers little margin for error, so prioritize hitting the putting surface over attacking pins. Aim for the center of the green regardless of pin position - with limited real estate, any part of the green gives you a reasonable putting opportunity. Wind conditions play a crucial role here, so factor in any breeze when making your club selection. The elevated nature of many Nicklaus greens means approach shots can be affected more than expected.
On the green
The small green size makes putting strategy relatively straightforward - avoid three-putts at all costs. With limited space, most putts will be relatively short, but don't underestimate the subtle breaks that Nicklaus incorporated into his designs. Focus on speed control above all else. A putt that rolls off this small green creates a difficult up-and-down situation. Read the green carefully and commit to your line, but err on the side of leaving putts short rather than running them well past the hole. Pay attention to the grain and any subtle slopes - even small greens can have significant undulation that affects ball roll. ## RISK VS REWARD This hole offers a classic risk/reward scenario in club selection rather than route selection. The primary decision revolves around how aggressively to attack the small green with your approach shot. The reward for precise execution is a legitimate birdie opportunity on a relatively short par 4. However, the risk of missing the small target and facing a difficult short game shot makes conservative play often the smarter choice. Missing the green here can easily lead to bogey or worse, making par a good score for most players. ## DIFFERENT SKILL LEVELS **High Handicappers:** Focus entirely on keeping the ball in play. Use whatever club gives you the best chance to find the fairway off the tee, even if it's a hybrid or long iron. On the approach, take plenty of club and aim for the center of the green. Don't worry about pin hunting - just find the putting surface and take your two-putt par. **Low Handicappers:** This hole rewards precision and course management skills. Consider the pin position when planning your tee shot to optimize your approach angle. You can be more aggressive with approach shots, but still respect the small target. This is a hole where your superior ball-striking should create a scoring opportunity, but don't force it if conditions aren't ideal. **Mid Handicappers:** Strike a balance between aggression and conservation. Play for the fat part of the fairway off the tee, then assess your lie and distance before committing to your approach strategy. If you're hitting it well, you can attack; if not, play for the center of the green and move on. The 13th hole at Muirfield Village exemplifies why Jack Nicklaus's designs have stood the test of time - it rewards good golf strategy while punishing poor execution, regardless of your skill level.
Hole 13 Green Complex
Mapped green boundary
Green size: 3,153 sq ft
Course and tournament history
Historical context for the course and venue. Each entry identifies the event or course it describes.
Jack Nicklaus
Muirfield Village was the brainchild of Jack Nicklaus, earning its nickname of "Jack's Place"
Source →1966 · Jack Nicklaus
Founded by Jack Nicklaus, it is named after Muirfield, Scotland,[1] where he won the first of his three British Open titles in 1966 to complete the first of his three career grand slams
Source →
Course coverage
Tournament and creator videos about Muirfield Village Golf Club — shared course coverage, not hole-specific clips.
Tournament coverage
The Memorial Tournament highlights
the Memorial Tournament | Final Round Highlights
2025
How did Hole 13 play?
How did this hole play today?
Frequently asked questions
Yardage reference: Championship tees · 455 yards.
What's the best strategy off the tee?
↓
For this 455-yard par 4, most players will hit driver to set up a comfortable approach.
How difficult is hole 13?
↓
This hole is a moderate challenge for most golfers. Key challenges include: long par 4, small green.
How big is the green on hole 13?
↓
The green is small and requires precision. Expect challenging pin positions with limited room for error.
What's a good score on hole 13?
↓
This hole is one of the tougher holes where par feels like birdie. A challenging par 4. Accept that bogey happens and avoid big numbers.