Hole 7 of 18 · Akron, Ohio

Hole 7 at Firestone Country Club - South

Par
3
Yards
219
Handicap
17
Bunkers
4
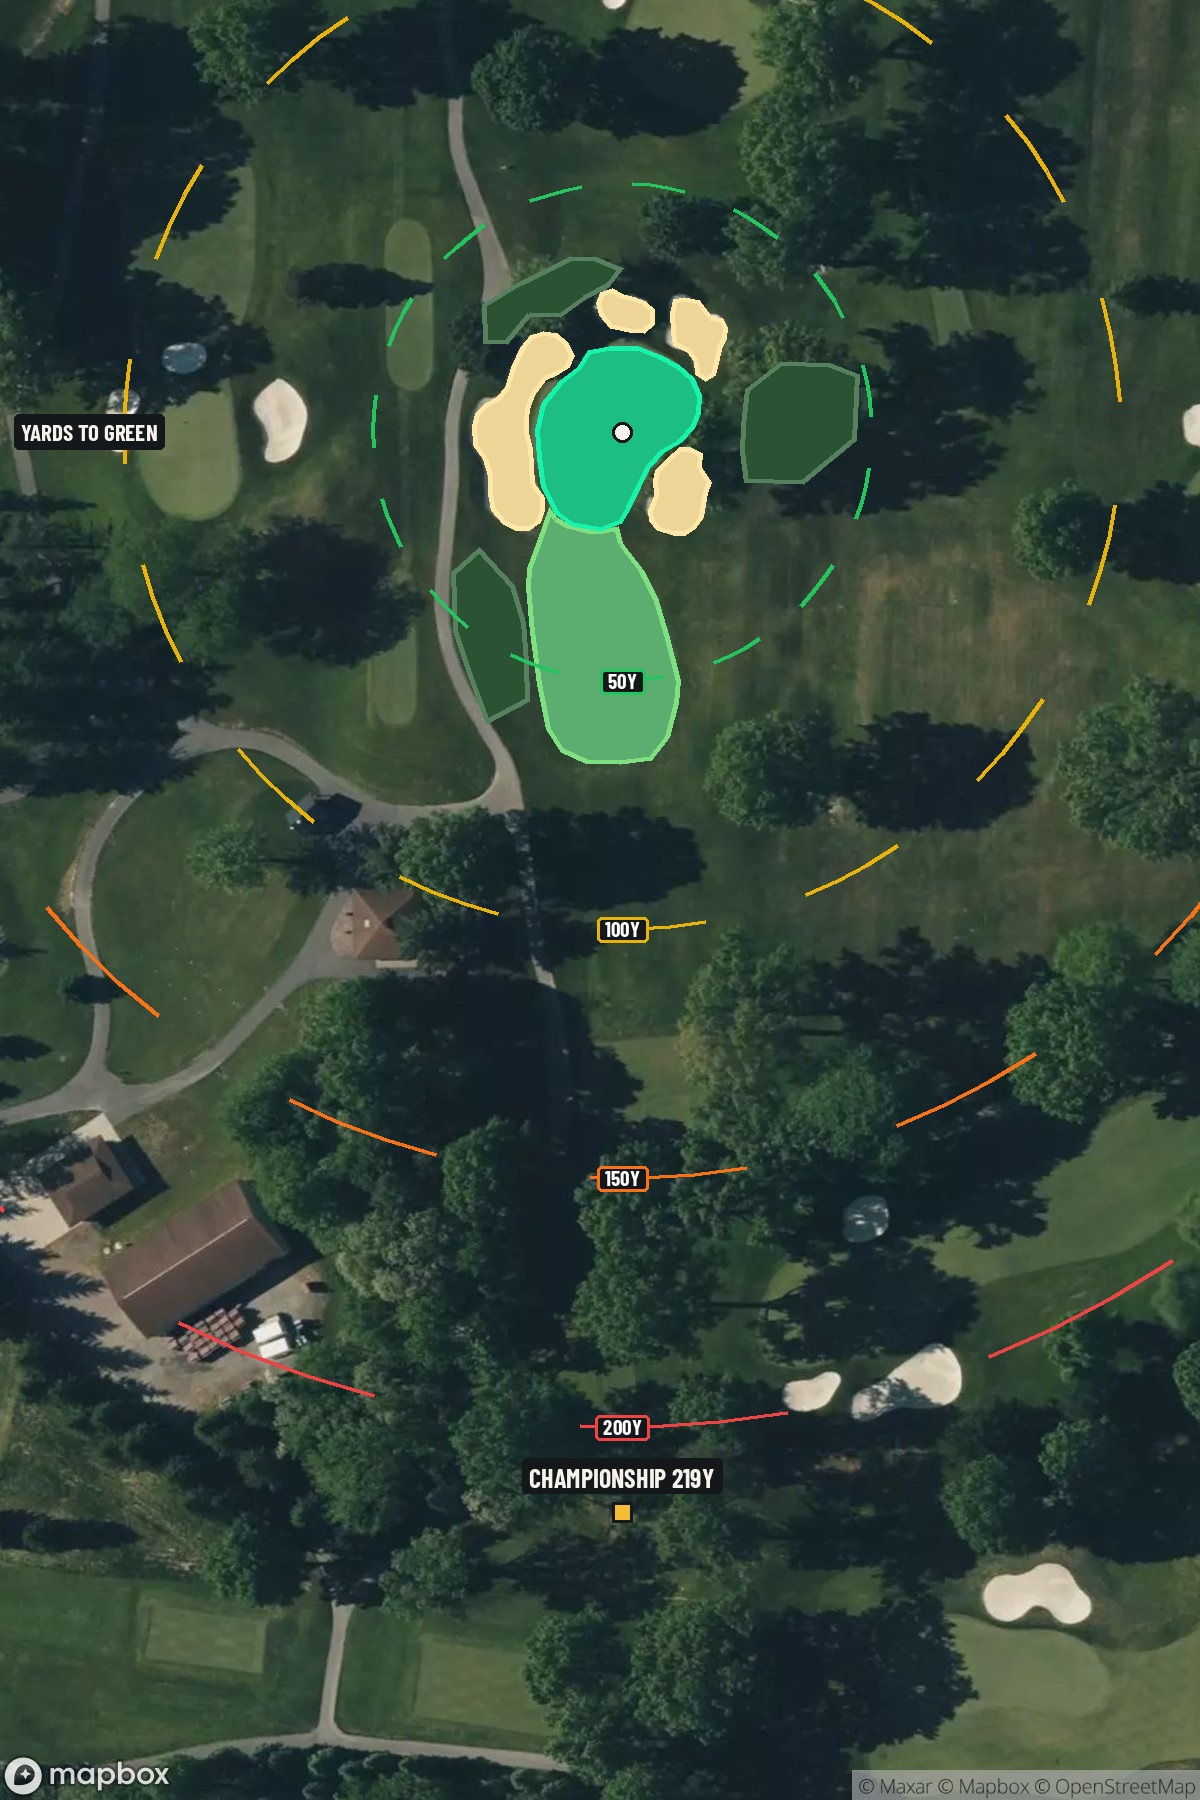
Hole 7 aerial at Firestone Country Club - South
Map distances from Championship tee · 219 yds

The map's printed distances are measured from the Championship tee to the green; they do not move when you change tees.

Green size: 37 yds deep × 33 yds wide

Mapbox Satellite composite · capture date not provided. Green at the top.

Where this map comes from

Satellite photo
Date not published
Mapbox satellite
Green contours
2019–2021 survey
USGS lidar survey
Report a map problem
100%
Hole 7 aerial at Firestone Country Club - South

The plan for No. 7

The play: Firestone Country Club - South hole 7 presents a deceptively challenging par 3 that demands precision from the championship tees at 219 yards. This straight shot requires golfers to navigate to a compact green complex that epitomizes the course's reputation for testing even the world's best players. The small target green sits nestled among the tree-lined landscape that has become synonymous with Firestone's South Course, where legends have battled during PGA Championships and the WGC-Bridgestone Invitational. Club selection proves critical on this mid-length par 3, as the unforgiving green offers little margin for error. While appearing straightforward in design, this hole exemplifies the subtle difficulty that has made Firestone South a proving ground for professional golf's elite for decades.

Shot by shot

  1. Off the tee

    Club selection is critical on this lengthy one-shotter. Most golfers will need anywhere from a 5-iron to a hybrid depending on conditions and personal distances. The key is committing to your yardage and swinging with confidence - tentative swings lead to mishits and missed greens. Aim for the center of the green regardless of pin position. With the compact target, trying to attack specific pin locations often leads to trouble. Focus on a smooth, controlled swing that prioritizes solid contact over extra distance. The straight layout means wind direction will be a major factor in club selection.

  2. Approach & recovery

    Since this is a par 3, your tee shot IS your approach. The primary consideration is landing the ball on the putting surface and keeping it there. With a small green, there's little room for error, making distance control more important than usual. Be aware that the green's compact size means any shot that's significantly long or short will find trouble. Trust your yardage, make a committed swing, and accept that the center of the green is always a good target, even if it means a longer putt.

  3. On the green

    The small green size means most putts will be relatively short, but don't underestimate the challenge. Every putt becomes crucial when par is your realistic best-case scenario from off the green. Read putts carefully and focus on speed control - with limited green space, balls can easily run off the putting surface if hit too firmly. Pay attention to subtle breaks that might not be immediately obvious. Championship-caliber greens often have nuances that only become apparent with careful observation. ## RISK VS REWARD This hole offers little in terms of risk/reward decisions - it's about execution under pressure. The "reward" is making par or better, while the "risk" is missing the green entirely. The strategic choice lies primarily in club selection and commitment to your yardage. Aggressive pin-seeking isn't advisable given the small target. The smart play is always center green, accepting a longer putt in exchange for finding the putting surface. ## DIFFERENT SKILL LEVELS **High Handicappers:** Focus entirely on finding the green with your most reliable long iron or hybrid. Don't worry about pin positions - aim for the biggest part of the green and be thrilled with any putt for par. Consider playing one club more than you think you need to ensure you reach the putting surface. **Low Handicappers:** While you have the skills to attack pins, resist the temptation on this small target. Center green remains the smart play, though`you can be more precise with distance control. Use this hole to build confidence with solid iron play rather than taking unnecessary risks. **Course Management Tip:** Remember that this is the easiest handicap hole on a championship course that has tested the world's best players. Respect the design, execute your fundamentals, and move on to the next tee with confidence.

  4. Watch for

    • Bunkers (4 mapped) guard landing areas and greens; favor the side that leaves a clear approach.

The green on No. 7

Mapped boundary
Wide × deepyards
33×37
Areasq ft
6,868

Gear for Hole 7

We may earn a commission when you buy through these links.

Golfer feedback

How did Hole 7 play?

⚡ Quick Golfer Pulse

How did this hole play today?

1-tap anonymous vote

Frequently asked questions

Yardage reference: Championship tees · 219 yards.

What club should I use on this par 3?

↓

At 219 yards, most golfers will need a fairway wood or hybrid to reach this green. Adjust for elevation, wind, and pin position.

How difficult is hole 7?

↓

This hole is a moderate challenge for most golfers. Key challenges include: long par 3, heavily bunkered.

What hazards should I watch out for on hole 7?

↓

Key hazards include: 4 greenside bunkers. Plan your shots to avoid these trouble spots.

How big is the green on hole 7?

↓

The green is fairly large with multiple pin positions. Lag putting becomes important on longer putts.

What's a good score on hole 7?

↓

This hole is a challenging par where bogey is acceptable. This longer par 3 will test your long iron or hybrid game. Par is a good score.