Hole 11 of 18 · Akron, Ohio

Hole 11 at Firestone Country Club - South

Par
4
Yards
418
Handicap
16
Bunkers
2
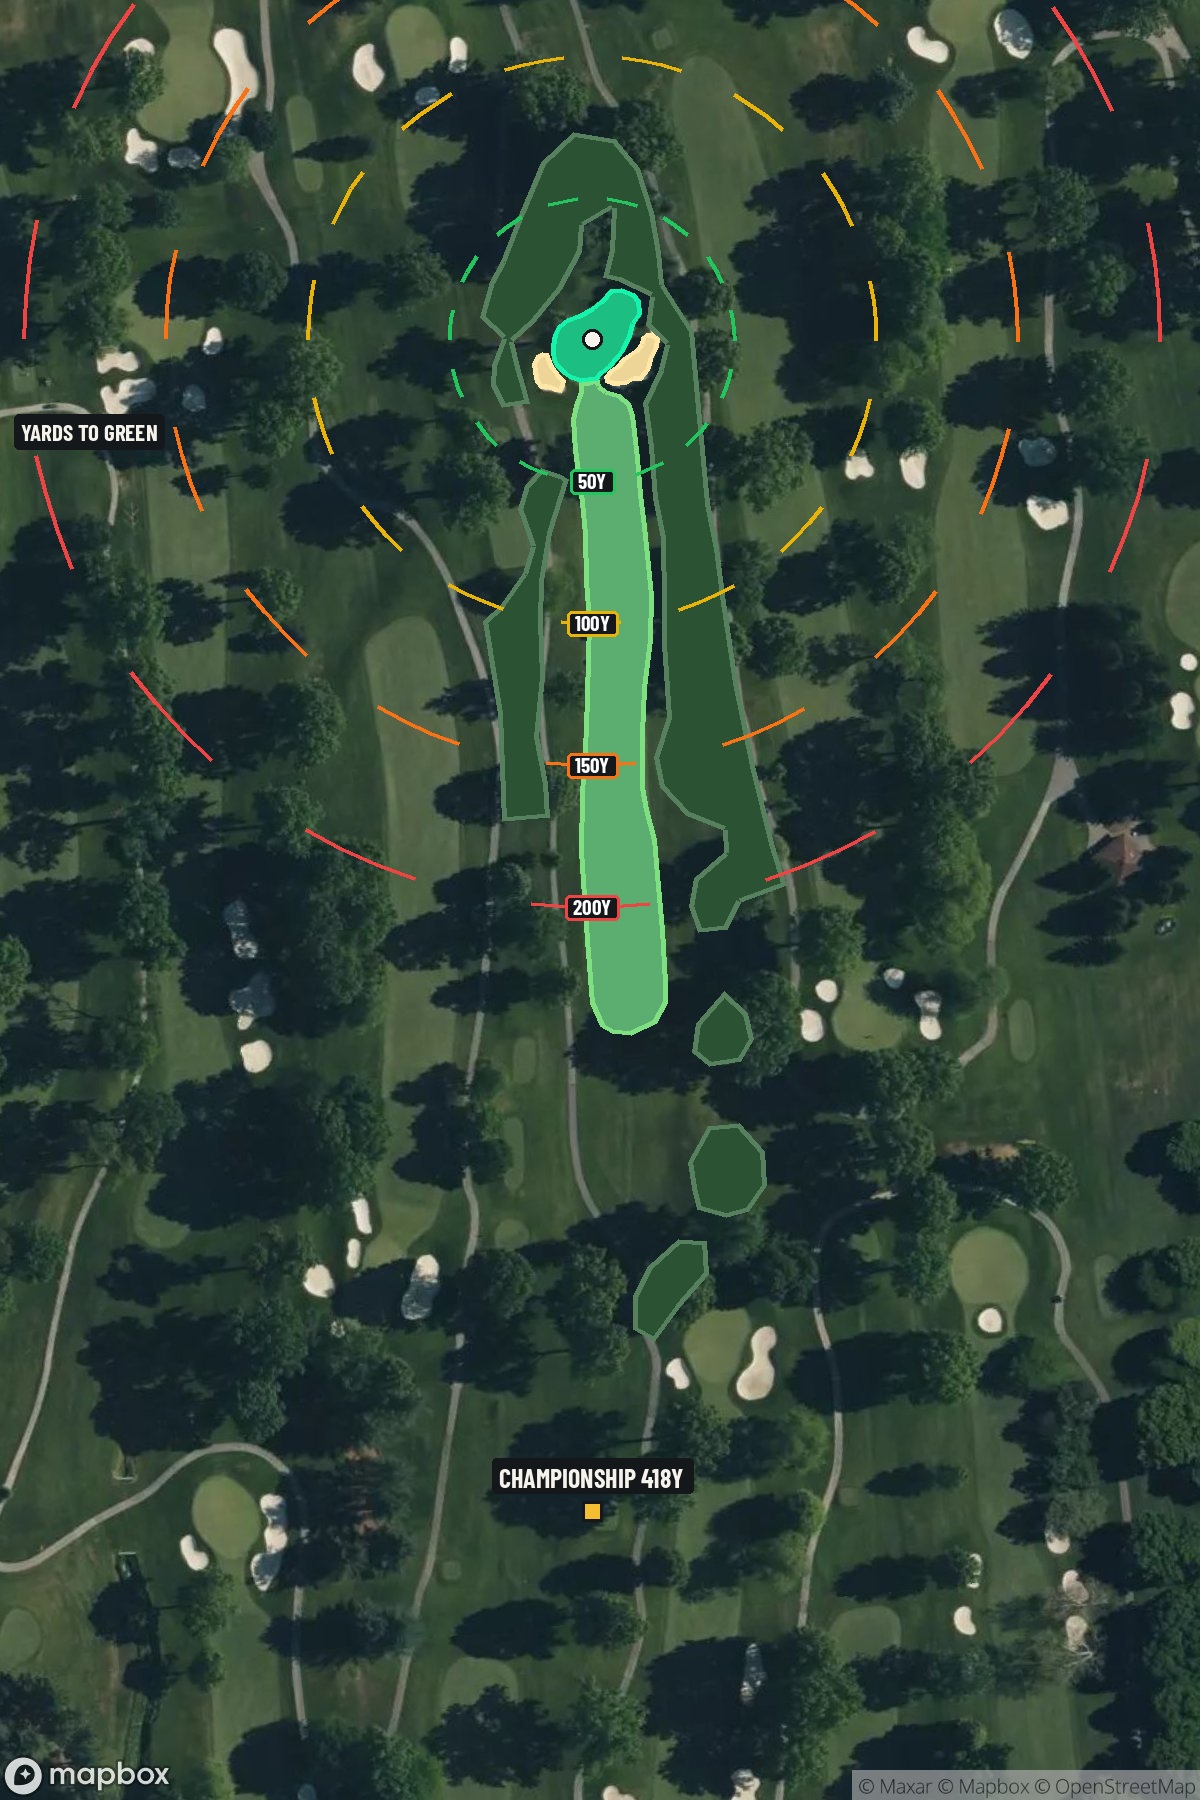
Hole 11 aerial at Firestone Country Club - South
Map distances from Championship tee · 418 yds

The map's printed distances are measured from the Championship tee to the green; they do not move when you change tees.

Green size: 33 yds deep × 32 yds wide

Mapbox Satellite composite · capture date not provided. Green at the top.

Where this map comes from

Satellite photo
Date not published
Mapbox satellite
Green contours
2019–2021 survey
USGS lidar survey
Report a map problem
100%
Hole 11 aerial at Firestone Country Club - South

The plan for No. 11

The play: The 11th hole at Firestone Country Club - South presents a deceptively challenging par 4 that embodies Robert Trent Jones Sr.'s strategic design philosophy. At 418 yards, this straight hole appears straightforward from the tee, but the approach shot reveals the true test. The small green demands precision with your second shot, as even well-struck approaches can find trouble around the putting surface. What makes this hole particularly memorable is its position on the back nine where scoring opportunities become precious. The absence of water hazards that characterize other holes on this course doesn't diminish the challenge - instead, the emphasis shifts to course management and accuracy. Players must resist the temptation to attack aggressively, as the compact green complex punishes overly bold approach shots with difficult recovery situations.

Shot by shot

  1. Off the tee

    Your tee shot strategy should prioritize finding the optimal distance for your preferred approach club rather than maximum distance. Most players will benefit from a controlled driver or 3-wood that leaves a comfortable mid-iron into the green. The key target line follows the center of the fairway, as the straight layout provides ample room for slight misses in either direction. Consider the pin position when selecting your tee club - if the flag is tucked in a corner of the small green, you'll want to ensure your approach distance allows for your most accurate iron. A drive that travels around 250-270 yards typically sets up the ideal approach angle and distance for most golfers.

  2. Approach & recovery

    The approach shot is where this hole reveals its teeth. The small green demands precision, making club selection and commitment crucial. Favor the center of the green regardless of pin position, as the compact target leaves little margin for error on aggressive pin-hunting. Wind conditions play a significant role in club selection here. Take an extra club if there's any doubt, as being short of this small green often leads to difficult up-and-down situations. The green's unknown shape means you should err toward the middle and rely on solid putting rather than trying to get too cute with approach angles.

  3. On the green

    With a small green, most putts will be relatively short, making this an excellent opportunity to be aggressive with your putting stroke. Focus on speed control, as the compact surface means you won't face many extremely long lag putts that require defensive putting strategies. Pay attention to the overall slope and drainage patterns around the green to read subtle breaks. On smaller greens, even minor slopes can create more break than expected over shorter distances. ## RISK VS REWARD This hole offers a classic risk/reward scenario where conservative play often yields the best results. The temptation to attack pins on the small green can backfire quickly, turning a straightforward par into a difficult bogey. The reward for precise execution is significant - this handicap 16 hole provides an excellent birdie opportunity for players who stick to their targets. The primary risk lies in being overly aggressive with approach shots. Missing the small green, even by a few yards, can create challenging recovery situations that eliminate any scoring advantage. ## DIFFERENT SKILL LEVELS **High-Handicap Players:** Focus on finding the fairway with your most reliable tee shot, even if that means using a hybrid or long iron off the tee. Aim for the center of the green with your approach, using one extra club to ensure you carry any front-edge trouble. Two-putting from anywhere on the small green represents excellent scoring. **Low-Handicap Players:** This hole rewards precision and offers a legitimate birdie opportunity. Use your distance control to set up your favorite approach yardage, then commit fully to center-green targeting. The small green size actually works in your favor if you're confident with your iron play, as you can be more aggressive knowing the target is well-defined. **Course Management Tip:** Regardless of skill level, remember that this Robert Trent Jones Sr. design emphasizes strategic thinking over raw power. The 16 handicap ranking suggests this should be a scoring hole, but only for players who respect the precision required and avoid the temptation to force difficult shots.

  4. Watch for

    • Bunkers (2 mapped) guard landing areas and greens; favor the side that leaves a clear approach.

The green on No. 11

Mapped boundary
Wide × deepyards
32×33
Areasq ft
5,414

Gear for Hole 11

We may earn a commission when you buy through these links.

Golfer feedback

How did Hole 11 play?

⚡ Quick Golfer Pulse

How did this hole play today?

1-tap anonymous vote

Frequently asked questions

Yardage reference: Championship tees · 418 yards.

What's the best strategy off the tee?

↓

For this 418-yard par 4, most players will hit driver to set up a comfortable approach.

How difficult is hole 11?

↓

This hole is a good scoring opportunity for most golfers.

What hazards should I watch out for on hole 11?

↓

Key hazards include: 2 greenside bunkers. Plan your shots to avoid these trouble spots.

How big is the green on hole 11?

↓

The green is medium-sized with moderate targets. Pay attention to pin placement when selecting your approach club.