Hole 5 of 18 · Akron, Ohio

Hole 5 at Firestone Country Club - South

Par
3
Yards
200
Handicap
11
Bunkers
3
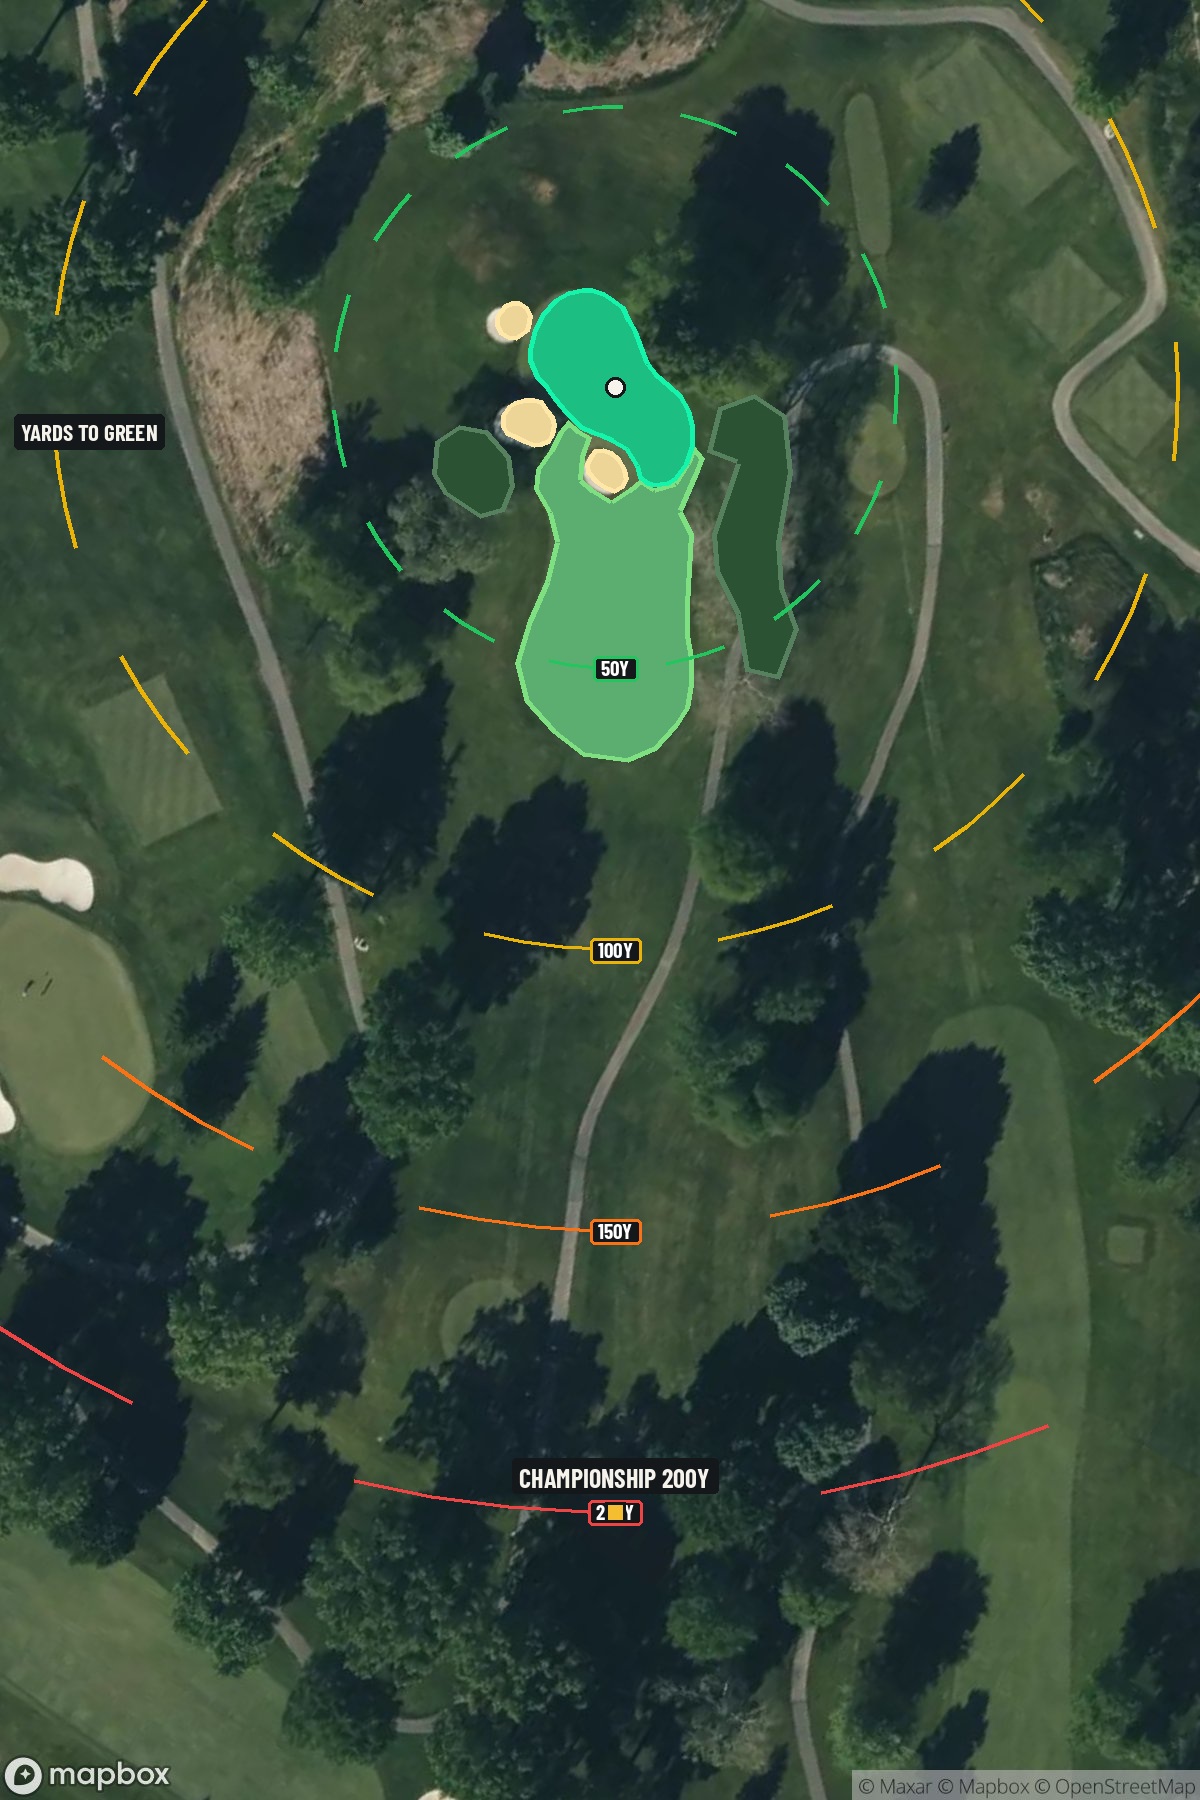
Hole 5 aerial at Firestone Country Club - South
Map distances from Championship tee · 200 yds

The map's printed distances are measured from the Championship tee to the green; they do not move when you change tees.

Green size: 35 yds deep × 30 yds wide

Mapbox Satellite composite · capture date not provided. Green at the top.

Where this map comes from

Satellite photo
Date not published
Mapbox satellite
Green contours
2019–2021 survey
USGS lidar survey
Report a map problem
100%
Hole 5 aerial at Firestone Country Club - South

The plan for No. 5

The play: The fifth hole at Firestone Country Club - South presents a deceptively challenging par 3 that demands precision over power. At 200 yards, this straight shot requires golfers to commit fully to their club selection, as the small green offers little margin for error. The elevated tee provides a commanding view of the target, but the lack of significant hazards can create a false sense of security. What makes this hole particularly treacherous is its position early in the round, where confidence meets reality on one of golf's most demanding courses. The compact green complex punishes anything but the most accurate tee shots, making par a satisfying achievement on this understated test of iron play at the legendary Akron venue.

Shot by shot

  1. Off the tee

    Club selection is paramount on this 200-yard one-shotter. Most golfers will need anything from a mid-iron to hybrid depending on conditions and personal distances. The key is selecting enough club to comfortably reach the green without flying it significantly long. Take note of wind direction and pin position during your pre-shot routine. Aim for the center of the green unless the pin is accessible, as the small putting surface leaves little margin for error. Commit fully to your swing - tentative swings on par 3s often lead to poor contact and short misses.

  2. Approach & recovery

    Since this is a par 3, your tee shot IS your approach shot. Focus on making solid contact with a smooth, controlled swing rather than trying to muscle the ball to the target. The straight layout means you can be aggressive with your target line toward the flag, but respect the small green size. When in doubt, favor the fat part of the green rather than challenging tight pin positions. Pay attention to the firmness of the green - harder conditions may require landing the ball short and letting it release, while softer conditions allow for more direct attacks.

  3. On the green

    The small green size means most putts will be relatively short, but don't underestimate the importance of lag putting when you do have longer attempts. Focus on getting your first putt close rather than being overly aggressive. Read the slopes carefully as even small greens can have subtle breaks that affect shorter putts. The putting surface likely holds its condition well given Firestone's championship pedigree, so trust your reads and stroke putts with confidence. ## RISK VS REWARD This hole offers a clear risk/reward scenario: aggressive pin-hunting versus conservative center-green strategy. When the pin is tucked or conditions are challenging, the smart play is aiming for the middle of the green and taking your par. However, with a manageable length and no major hazards, confident ball-strikers can attack pins when they're in accessible positions. The reward for precision is a legitimate birdie opportunity, while the penalty for missing the green entirely can quickly turn into bogey or worse. ## DIFFERENT SKILL LEVELS **High-Handicap Players:** Focus on club selection that ensures you can reach the green comfortably. Don't be afraid to take one extra club and swing smoothly rather than forcing a shot. Aim for the center of the green regardless of pin position, and be satisfied with two-putt pars. This approach eliminates big numbers and builds confidence. **Low-Handicap Players:** You have the luxury of being more aggressive with pin positions, especially when they're in the middle portions of the green. Use your distance control skills to attack accessible pins while still respecting the small target. Consider factors like green firmness and wind more heavily in your club selection, and don't hesitate to use the slope of the green to feed balls toward difficult pin positions. The 5th hole rewards solid fundamentals and smart course management - make committed swings, pick appropriate targets, and trust your putting stroke for consistent scoring opportunities.

  4. Watch for

    • Bunkers (3 mapped) guard landing areas and greens; favor the side that leaves a clear approach.

The green on No. 5

Mapped boundary
Wide × deepyards
30×35
Areasq ft
4,790

Gear for Hole 5

We may earn a commission when you buy through these links.

Golfer feedback

How did Hole 5 play?

⚡ Quick Golfer Pulse

How did this hole play today?

1-tap anonymous vote

Frequently asked questions

Yardage reference: Championship tees · 200 yards.

What club should I use on this par 3?

↓

At 200 yards, most golfers will need a long iron or hybrid (5-iron to 6-iron) to reach this green. Adjust for elevation, wind, and pin position.

How difficult is hole 5?

↓

This hole is a good scoring opportunity for most golfers.

What hazards should I watch out for on hole 5?

↓

Key hazards include: 3 greenside bunkers. Plan your shots to avoid these trouble spots.

How big is the green on hole 5?

↓

The green is medium-sized with moderate targets. Pay attention to pin placement when selecting your approach club.