Hole 16 at Sedgefield Country Club
- Par
- 3
- Yardage
- 165 yds
- Stroke index
- 18
- Hazards
- 2 bunkers · Water
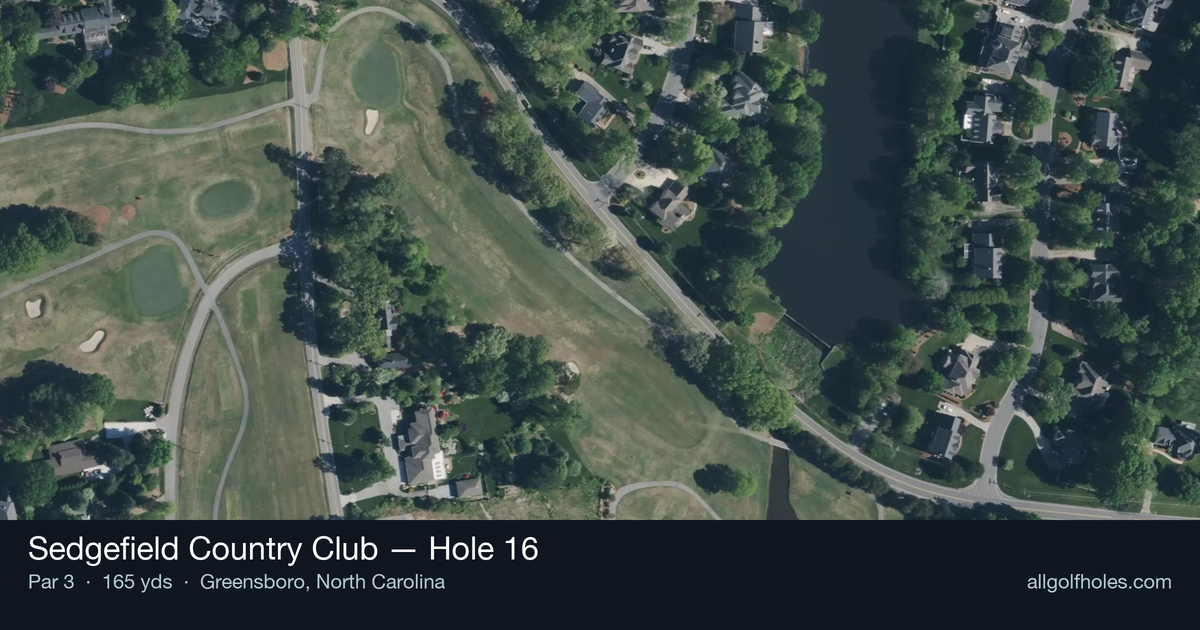
Aerial source not provided
Green size: 28 yds deep × 40 yds wide
Scorecard yardage is for Championship tees. The aerial shows its labeled reference position; distance rings measure to the green.
Championship tees · Par 3 · 165 yards
The plan for No. 16
The iconic 16th hole at Sedgefield Country Club presents one of Donald Ross's most deceptive par 3 challenges on the PGA Tour's Wyndham Championship venue. This deceptively treacherous 165-yard downhill shot features the famous horseshoe-shaped green that has confounded professionals and amateurs alike. The elevated tee provides a scenic vista, but the 30-foot drop creates club selection complexity that demands precision over power. A formidable phalanx of front bunkers guards the compact green, making distance control absolutely critical. The real test isn't reaching the putting surface—it's holding it once your ball clears those menacing sand traps. With its strategic bunkering and undulating green complex, this hole epitomizes Ross's genius for creating memorable short holes that reward thoughtful execution over brute force.
Off the tee
With the downhill lie, your tee shot will play closer to 140-150 yards, making club selection critical. Choose a mid-iron that allows for a controlled, high trajectory - typically one or two clubs less than the yardage would normally require. The target line should favor the center of the green rather than attacking pins, as the horseshoe shape creates deceptive angles. Focus on a smooth tempo to ensure clean contact, as the elevation change can lead to rushed swings. The front bunkers demand sufficient carry, but avoid the temptation to over-club, as balls landing on the back portion of the horseshoe can easily roll off into trouble.
Approach & recovery
Since this is a par 3, your tee shot IS your approach shot, making precision even more crucial. The horseshoe-shaped green creates multiple pin positions with vastly different strategies. When the pin is tucked in the curved sections, resist the urge to fire directly at it - instead, aim for the fat part of the green and rely on your putting. The elevation change affects not just distance but also ball flight, so expect your shot to come in at a steeper angle than normal. This can actually help with stopping power once you clear those front bunkers.
On the green
The horseshoe shape creates some of the most challenging putts you'll face, with significant breaks toward the center of the "U." Putts from the outer edges of the horseshoe often require reading multiple breaks and elevation changes. Pin positions in the curved sections demand careful attention to speed control, as aggressive putts can easily run off the green. The small green size means every putt requires precision - focus on getting your first putt within tap-in range rather than being overly aggressive with longer attempts. ## RISK VS REWARD The risk/reward calculation here is subtle but important. The reward for aggressive pin-hunting is minimal - even a perfect shot to a tucked pin only saves you a few feet of putting. However, the risks are severe: miss short and you're in the front bunkers with a difficult up-and-down; miss long or to the sides and you could face an impossible recovery shot. The smart play is always to the center of the green, accepting a longer putt in exchange for guaranteed par opportunities. ## DIFFERENT SKILL LEVELS **High-handicap players** should treat this hole with maximum respect. Club up if in doubt, aim for the absolute center of the green, and focus on making solid contact. The downhill nature of the shot can help you reach the green even with a conservative club choice. Don't attempt to attack pins - a bogey here is perfectly acceptable given the hole's difficulty. **Low-handicap players** can be slightly more aggressive with pin positions in the wider sections of the horseshoe, but should still exercise caution with tucked pins. Your superior short game skills allow for more precise distance control, making it possible to attack certain pin positions while still respecting the hole's demands. Use the elevation change to your advantage by focusing on trajectory control rather than just distance. This hole epitomizes the scoring opportunities and strategic challenges that make Sedgefield a worthy PGA Tour venue, rewarding thoughtful course management over raw power.
Watch for
- Course conditioning and mapped hazards may affect line selection; confirm from the aerial.
Hole 16 Green Complex
Mapped green boundary
Green size: 6,271 sq ft
Course coverage
Tournament and creator videos about Sedgefield Country Club — shared course coverage, not hole-specific clips.
Tournament coverage
Wyndham Championship highlights
Wyndham Championship | Final Round Highlights
2025
How did Hole 16 play?
How did this hole play today?
Frequently asked questions
Yardage reference: Championship tees · 165 yards.
What club should I use on this par 3?
↓
At 165 yards, most golfers will need a mid-iron (7-iron to 8-iron) to reach this green. Adjust for elevation, wind, and pin position.
How difficult is hole 16?
↓
This hole is a moderate challenge for most golfers. Key challenges include: water in play.
What hazards should I watch out for on hole 16?
↓
Key hazards include: 2 greenside bunkers; water at 108.2 yards. Plan your shots to avoid these trouble spots.
How big is the green on hole 16?
↓
The green is fairly large with multiple pin positions. The green is deeper than wide, so club selection is crucial. Lag putting becomes important on longer putts.
What's a good score on hole 16?
↓
This hole is a solid par with birdie chances for precise approach shots. Making par is a good result here. Focus on hitting the green and avoiding three-putts.