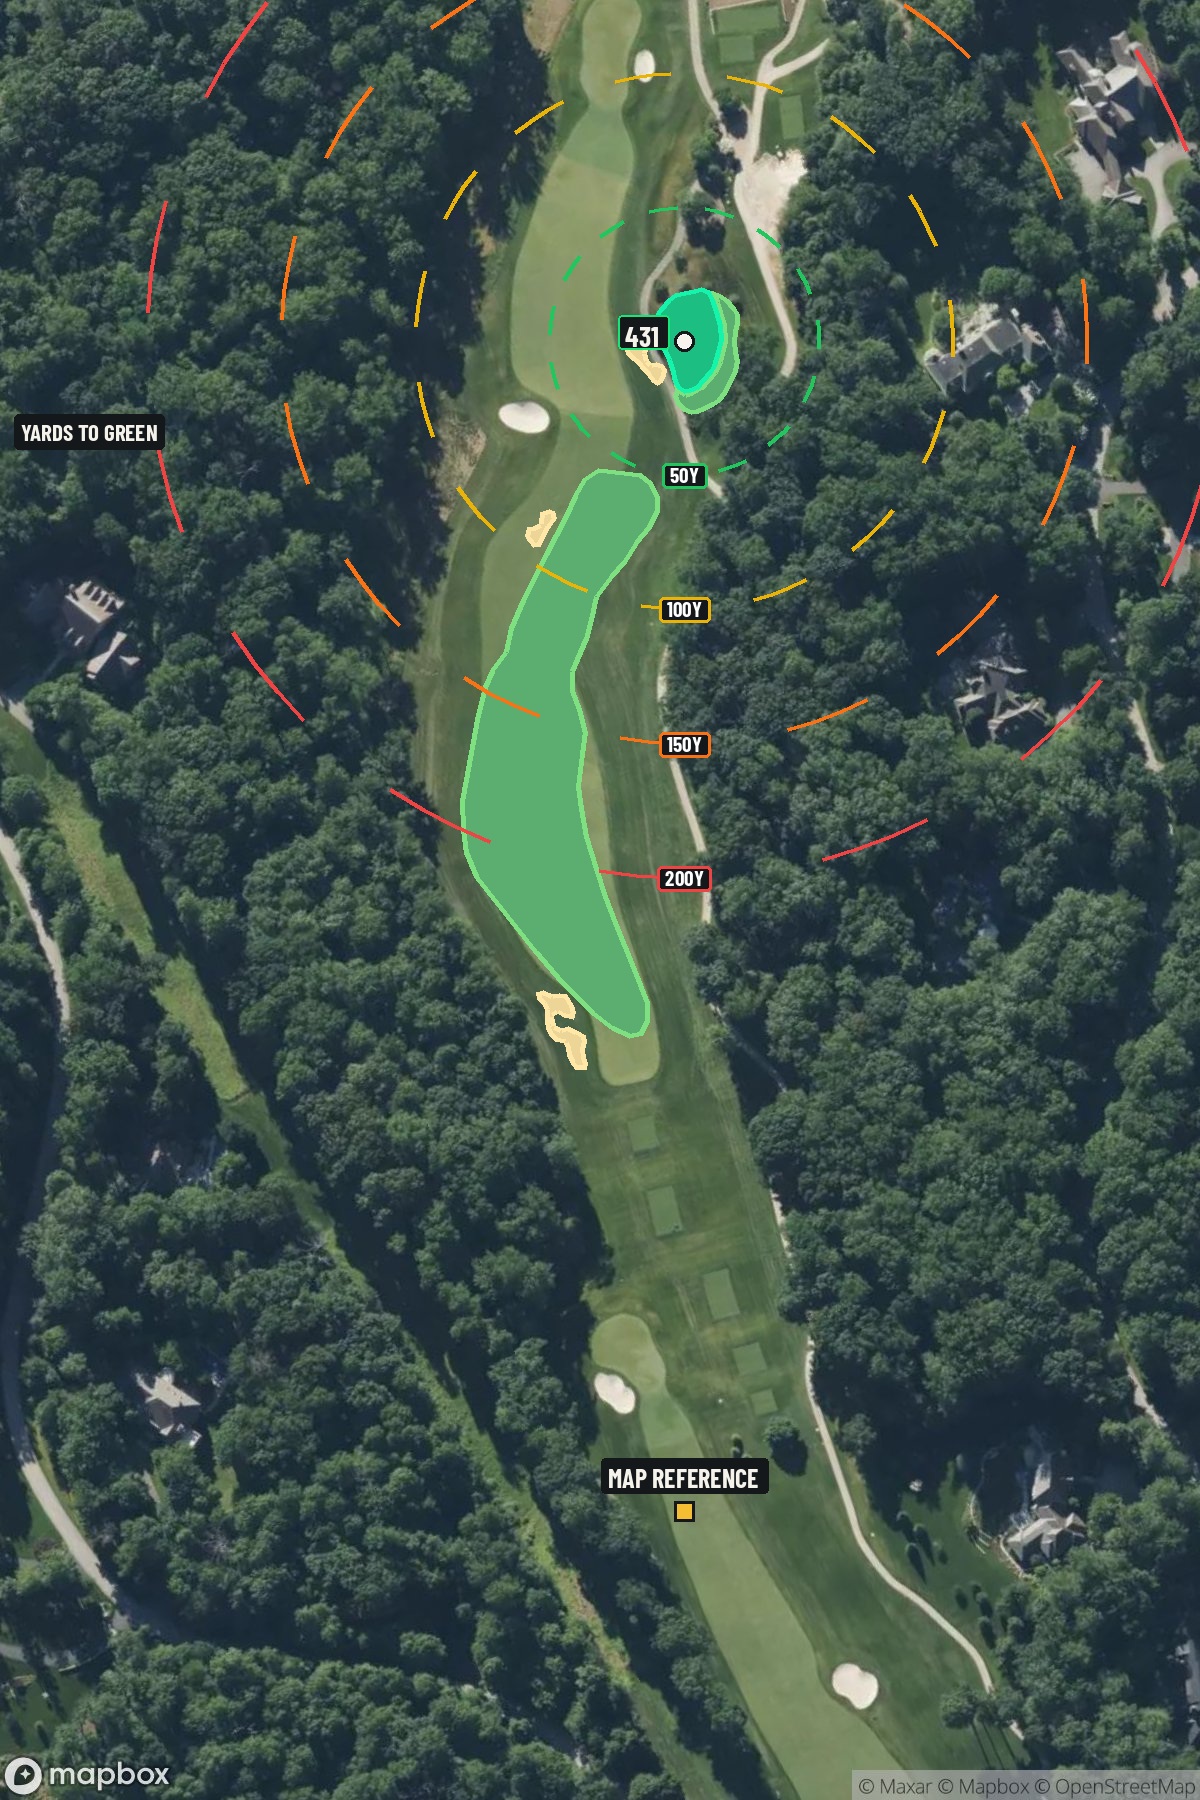
Hole 11 of 18 · Owings Mills, Maryland

Hole 11 at Caves Valley Golf Club

Par
5
Yards
463
Handicap
4
Bunkers
4
Hole 11 aerial at Caves Valley Golf Club
Map distances from Map reference tee

The map's printed distances are measured from the Map reference tee to the green; they do not move when you change tees. Your Championship yardage is in the tiles above.

Green size: 39 yds deep × 26 yds wide

Mapbox Satellite composite · capture date not provided. Green at the top.

Where this map comes from

Satellite photo
Date not published
Mapbox satellite
Green contours
2024 survey
USGS lidar survey
Report a map problem
100%
Hole 11 aerial at Caves Valley Golf Club

The plan for No. 11

These notes were written before the current map. Where their distances differ, trust the map.

The play: The 11th hole at Caves Valley Golf Club exemplifies Tom Fazio's masterful design philosophy, presenting a deceptively challenging par 4 that demands both power and precision. This 463-yard test stretches across rolling Maryland terrain, offering golfers a seemingly straightforward layout that reveals its complexities upon closer inspection. The tee shot requires careful positioning on a generous fairway that narrows considerably in the landing zone, setting up the critical approach to a small, well-protected green complex. Without significant hazards to intimidate, this hole relies on strategic nuance and green-reading skills to separate good scores from great ones. The compact putting surface demands accurate iron play, making club selection and distance control paramount. Having hosted PGA Tour professionals during the BMW Championship, this hole showcases why Caves Valley Golf Club has earned its reputation as a premier championship venue in the Mid-Atlantic region.

Shot by shot

  1. Off the tee

    The key to success begins with a committed tee shot that finds the optimal position in the landing zone. Given the hole's length, most players will need driver or strong 3-wood to leave a manageable approach. Focus on the center-left portion of the fairway, which typically provides the best angle into the small green. Avoid the temptation to overswing for extra distance - a smooth, controlled swing that finds the short grass is far more valuable than an extra 10-15 yards in the rough. The straight layout rewards accuracy over raw power, so trust your natural shot shape and commit to your target line.

  2. Approach & recovery

    With the small green as your target, precision becomes paramount on the approach shot. Expect to hit anything from a mid-iron to long-iron depending on your tee shot and conditions. The compact green size means there's little margin for error, so club selection should favor the center of the green rather than attacking pins. Take one extra club and swing smoothly rather than forcing a shot that might come up short. The approach angle from the center-left of the fairway typically offers the best entry to the green, allowing for the most forgiving miss.

  3. On the green

    The small green demands respect with your putter selection and read. Pace control becomes critical on a compact surface where aggressive putts can easily run well past the hole. Focus on getting your first putt to the hole with proper speed rather than trying to make everything. Two-putt pars are excellent scores on this green, and avoiding three-putts should be the primary objective. Study the overall slope and grain direction during your approach to better understand how putts will break. ## RISK VS REWARD This hole rewards conservative, strategic play over aggressive tactics. The primary risk/reward decision comes with tee shot positioning - longer drives may provide shorter irons but can also find trouble if mishit. The reward for finding the fairway and hitting a solid approach is a legitimate birdie opportunity, but the small green punishes wayward shots severely. Smart players recognize that par is always a good score here and avoid the big numbers that can derail a round. ## DIFFERENT SKILL LEVELS **High Handicappers:** Focus on keeping the ball in play off the tee, even if it means hitting 3-wood or hybrid for position. Aim for the center of the green on approach shots and don't worry about pin hunting. Two-putt pars represent excellent scores, and bogey is perfectly acceptable on this challenging hole. **Low Handicappers:** Can be more aggressive with driver off the tee to set up shorter irons, but must still respect the small green. Consider pin position when selecting approach clubs, but always err on the side of caution with the compact target. Look for birdie opportunities when pins are accessible, but never force shots that aren't there. The 11th hole at Caves Valley exemplifies championship-caliber golf design, where strategic thinking and precise execution are rewarded over pure aggression. Success here builds confidence for the challenging holes ahead while demonstrating the course management skills essential for low scoring.

  4. Watch for

    • Course conditioning and mapped hazards may affect line selection; confirm from the aerial.

The green on No. 11

Mapped boundary
Wide × deepyards
26×39
Areasq ft
5,736

Gear for Hole 11

We may earn a commission when you buy through these links.

Course coverage

Tournament and creator videos about Caves Valley Golf Club — shared course coverage, not hole-specific clips.

Featured by these creators

Creator videos about this course

YouTube creators who filmed or featured Caves Valley Golf Club. · Stats as of Nov 16, 2026 · 6d ago

Explore golf creators →

Burger Dog inflation, BMW at Caves Valley Conundrums, Versant gets the U.S. Open | The Shotgun Start

Golfer feedback

How did Hole 11 play?

⚡ Quick Golfer Pulse

How did this hole play today?

1-tap anonymous vote

Frequently asked questions

Yardage reference: Championship tees · 463 yards.

How big is the green on hole 11?

↓

The green is medium-sized with moderate targets. The green is wider than it is deep, rewarding shots that find the correct tier. Pay attention to pin placement when selecting your approach club.