Hole 7 at Westin Innisbrook Resort 'Copperhead Course'
- Par
- 4
- Yardage
- 420 yds
- Stroke index
- 13
- Hazards
- 4 bunkers
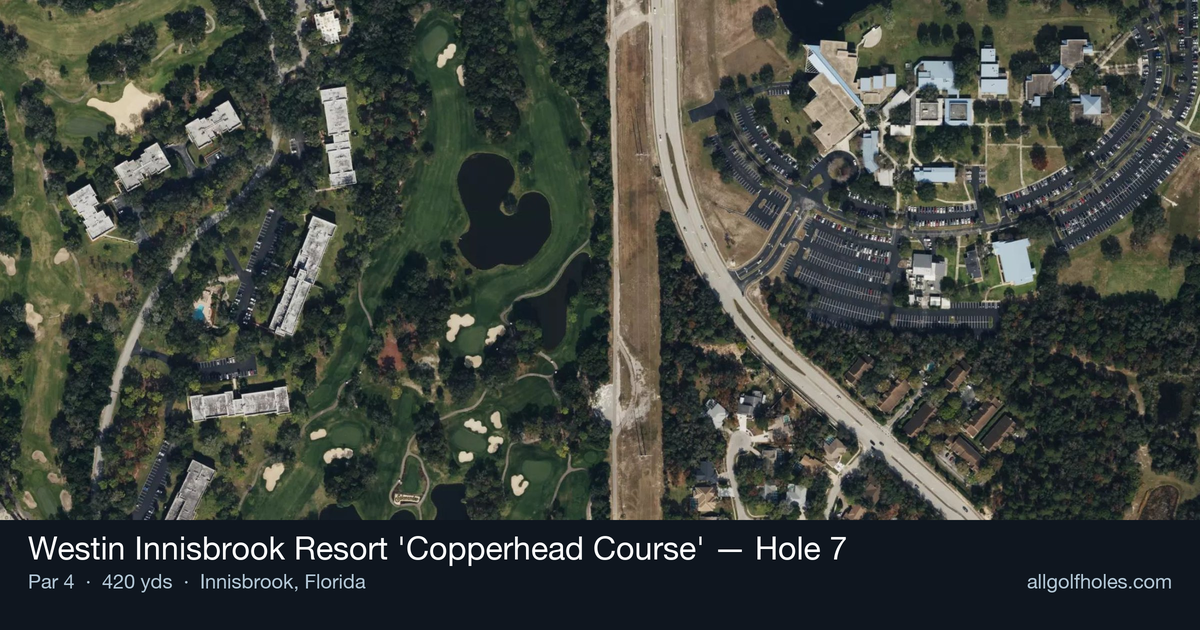
Aerial source not provided
Green size: 30 yds deep × 35 yds wide
Scorecard yardage is for Championship tees. The aerial shows its labeled reference position; distance rings measure to the green.
Championship tees · Par 4 · 420 yards
The plan for No. 7
The seventh hole at Westin Innisbrook Resort 'Copperhead Course' exemplifies the precision ball-striking challenge that defines this renowned PGA Tour venue. This 420-yard par 4 demands accuracy from the tee, where golfers must navigate between the characteristic tight, tree-lined fairways that have tested professionals for decades. The straight layout may appear straightforward, but the small green complex requires a precise approach shot to find the putting surface. With trees framing both sides of the fairway, there's little room for error on either the tee shot or approach. The compact green rewards accurate iron play while punishing wayward shots, making this a true test of consistency that embodies the Copperhead's reputation as one of Florida's most demanding golf courses.
Off the tee
The tee shot strategy centers on finding the optimal position for your approach while respecting the tree-lined boundaries. Most players should favor a controlled tee shot with a 3-wood or hybrid, aiming for the center-right portion of the fairway. This target line provides the best angle into the small green while avoiding the trees that guard both sides. Driver can be tempting given the moderate length, but the tight fairway makes accuracy paramount over distance. A well-struck fairway wood leaving a mid-iron approach is far superior to a driver that finds trouble among the trees. The key is committing to your club selection and making a confident swing down your chosen target line.
Approach & recovery
The approach shot is where scores are made or lost on this hole. The small green demands precision, making club selection critical. Take one extra club and swing smoothly rather than forcing a shot that might come up short or miss the target entirely. Pin position significantly affects strategy. When the flag is tucked behind bunkers or near edges, aim for the center of the green and rely on putting rather than risking a missed green. The putting surface, while small, typically offers reasonable birdie chances from most positions if you can consistently find it with your approach.
On the green
The small green creates interesting putting dynamics, often featuring subtle breaks that can be deceptive. Pace control becomes crucial, as aggressive putts on a compact surface can easily run well past the hole. Focus on getting your first putt close rather than trying to make everything. Read putts carefully from multiple angles, as the limited green space means even slight misreads can result in challenging comeback putts. Uphill putts generally offer the best scoring chances, while downhill putts require extra caution to avoid three-putting. ## RISK VS REWARD The primary risk-reward decision occurs with tee shot club selection. Aggressive drivers can set up short irons into the green, but the penalty for missing the narrow fairway is severe. Conservative play with fairway woods virtually guarantees a reasonable approach opportunity, though from a longer distance. The small green creates its own risk-reward scenario on approach shots. Firing directly at pins offers birdie chances but increases the likelihood of missing the green entirely. Playing to the center of the green may mean longer putts but ensures you're putting rather than chipping. ## DIFFERENT SKILL LEVELS **High Handicap Players:** Prioritize finding the fairway with your most reliable club, even if it means a longer approach shot. Aim for the center of the green regardless of pin position, focusing on avoiding big numbers rather than chasing birdies. Two-putting from anywhere on the green represents a successful hole. **Low Handicap Players:** Can be more aggressive with driver selection if they consistently find fairways. Should factor pin position heavily into approach strategy, being willing to attack favorable positions while respecting difficult ones. The small green rewards precise distance control and spin management. **Tour-Level Strategy:** This hole has tested PGA Tour professionals during the Valspar Championship, where course management often trumps pure aggression. The tight fairways and small greens that characterize Innisbrook's Copperhead design make patient, strategic play essential even for the world's best players. The 7th hole perfectly encapsulates what makes the Copperhead Course a respected PGA Tour venue - it appears manageable but punishes any lapse in concentration or execution.
Hole 7 Green Complex
Mapped green boundary
Green size: 5,148 sq ft
Course coverage
Tournament and creator videos about Westin Innisbrook Resort 'Copperhead Course' — shared course coverage, not hole-specific clips.
Tournament coverage
Valspar Championship highlights
Valspar Championship | Final Round Highlights
2025
How did Hole 7 play?
How did this hole play today?
Frequently asked questions
Yardage reference: Championship tees · 420 yards.
What's the best strategy off the tee?
↓
For this 420-yard par 4, most players will hit driver to set up a comfortable approach.
How difficult is hole 7?
↓
This hole is a moderate challenge for most golfers. Key challenges include: heavily bunkered.
How big is the green on hole 7?
↓
The green is medium-sized with moderate targets. Pay attention to pin placement when selecting your approach club.