Hole 9 at Doral Golf Resort and Spa 'The Blue monster'
- Par
- 3
- Yardage
- 169 yds
- Stroke index
- 15
- Hazards
- 1 bunker · Water
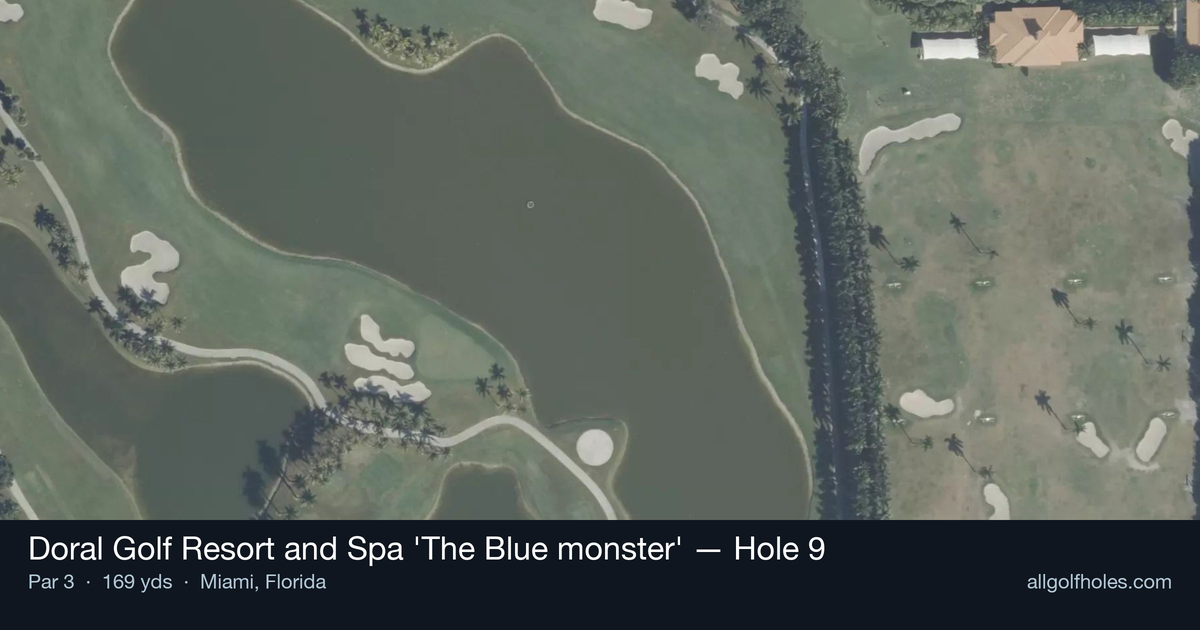
Aerial source not provided
Green size: 38 yds deep × 33 yds wide
Scorecard yardage is for Championship tees. The aerial shows its labeled reference position; distance rings measure to the green.
Championship tees · Par 3 · 169 yards
The plan for No. 9
The ninth hole at Doral Golf Resort and Spa 'The Blue Monster' serves as a strategic mid-round test, offering players a seemingly straightforward par 3 that demands precision over power. At 169 yards, this hole presents a deceptively simple challenge that can quickly punish wayward tee shots. The small green complex requires accurate club selection and committed execution, as Miami's notorious wind conditions can transform what appears to be a routine short iron into a demanding approach shot. Without the dramatic water hazards that define many of the Blue Monster's signature holes, the ninth relies on subtle green contours and tight pin positions to extract respect from golfers. This hole perfectly embodies the Blue Monster's reputation for rewarding precise shot-making while punishing those who underestimate its challenges, making it a crucial scoring opportunity before heading into the back nine.
Off the tee
Club selection is critical on this hole, with most players needing anywhere from a 7-iron to a 5-iron depending on wind conditions and pin position. The Miami climate often brings afternoon breezes that can significantly affect ball flight, so factor in wind direction when making your selection. Aim for the center of the green rather than chasing pins, as the small target leaves little margin for error. Take one extra club and make a smooth, committed swing rather than forcing a shorter iron. The straight layout means you can be aggressive with your target line without worrying about doglegs or hidden trouble.
Approach & recovery
Since this is a par 3, your tee shot IS your approach shot. Focus on landing the ball on the front portion of the green and letting it release toward the pin. The small green size means any shot that finds the putting surface gives you a legitimate birdie chance. Avoid the temptation to attack tight pin positions - the center of the green is always your friend on holes like this. Pay attention to the green's subtle slopes and contours, as even small greens can have significant breaks that affect both approach shots and putting.
On the green
With a small green, you're likely looking at manageable putt distances regardless of where you land. Focus on reading the overall slope and grain direction, which can be influenced by the South Florida climate. Most putts will have subtle breaks rather than dramatic slopes, so trust your read and make confident strokes. The key is avoiding three-putts by being conservative with your first putt speed - better to leave yourself a short uphill second putt than blast one well past the hole. ## RISK VS REWARD This hole offers a classic risk/reward scenario disguised as a simple par 3. The reward is clear - a well-struck shot to this small green sets up an excellent birdie opportunity. The risk lies in missing the green entirely, which can lead to difficult up-and-down situations. The smart play is always targeting the center of the green, but aggressive players might attack pins when conditions are favorable and their swing feels dialed in. ## DIFFERENT SKILL LEVELS **Higher Handicap Players:** Take the conservative approach by aiming for the center of the green with a club that ensures you reach the target. Don't worry about pin hunting - any shot on the green is a success. Focus on making solid contact and committing to your swing. **Lower Handicap Players:** You can be more aggressive with pin positions, especially when the wind is down. Still respect the small green size, but use your distance control skills to attack favorable pins. Consider the pin position in your pre-shot routine and adjust your target accordingly. **Tour-Level Strategy:** This is where course management becomes crucial. Study the pin sheet carefully and factor in afternoon wind patterns that are common at Doral. Use your yardage book to identify the optimal miss areas around this small green, and don't be afraid to use the slope to feed shots toward difficult pins. The 9th hole at the Blue Monster rewards patience and precision over aggression, making it a perfect example of how strategic thinking can turn a seemingly simple hole into a genuine scoring opportunity.
Watch for
- Mapped water influences carry decisions and safe margins off the tee and on approaches.
- Mapped bunkers guard landing areas and greenside recovery lines.
Hole 9 Green Complex
Mapped green boundary
Green size: 4,499 sq ft
How did Hole 9 play?
How did this hole play today?
Frequently asked questions
Yardage reference: Championship tees · 169 yards.
What club should I use on this par 3?
↓
At 169 yards, most golfers will need a mid-iron (7-iron to 8-iron) to reach this green. Adjust for elevation, wind, and pin position.
How difficult is hole 9?
↓
This hole is a moderate challenge for most golfers. Key challenges include: water in play, small green.
What hazards should I watch out for on hole 9?
↓
Key hazards include: 1 greenside bunker; water at 88.5 yards. Plan your shots to avoid these trouble spots.
How big is the green on hole 9?
↓
The green is small and requires precision. Expect challenging pin positions with limited room for error.
Where is the best miss on hole 9?
↓
If you're going to miss the green, favor the left side. The right (water) brings more trouble into play and makes recovery difficult.
What's a good score on hole 9?
↓
This hole is a solid par with birdie chances for precise approach shots. Making par is a good result here. Focus on hitting the green and avoiding three-putts.