Hole 3 at Wilshire Country Club
- Par
- 4
- Yardage
- 345 yds
- Stroke index
- 13
- Hazards
- 5 bunkers · Water
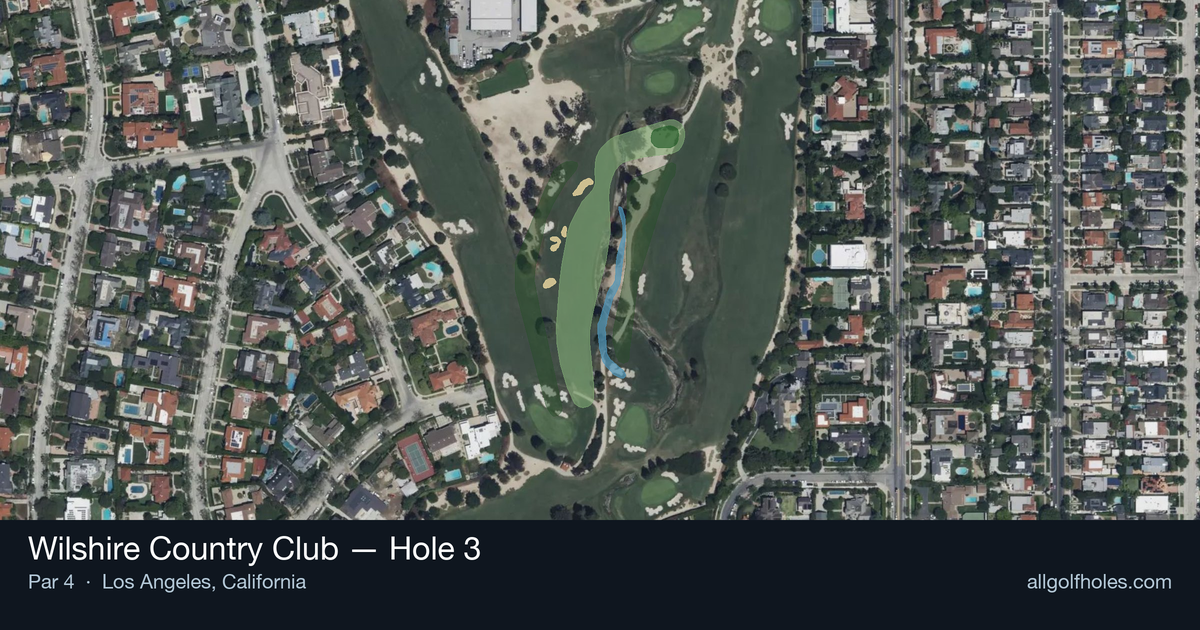
Aerial source not provided
Green size: 21 yds deep × 24 yds wide
Scorecard yardage is for Pro tees. The aerial shows its labeled reference position; distance rings measure to the green.
Pro tees · Par 4 · 345 yards
The plan for No. 3
The third hole at Wilshire Country Club presents a deceptively strategic par 4 that rewards precision over power. At 345 yards, this straight-away hole may appear straightforward, but the small green demands an accurate approach shot that tests every golfer's short iron game. The generous fairway provides ample landing area for the tee shot, allowing players to focus on positioning for the critical second shot. Without significant hazards to navigate, success hinges entirely on distance control and pin placement awareness. The compact putting surface punishes wayward approaches, making this seemingly benign hole a true test of accuracy. Smart course management and committed execution separate good scores from missed opportunities on Wilshire's thoughtful third.
Off the tee
The tee shot strategy centers on finding the optimal distance for your approach shot comfort zone. Most players should consider a controlled driver or strong 3-wood, aiming for the center-left portion of the fairway to open up the best angle to the green. Longer hitters might even consider laying back with a hybrid or long iron to ensure they have a full wedge or short iron for their second shot - often the most reliable way to attack a small green. The key is avoiding the temptation to blast driver and leave yourself with an awkward half-swing from close range.
Approach & recovery
The approach shot is where this hole is won or lost. With the green being small, precision trumps distance every time. Focus on the center of the green regardless of pin position, as the compact target leaves little room for error. A smooth, controlled swing with proper club selection beats an aggressive attack. Take one extra club if you're between distances - it's better to be long and putting back than short and chipping up. Pay attention to wind conditions, as they can significantly affect ball flight on this shorter approach.
On the green
The small green means most putts will be relatively short, but don't underestimate the importance of lag putting. Focus on getting your first putt close rather than being overly aggressive, as three-putts can quickly turn a scoring opportunity into a bogey. The compact surface typically means fewer severe breaks, but read putts carefully as subtle slopes can be deceptive. When the pin is tucked near an edge, aim for the fat part of the green and take your par. ## RISK VS REWARD The primary risk/reward decision comes on the tee shot: how aggressive to be with driver versus laying back for position. The reward of a shorter approach must be weighed against the risk of an awkward distance or poor lie. Conservative players should favor position over distance, while confident ball-strikers can be more aggressive off the tee. There's minimal penalty for missing the green slightly, making this a hole where you can afford to be somewhat aggressive with your approach. ## DIFFERENT SKILL LEVELS **High-handicap players** should treat this as a two-shot hole, focusing on hitting two solid, conservative shots rather than trying to attack. Use a 3-wood or hybrid off the tee to ensure finding the fairway, then take plenty of club for the approach and aim for the center of the green. Par is an excellent score here. **Low-handicap players** can be more aggressive, using driver if comfortable and looking to get their approach shot within birdie range. However, even scratch golfers should respect the small green and avoid forcing shots to tight pin positions. The hole's length makes it tempting to attack, but patience and precision will yield better results than raw aggression.
Watch for
- Course conditioning and mapped hazards may affect line selection; confirm from the aerial.
Hole 3 Green Complex
Mapped green boundary
Green size: 2,818 sq ft
How did Hole 3 play?
How did this hole play today?
Frequently asked questions
Yardage reference: Pro tees · 345 yards.
What's the best strategy off the tee?
↓
For this 345-yard par 4, most players will hit 3-wood or driver to set up a comfortable approach.
How difficult is hole 3?
↓
This hole is a moderate challenge for most golfers. Key challenges include: water in play, small green.
What hazards should I watch out for on hole 3?
↓
Key hazards include: water at 185.7 yards. Plan your shots to avoid these trouble spots.
How big is the green on hole 3?
↓
The green is small and requires precision. Expect challenging pin positions with limited room for error.
What's a good score on hole 3?
↓
This hole is a birdie opportunity if you find the fairway. This shorter par 4 rewards accuracy off the tee with a short iron approach.