Hole 10 of 18 · La Jolla, California

Hole 10 at Torrey Pines Golf Club (North Course)

Par
4
Yards
416
Handicap
6
Bunkers
6
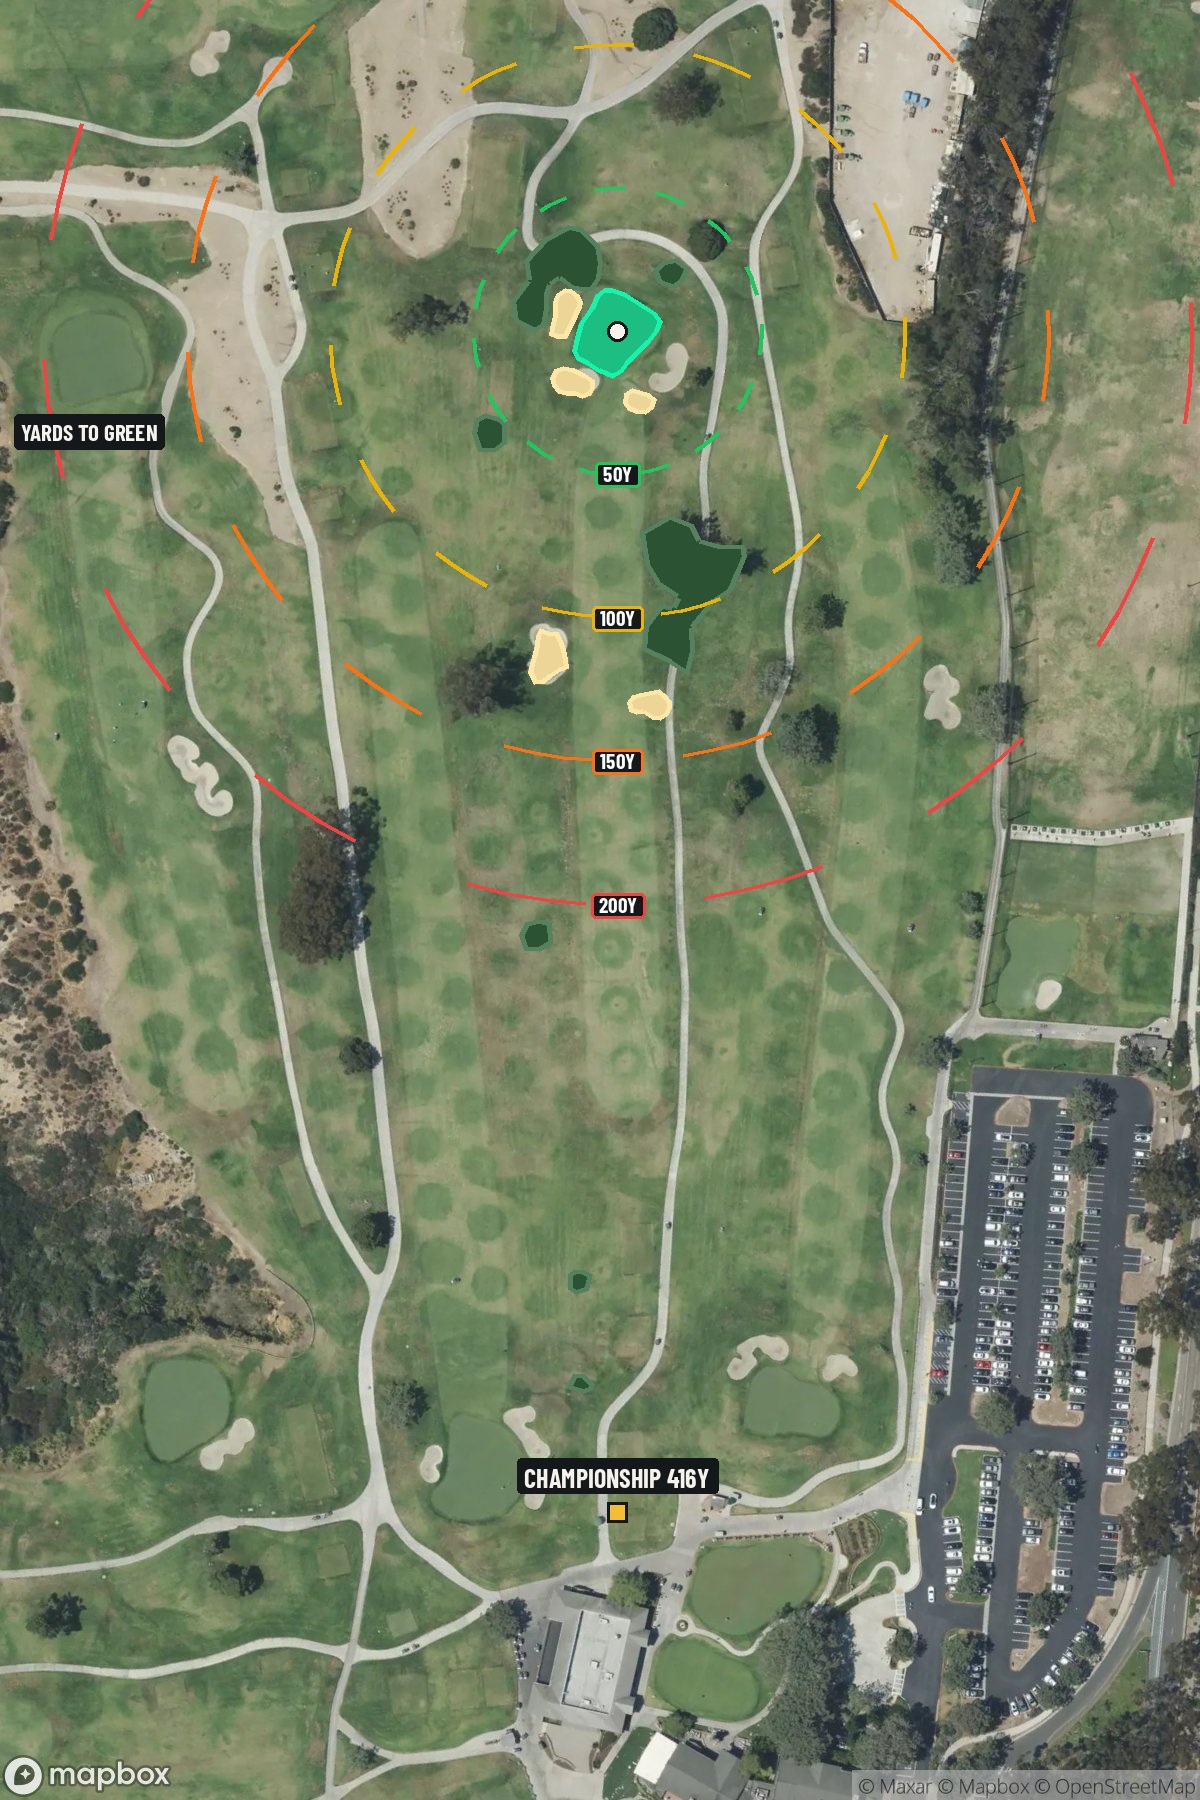
Hole 10 aerial at Torrey Pines Golf Club (North Course)
Map distances from Championship tee · 416 yds

The map's printed distances are measured from the Championship tee to the green; they do not move when you change tees.

Green size: 31 yds deep × 32 yds wide

Mapbox Satellite composite · capture date not provided. Green at the top.

Where this map comes from

Satellite photo
Date not published
Mapbox satellite
Green contours
2014–2015 survey
USGS lidar survey
Report a map problem
100%
Hole 10 aerial at Torrey Pines Golf Club (North Course)

The plan for No. 10

The play: The tenth hole at Torrey Pines Golf Club North Course presents a deceptively challenging par 4 that demands both precision and course management. This 416-yard straight-away hole may appear straightforward from the tee, but the small green complex becomes the focal point of strategy. With no significant hazards protecting the fairway, golfers can be aggressive off the tee, but the approach shot requires careful club selection and accurate distance control. The compact putting surface punishes wayward iron shots, making pin position crucial for scoring opportunities. Set against the stunning backdrop of the Pacific coastline, this hole exemplifies Torrey Pines' ability to challenge players through subtle design rather than obvious hazards, rewarding thoughtful play over power.

Shot by shot

  1. Off the tee

    The key to this hole starts with finding the fairway and setting up the ideal approach distance. Most players should focus on a controlled tee shot that leaves a comfortable approach yardage rather than trying to get as close as possible to the green. A driver or 3-wood down the center line provides the best angle and distance for the approach. The straight layout allows for an aggressive line, but maintaining control is more important than maximum distance. Position yourself in the fairway's center to have the best angle into the small green.

  2. Approach & recovery

    The approach shot is where this hole's true challenge reveals itself. With a small green as your target, club selection becomes critical - it's better to be slightly long with a controlled shot than to come up short with an aggressive swing. The key is committing to your yardage and making a smooth, confident swing. Since there are no major hazards to navigate, focus entirely on distance control and hitting the green. A mid-iron to long-iron depending on your tee shot position will typically be required, and the goal should be the center of the green regardless of pin position.

  3. On the green

    The small green demands respect with your putter. While specific break patterns aren't detailed, focus on getting your first putt close rather than being overly aggressive. Two-putt pars are excellent scores on small greens, and avoiding three-putts should be the priority. Pay attention to the green's subtle slopes during your approach and use that information to plan your putting strategy. ## RISK VS REWARD This hole offers a different type of risk/reward calculation - the reward of an easy par or potential birdie versus the risk of missing the small green and facing a difficult up-and-down. The straightforward layout might tempt players to be overly aggressive, but the smart play is conservative course management that prioritizes hitting the green in regulation. ## DIFFERENT SKILL LEVELS **High-Handicap Players:** Focus on two solid, straight shots rather than trying to overpower the hole. A 3-wood or hybrid off the tee ensures fairway position, followed by whatever club gets you on the green safely. Don't worry about pin-hunting - aim for the center of the green and take your par. **Low-Handicap Players:** This hole offers a legitimate birdie opportunity with precise execution. An aggressive tee shot can set up a shorter iron approach, allowing for more spin and control into the small green. Consider pin position more carefully and use course conditions to your advantage, but remember that even scratch players should respect the small target and prioritize green-in-regulation over risky pin-hunting. The beauty of Hole 10 lies in its simplicity - execute two quality golf shots and you'll score well. Let the hole's straightforward design work in your favor through smart club selection and committed swings.

  4. Watch for

    • Mapped bunker (Crossing center) on the center side.
    • Mapped woods (Crossing center) on the center side; treat as a forced-carry obstacle from the mapped line.

The green on No. 10

Mapped boundary
Wide × deepyards
32×31
Areasq ft
4,516

Course coverage

Tournament and creator videos about Torrey Pines Golf Club (North Course) — shared course coverage, not hole-specific clips.

Featured by these creators

Creator videos about this course

YouTube creators who filmed or featured Torrey Pines Golf Club (North Course). · Stats as of Nov 2, 2026 · 2d ago

Explore golf creators →

The Major Cut @ Torrey Pines (US Open)

Can We Make Major Cut @ Torrey Pines ?

Bryan Bros Golf1.7M views

Range work with Max Homa at Torrey Pines. #golf #cobragolf #maxhoma #torreypines

Ludvig Åberg wins Genesis Invitational at Torrey Pines | The Shotgun Start

Golfer feedback

How did Hole 10 play?

⚡ Quick Golfer Pulse

How did this hole play today?

1-tap anonymous vote

Frequently asked questions

Yardage reference: Championship tees · 416 yards.

What's the best strategy off the tee?

↓

For this 416-yard par 4, most players will hit driver to set up a comfortable approach.

How difficult is hole 10?

↓

This hole is a good scoring opportunity for most golfers.

How big is the green on hole 10?

↓

The green is medium-sized with moderate targets. Pay attention to pin placement when selecting your approach club.