Hole 9 of 18 · La Jolla, California

Hole 9 at Torrey Pines Golf Club (North Course)

Par
5
Yards
548
Handicap
11
Bunkers
4
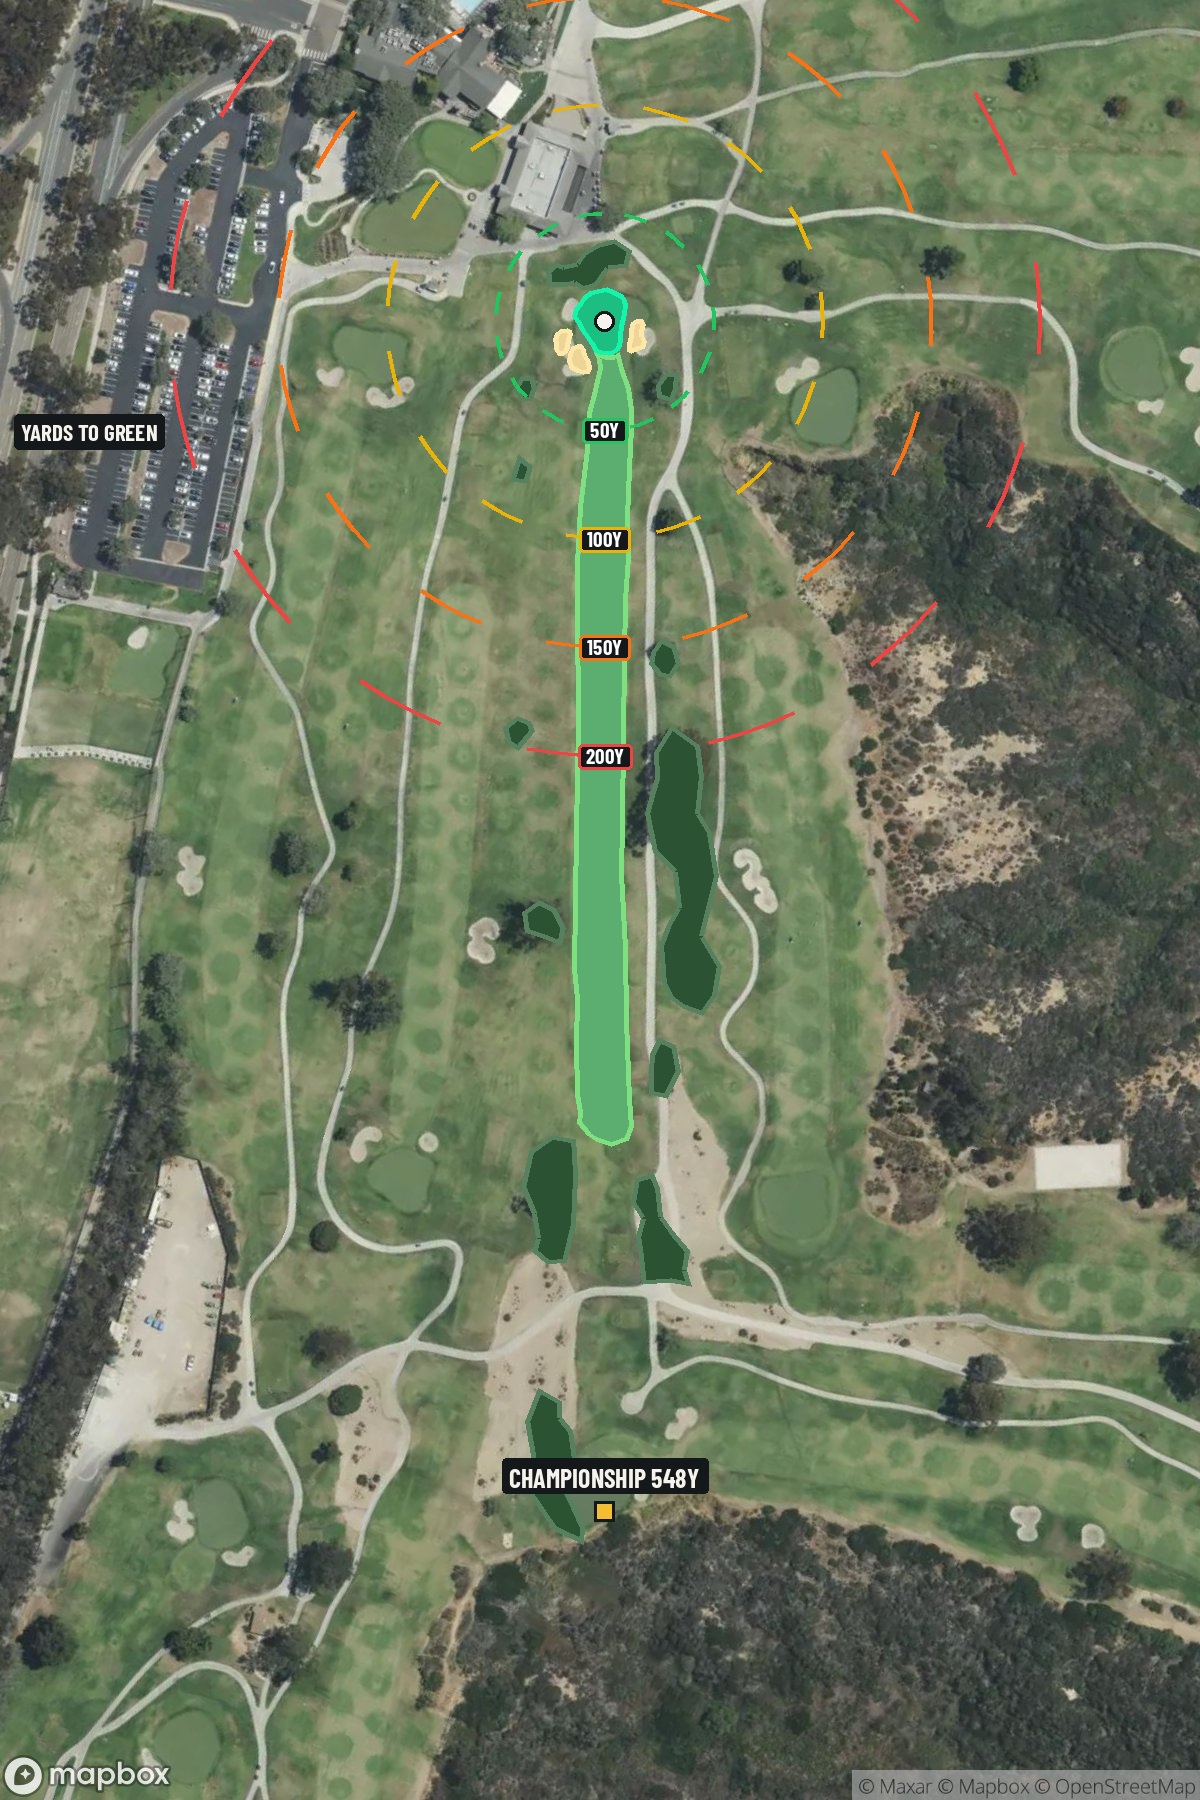
Hole 9 aerial at Torrey Pines Golf Club (North Course)
Map distances from Championship tee · 548 yds

The map's printed distances are measured from the Championship tee to the green; they do not move when you change tees.

Green size: 31 yds deep × 25 yds wide

Mapbox Satellite composite · capture date not provided. Green at the top.

Where this map comes from

Satellite photo
Date not published
Mapbox satellite
Green contours
2014–2015 survey
USGS lidar survey
Report a map problem
100%
Hole 9 aerial at Torrey Pines Golf Club (North Course)

The plan for No. 9

The play: The finishing hole on Torrey Pines Golf Club North Course's front nine presents a reachable par 5 at 548 yards that tempts aggressive players while rewarding strategic thinking. This straight-forward layout offers one of the most birdie-friendly opportunities on the North Course, with generous fairway width that encourages drivers to let loose from the elevated tee. The absence of significant hazards creates a risk-free environment for golfers to attack in two, though the small green demands precision on approach shots. Length-challenged players can comfortably lay up for a manageable wedge into the putting surface. With its scenic Pacific Ocean backdrop and forgiving design, this hole provides the perfect confidence boost before making the turn, embodying the North Course's reputation as the more accessible of Torrey Pines' two championship layouts.

Shot by shot

  1. Off the tee

    The tee shot strategy revolves around maximizing distance while maintaining accuracy down the center of the fairway. With no hazards to avoid, this is an opportunity to let the driver work and gain valuable yardage toward the green. Aim for the center-left portion of the fairway to provide the best angle for your second shot. The relatively low handicap rating of 11 suggests this hole plays easier than others on the course, so take advantage with an aggressive but controlled drive.

  2. Approach & recovery

    Your approach strategy depends heavily on your tee shot results. Longer hitters who've driven it well may have an opportunity to reach the green in two with a mid-iron to long-iron, but the small green size demands precision. If you're laying up, position your second shot in the 80-100 yard range to set up a full wedge into the green. Avoid getting caught between clubs on your approach - the small green penalizes anything but precise distance control.

  3. On the green

    The small green size means every putt matters significantly. Focus on getting your approach shot below the hole when possible, as uphill putts will be more manageable than downhill attempts on a compact surface. Speed control becomes critical - with limited green to work with, pace is often more important than perfect line. Study the subtle breaks carefully, as even minor slopes are amplified on smaller putting surfaces. ## RISK VS REWARD This hole presents a clear risk-reward decision for most golfers. Going for the green in two offers genuine birdie and even eagle opportunities, but the small target increases the likelihood of missing the green entirely. The conservative play of laying up virtually guarantees a birdie chance with a wedge in hand, making this an excellent risk-reward analysis hole where course management skills are tested. ## DIFFERENT SKILL LEVELS **Low Handicap Players:** Should seriously consider going for the green in two, especially with favorable conditions. Your precision with longer irons makes the small green a manageable target, and the scoring opportunity is too valuable to pass up on a hole with no hazards. **High Handicap Players:** Strongly consider the three-shot approach. Use this as an opportunity to practice course management - hit a conservative tee shot, lay up to your favorite wedge distance, and attack the pin with your most reliable scoring club. This strategy often produces better results than forcing a risky second shot at a small target. The key to success on this closing hole is matching your strategy to your strengths while recognizing that conservative play still offers excellent scoring potential when executed properly.

  4. Watch for

    • Mapped bunker (Crossing center) on the center side.
    • Mapped woods (Crossing center) on the center side.

The green on No. 9

Mapped boundary
Wide × deepyards
25×31
Areasq ft
4,114

Course coverage

Tournament and creator videos about Torrey Pines Golf Club (North Course) — shared course coverage, not hole-specific clips.

Featured by these creators

Creator videos about this course

YouTube creators who filmed or featured Torrey Pines Golf Club (North Course). · Stats as of yesterday (Nov 2, 2026)

Explore golf creators →

The Major Cut @ Torrey Pines (US Open)

Can We Make Major Cut @ Torrey Pines ?

Bryan Bros Golf1.7M views

Range work with Max Homa at Torrey Pines. #golf #cobragolf #maxhoma #torreypines

Ludvig Åberg wins Genesis Invitational at Torrey Pines | The Shotgun Start

Golfer feedback

How did Hole 9 play?

⚡ Quick Golfer Pulse

How did this hole play today?

1-tap anonymous vote

Frequently asked questions

Yardage reference: Championship tees · 548 yards.

Can this par 5 be reached in two?

↓

At 548 yards, A true three-shot hole for most players. Position your layup to leave a comfortable wedge distance.

How difficult is hole 9?

↓

This hole is a good scoring opportunity for most golfers. Key challenges include: small green.

How big is the green on hole 9?

↓

The green is small and requires precision. Expect challenging pin positions with limited room for error.