Hole 6 at La Costa Resort and Spa (South course)
- Par
- 3
- Yardage
- 170 yds
- Stroke index
- 15
- Hazards
- 8 bunkers · Water
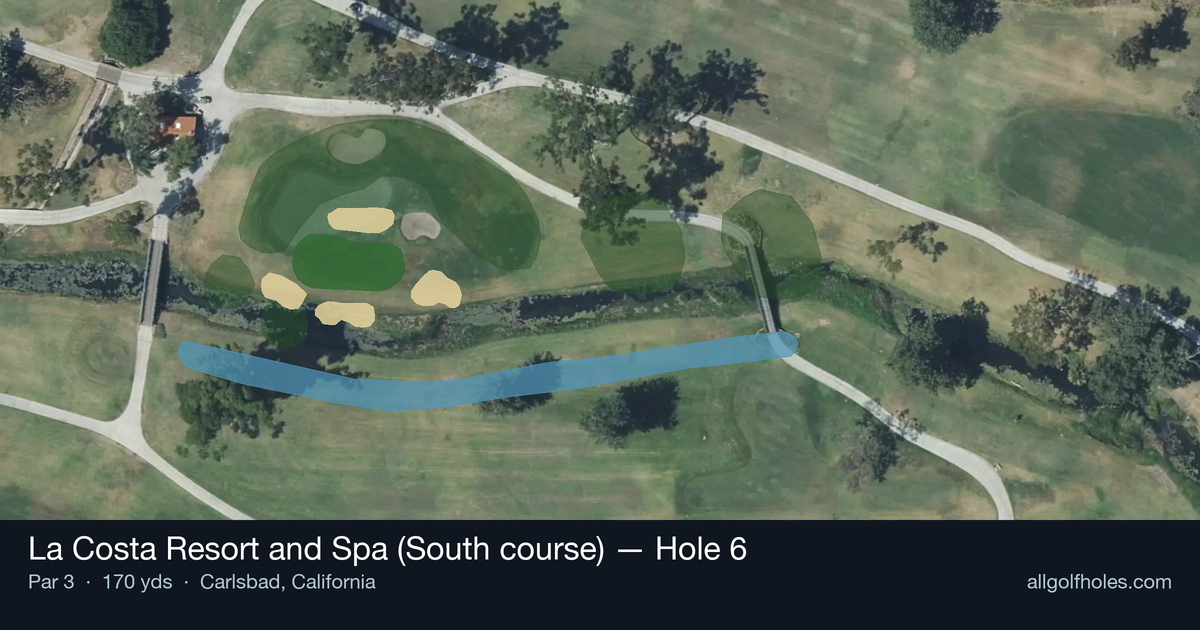
Aerial source not provided
Green size: 26 yds deep × 16 yds wide
Scorecard yardage is for Championship tees. The aerial shows its labeled reference position; distance rings measure to the green.
Championship tees · Par 3 · 170 yards
The plan for No. 6
La Costa Resort and Spa (South course) hole 6 presents a deceptively straightforward par 3 that demands precision over power. At 170 yards, this mid-iron challenge features a small, well-protected green that rewards accurate tee shots while punishing wayward attempts. The straight layout eliminates any guesswork about direction, placing the entire focus on distance control and green-finding accuracy. Without significant hazards to navigate, golfers might expect an easy scoring opportunity, but the compact target requires committed swings with proper club selection. This hole exemplifies strategic simplicity – pick your yardage, trust your swing, and execute. The small green complex ensures that even slight misses can leave challenging recovery shots, making this seemingly benign par 3 a true test of iron play precision at this renowned Carlsbad resort course.
Off the tee
Club selection is critical on this 170-yard test. Most players will be looking at a mid-iron (6 or 7-iron) to long-iron (4 or 5-iron) depending on conditions and personal distance. The key is committing to a club that will carry the distance comfortably - coming up short on a small green is a common mistake. Aim for the center of the green regardless of pin position, as the small target leaves little room for error. Take one more club than you think you need and make a smooth, controlled swing rather than forcing a shot.
Approach & recovery
Since this is a par 3, your tee shot IS your approach shot. Focus on landing the ball on the green rather than trying to get cute with pin hunting. The small green size means even a center-green shot will leave you with a reasonable putt. Pay attention to wind conditions, as they can significantly affect club selection on this length of shot. If there's any doubt between clubs, take the longer club and swing easier for better control.
On the green
With a small green, most putts will be relatively short, but don't underestimate the importance of speed control. Small greens often have subtle breaks that can be tricky to read. Take time to study the putt from both sides, as the shorter length means you should be aggressive with your line while maintaining good speed control. Focus on getting your first putt close rather than being overly aggressive with longer attempts. ## RISK VS REWARD The primary risk/reward decision comes with club selection and target choice. Playing aggressively to tucked pins on a small green increases the chance of missing the putting surface entirely. The reward for hitting it close is significant - birdie putts on a par 3 are always valuable. However, the conservative play of aiming for the center of the green, regardless of pin position, often yields the best scoring average over time. ## DIFFERENT SKILL LEVELS **High-handicap players** should focus entirely on finding the green. Choose a club you're confident will carry the distance and aim for the largest part of the green. Don't worry about pin position - any shot on the green gives you a chance at par or better. Practice your 170-yard club extensively on the range. **Low-handicap players** can be more aggressive with pin hunting, especially when the pin is in the center portion of the green. However, even skilled players should resist the temptation to attack extremely tucked pins on such a small target. The scoring opportunity here comes from solid course management and execution rather than heroic shots. Focus on your pre-shot routine and commit fully to your club selection and target line. This hole rewards patience and precision over aggression - treat it as a scoring opportunity by playing smart golf rather than trying to make something spectacular happen.
Watch for
- Course conditioning and mapped hazards may affect line selection; confirm from the aerial.
Hole 6 Green Complex
Mapped green boundary
Green size: 2,076 sq ft
How did Hole 6 play?
How did this hole play today?
Frequently asked questions
Yardage reference: Championship tees · 170 yards.
What club should I use on this par 3?
↓
At 170 yards, most golfers will need a mid-iron (7-iron to 8-iron) to reach this green. Adjust for elevation, wind, and pin position.
How difficult is hole 6?
↓
This hole is a good scoring opportunity for most golfers.
What's a good score on hole 6?
↓
This hole is a solid par with birdie chances for precise approach shots. Making par is a good result here. Focus on hitting the green and avoiding three-putts.