Hole 2 at La Costa Resort and Spa (South course)
- Par
- 4
- Yardage
- 357 yds
- Stroke index
- 13
- Hazards
- 8 bunkers · Water
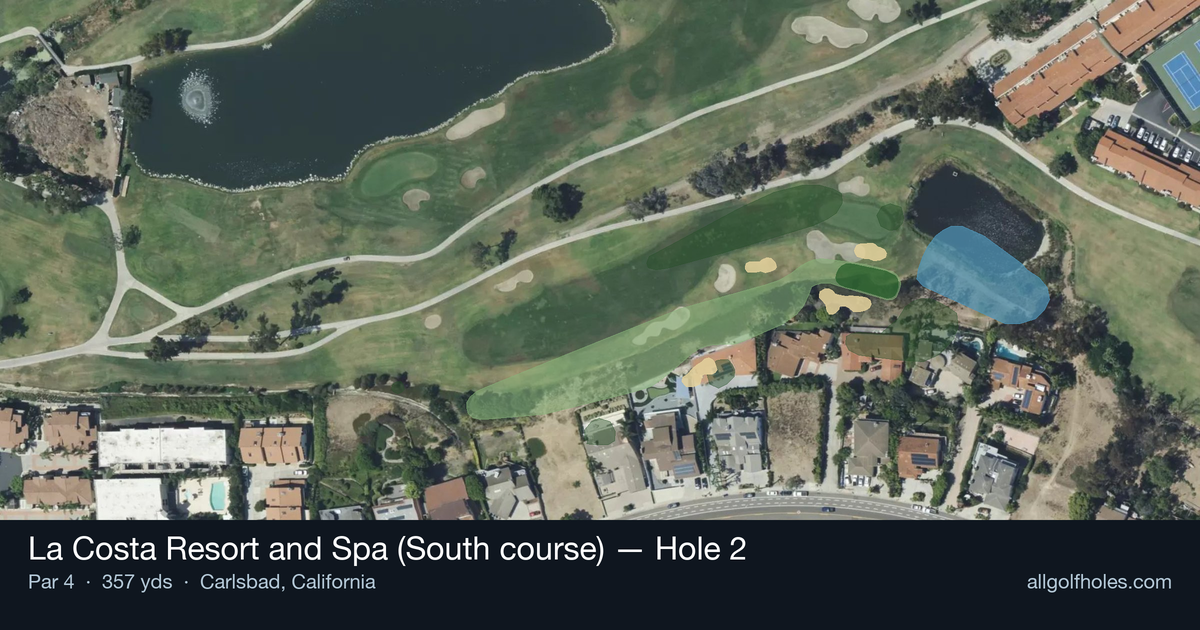
Aerial source not provided
Green size: 29 yds deep × 20 yds wide
Scorecard yardage is for Championship tees. The aerial shows its labeled reference position; distance rings measure to the green.
Championship tees · Par 4 · 357 yards
The plan for No. 2
The second hole at La Costa Resort and Spa (South course) presents a deceptively straightforward par 4 that demands precision over power. At 357 yards, this straight-away hole may appear generous from the tee, but the small green complex quickly reveals its true challenge. The absence of major hazards allows golfers to focus purely on execution and course management. A well-placed tee shot sets up a critical approach shot to a compact target that punishes wayward iron play. The green's modest size demands accurate distance control and proper club selection, making this seemingly benign hole a true test of fundamental golf skills. It's a hole where strategy trumps strength, rewarding thoughtful play over aggressive tactics.
Off the tee
The straight layout allows for multiple tee shot options depending on your comfort level and preferred approach distance. Longer hitters should consider throttling back to a 3-wood or hybrid to leave a full wedge or short iron into the green - this provides better distance control and spin for holding the small putting surface. Mid-handicap players can confidently use driver, aiming for the center of the fairway to leave themselves in the 100-130 yard range. The key target line runs down the middle of the hole, as the straight design doesn't favor either side of the fairway.
Approach & recovery
The small green size makes this approach shot the critical scoring moment. Club selection should prioritize accuracy and spin over distance - a full swing with a shorter iron typically provides better control than a finesse shot with a longer club. Aim for the center of the green regardless of pin position, as the compact putting surface makes any part of the green a reasonable result. Pay attention to wind conditions, as they'll have an outsized impact on a smaller target. Consider taking one extra club and making a smooth swing rather than forcing a shot.
On the green
While the green shape is unknown, small greens typically feature subtle breaks that can be deceptive. Focus on lag putting to avoid three-putts, as getting close to any pin position on a small green should leave manageable second putts. The compact size means most putts will be relatively straight, but don't underestimate the importance of reading the grain and slope carefully. Pin positions on small greens can create challenging up-and-down situations if you miss the putting surface. ## RISK VS REWARD This hole offers a clear risk/reward decision on the tee shot. The reward for laying back to ideal approach distance is significant - better distance control leads to more birdie opportunities on this scoring hole. The risk of being overly aggressive with driver is leaving yourself an awkward in-between distance where you might struggle with distance control into the small target. Given the handicap rating of 13, this hole expects to give up strokes to the field, making conservative strategy the smart play. ## DIFFERENT SKILL LEVELS **High-handicap players** should focus on finding the fairway with their most reliable tee shot option, even if it means laying up to a longer approach. The small green will challenge distance control, so prioritize hitting the putting surface over attacking pins. **Low-handicap players** can be more aggressive with their approach shots and target specific quadrants of the green based on pin position. They should also consider how this hole fits into their overall round strategy - it's an excellent opportunity to gain strokes on the field if played intelligently. Both skill levels benefit from conservative tee shot strategy that prioritizes optimal approach positioning over maximum distance.
Watch for
- Course conditioning and mapped hazards may affect line selection; confirm from the aerial.
Hole 2 Green Complex
Mapped green boundary
Green size: 2,402 sq ft
How did Hole 2 play?
How did this hole play today?
Frequently asked questions
Yardage reference: Championship tees · 357 yards.
What's the best strategy off the tee?
↓
For this 357-yard par 4, most players will hit 3-wood or driver to set up a comfortable approach.
How difficult is hole 2?
↓
This hole is a good scoring opportunity for most golfers.
What's a good score on hole 2?
↓
This hole is a medium-length test where par is a solid result. A straightforward par 4 where course management pays off.