Hole 7 at La Costa Resort and Spa (South course)
- Par
- 5
- Yardage
- 501 yds
- Stroke index
- 7
- Hazards
- 12 bunkers
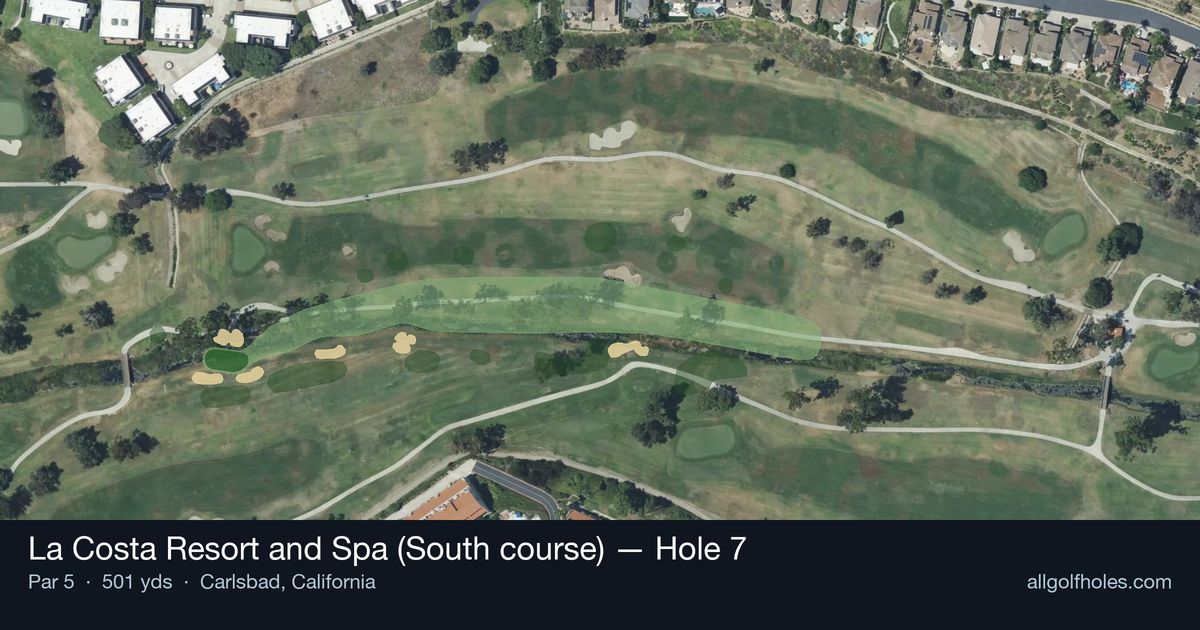
Aerial source not provided
Green size: 26 yds deep × 13 yds wide
Scorecard yardage is for Championship tees. The aerial shows its labeled reference position; distance rings measure to the green.
Championship tees · Par 5 · 501 yards
The plan for No. 7
The seventh hole at La Costa Resort and Spa (South course) presents a classic risk-reward par 5 that epitomizes strategic golf design. At 501 yards, this straight-away hole appears deceptively straightforward from the tee, but its true challenge lies in the precision required for scoring opportunities. The generous fairway welcomes aggressive tee shots, encouraging longer hitters to consider going for the green in two. However, the small, subtly contoured green demands pinpoint accuracy on approach shots, making club selection and distance control paramount. With minimal hazards to navigate, success hinges purely on execution and course management. This hole rewards bold play while punishing the overly ambitious, creating memorable moments for golfers seeking that elusive eagle or settling for a well-earned birdie.
Off the tee
Driver is the clear choice here for most players, as the absence of hazards allows you to unleash your longest club with confidence. Aim down the center of the fairway to maximize distance while maintaining the best angle for your second shot. The straight layout means there's no premium on working the ball either direction - pure distance and accuracy are your friends. Longer hitters should focus on finding the fairway rather than trying to bomb it, as position trumps pure distance when setting up scoring opportunities.
Approach & recovery
Your strategy on the approach depends entirely on your tee shot execution and personal capabilities. Strong players who've hit quality drives will face a decision: go for the small green in two or lay up to their favorite wedge distance. When going for it, target the center of the green regardless of pin position - the small putting surface makes precision essential, and the lack of hazards means a miss won't be severely penalized. For those laying up, position your ball about 80-100 yards from the green to ensure a comfortable wedge shot with full swing rhythm.
On the green
The small green size makes lag putting crucial - getting your first putt close is more important than being aggressive with longer putts. Focus on speed control and reading the subtle breaks that characterize most greens at La Costa. Pin position will significantly impact your putting strategy given the limited real estate, so pay attention to where the flag is positioned during your approach planning. ## RISK VS REWARD This hole offers one of the clearest risk/reward scenarios you'll find. Going for the green in two provides an excellent eagle opportunity with minimal downside risk due to the lack of hazards. The reward clearly outweighs the risk for players with the distance and accuracy to reach the putting surface. Even a missed attempt at going for it in two typically leaves a manageable pitch shot. ## DIFFERENT SKILL LEVELS **Low Handicappers:** Aggressive play is recommended. Go for the green in two whenever you have a reasonable chance, focusing on the center of the putting surface. This is a hole where you should expect to make birdie and have a legitimate chance at eagle. **High Handicappers:** Take advantage of the hazard-free layout by playing aggressively within your capabilities. Even if you can't reach in two, a solid drive followed by a well-positioned layup sets up an excellent birdie opportunity with a short iron to the green. Don't let the small green intimidate you - focus on smooth swings and commit to your club selections. The key for all players is recognizing this as a scoring hole and adjusting expectations accordingly. Par should feel disappointing here, while birdie represents a solid score that keeps you competitive on La Costa's challenging South course.
Watch for
- Course conditioning and mapped hazards may affect line selection; confirm from the aerial.
Hole 7 Green Complex
Mapped green boundary
Green size: 2,001 sq ft
How did Hole 7 play?
How did this hole play today?
Frequently asked questions
Yardage reference: Championship tees · 501 yards.
Can this par 5 be reached in two?
↓
At 501 yards, Reachable in two for longer hitters. Consider laying up short of hazards if going for it is risky.
How difficult is hole 7?
↓
This hole is a good scoring opportunity for most golfers.
What's a good score on hole 7?
↓
This hole is a solid birdie opportunity with smart layup strategy. Most golfers can reach in three. Position your layup to leave a comfortable wedge.