Hole 6 at Aviara Golf Club at Four Seasons Resort
- Par
- 3
- Yardage
- 195 yds
- Stroke index
- 11
- Hazards
- 2 bunkers
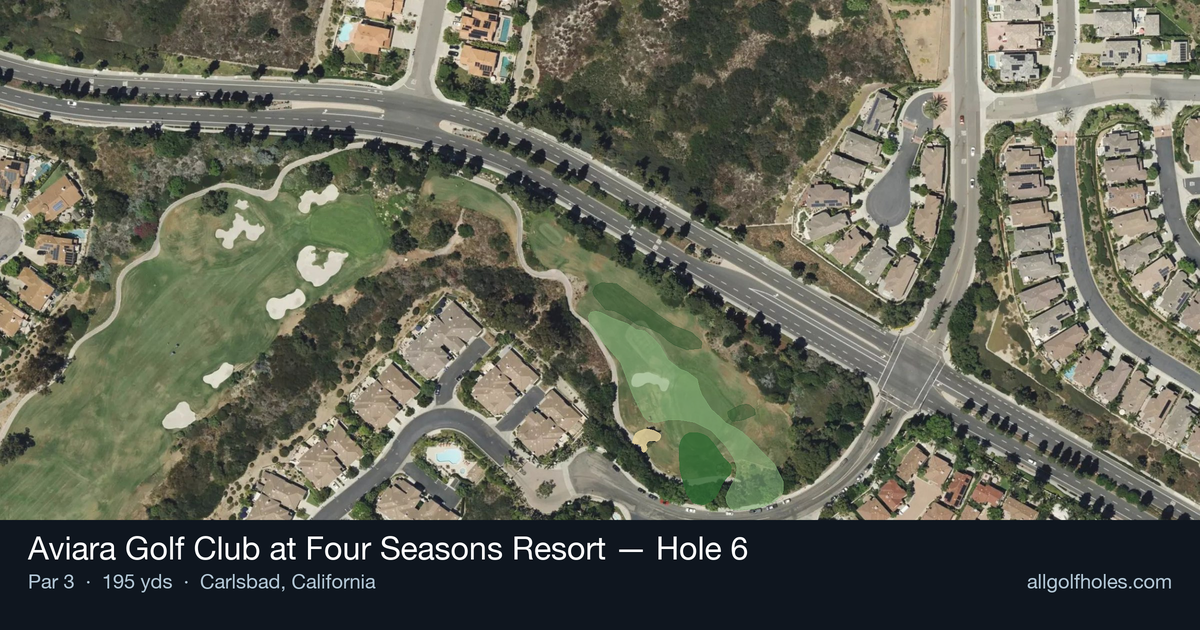
Aerial source not provided
Green size: 37 yds deep × 34 yds wide
Scorecard yardage is for Championship tees. The aerial shows its labeled reference position; distance rings measure to the green.
Championship tees · Par 3 · 195 yards
The plan for No. 6
The sixth hole at Aviara Golf Club at Four Seasons Resort presents a deceptively challenging par 3 that demands precision over the 195-yard carry. This mid-length one-shotter features a straight shot to a small, well-protected green that rewards accurate iron play while punishing wayward attempts. Despite the absence of major water hazards or bunkers, the compact target and elevated positioning create an intimidating visual that tests even confident ball-strikers. The ocean breeze off the nearby Pacific adds another strategic element, often requiring club adjustments throughout the round. What makes this hole memorable is its pure, honest test of accuracy – no tricks or gimmicks, just a premium tee shot to a demanding green complex that separates the precise from the hopeful.
Off the tee
From the tee, focus on smooth tempo and solid contact rather than trying to overpower the shot. Club selection is critical - take one extra club and make a controlled swing rather than forcing a shorter iron. Aim for the center of the green regardless of pin position, as the small putting surface makes any part of the green a successful outcome. Consider wind conditions carefully, as they can significantly impact club selection on this length of shot. The straight layout removes any concern about course routing, allowing full focus on execution.
Approach & recovery
Since this is a par 3, your tee shot IS your approach shot. The key is committing to your yardage and club selection. With a small green, precision is more valuable than trying to get cute with pin positions. Favor the middle of the green and let your putting take care of the rest. If the pin is tucked in a corner, resist the temptation to fire directly at it - the margin for error is too small.
On the green
The small green size means most putts will be relatively short, but don't underestimate the importance of green reading. Study the slope and grain carefully, as even short putts can be tricky on undulating surfaces. Focus on getting your first putt close rather than trying to hole everything. Two-putt pars are excellent scores on demanding par 3s like this. ## RISK VS REWARD This hole offers minimal risk/reward decisions since there are no significant hazards to challenge. The primary risk comes from being overly aggressive with pin positions or club selection. The reward for conservative play - aiming center green with proper club selection - is consistently solid scoring opportunities. ## DIFFERENT SKILL LEVELS **High Handicappers:** Take the guesswork out of club selection by choosing one extra club and making a smooth swing. Aim for the biggest part of the green and don't worry about pin positions. Focus on making solid contact and getting the ball somewhere on the putting surface. **Low Handicappers:** While you have the skill to attack pins, respect the small green size. Consider pin position only if you're hitting the ball particularly well that day. Use your course management skills to assess conditions (wind, pin position, your current ball-striking) before deciding how aggressive to be. This is a hole where patience often leads to better scoring than aggression. The handicap rating of 11 suggests this isn't the most difficult hole on the course, making it a prime scoring opportunity for players who execute smart, conservative strategy rather than trying to force birdies.
Watch for
- Course conditioning and mapped hazards may affect line selection; confirm from the aerial.
Hole 6 Green Complex
Mapped green boundary
Green size: 6,244 sq ft
How did Hole 6 play?
How did this hole play today?
Frequently asked questions
Yardage reference: Championship tees · 195 yards.
What club should I use on this par 3?
↓
At 195 yards, most golfers will need a long iron or hybrid (5-iron to 6-iron) to reach this green. Adjust for elevation, wind, and pin position.
How difficult is hole 6?
↓
This hole is a good scoring opportunity for most golfers.
How big is the green on hole 6?
↓
The green is fairly large with multiple pin positions. The green is deeper than wide, so club selection is crucial. Lag putting becomes important on longer putts.