Hole 1 at Blackwolf Run Golf Course
- Par
- 4
- Yardage
- 392 yds
- Stroke index
- 7
- Hazards
- 5 bunkers · Water
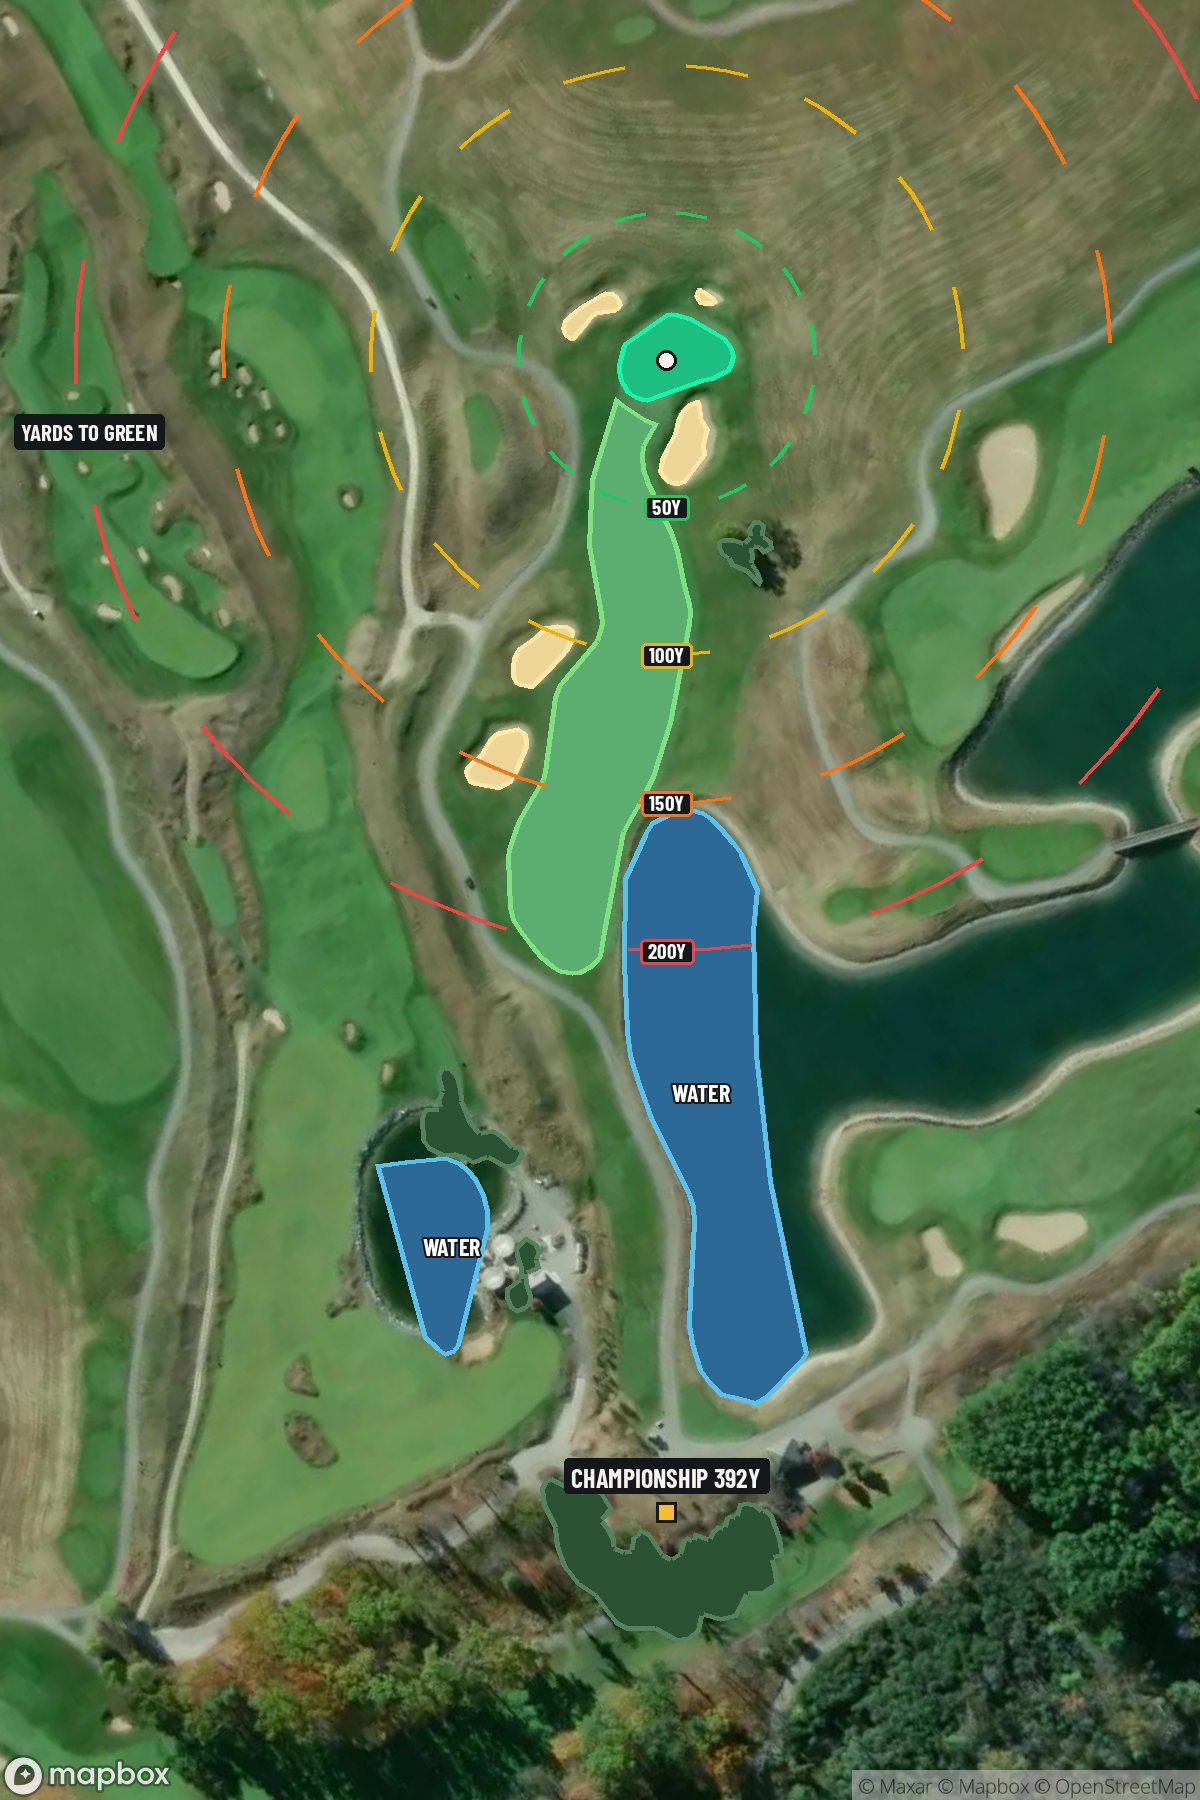 Hole 1 map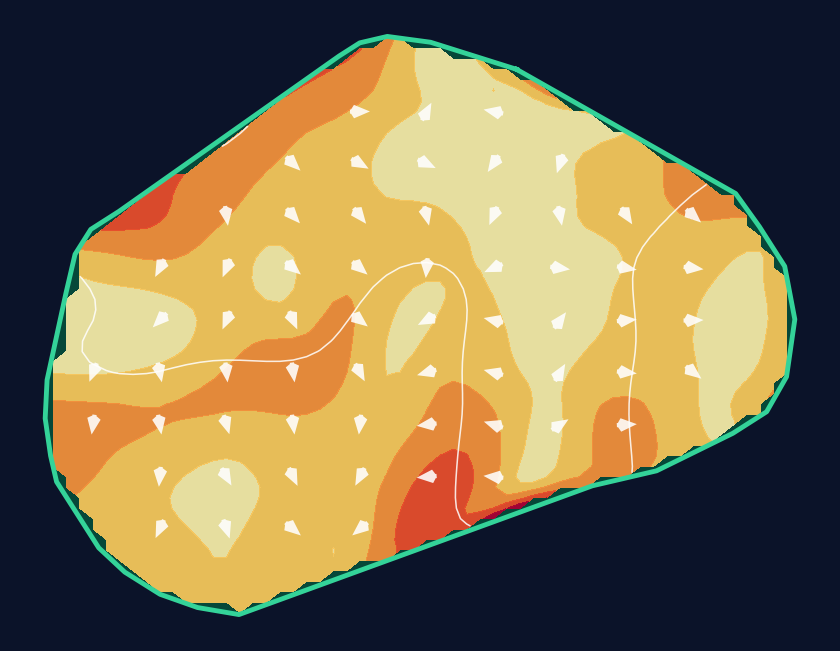
40 yd wide × 31 yd deep · 2 ft total elevation range
Light = gentler slope · Red = steeper slope
White lines: 1 foot of elevation. Arrows: downhill. General terrain, not a pin read.
Approach from bottom
Contour source
USGS 1 Meter 16 x43y485 WI_Oshkosh_3Rivers_2018_D19 · collection 2019
Map source & reference
Mapbox Satellite composite · capture date not provided. Green at the top; the labeled map reference is below.
Scorecard yardage is for Championship tees. The aerial shows its labeled reference position; distance rings measure to the green.
Championship tees · Par 4 · 392 yards
The plan for No. 1
The opening hole at Blackwolf Run Golf Course sets the tone for Pete Dye's masterful design, welcoming players with a deceptively straightforward 392-yard par 4 that embodies the course's "subtle and devilish" character. This strategic opener demands precision over power, with a generous fairway that encourages an aggressive tee shot but rewards thoughtful placement. The approach shot to the small green requires careful club selection and accurate distance control, as Pete Dye's signature design elements become immediately apparent. Without significant hazards to intimidate, this hole relies on its understated challenge and pristine conditioning to test golfers of all abilities. It's an elegant introduction to one of Wisconsin's premier championship venues, where every shot matters from the very first swing.
Off the tee
The tee shot strategy centers on finding the optimal position in the landing zone, typically around 250 yards out for longer hitters. Driver isn't automatically the right choice here - consider a 3-wood or hybrid to ensure you stay in the preferred landing area. The straight layout allows you to aim down the center, but pay attention to any subtle fairway contours that might influence ball position. Pete Dye's design philosophy often includes hidden undulations that can kick balls into less favorable positions, so focus on a smooth, controlled swing rather than maximum distance.
Approach & recovery
The approach shot is where this hole reveals its true character. With a small green as your target, precision trumps power in your club selection. Depending on your tee shot position, you'll likely face a short to mid-iron approach. The key is committing to your yardage and trusting your swing - small greens punish indecisive shots. Study the pin position carefully, as different quadrants of the green may offer varying levels of difficulty. Aim for the center of the green unless you're confident in your iron play and the pin position offers a clear scoring opportunity.
On the green
The small green demands respect with your putter. While specific break patterns aren't detailed, Pete Dye greens typically feature subtle slopes that can fool the eye. Take extra time reading your putts, especially from longer distances where the smaller target makes lag putting crucial. Focus on getting your first putt close rather than being overly aggressive - two-putting from anywhere on this green represents solid course management. ## RISK VS REWARD This opening hole presents a classic risk/reward decision in club selection off the tee. The reward for an aggressive driver that finds the fairway is a shorter iron into the green, but the risk of missing the landing zone can leave you with a more challenging angle or lie. The conservative play of a fairway wood or hybrid reduces risk while still leaving a manageable approach shot. Given that it's the first hole, starting with a conservative strategy can build confidence for the challenges ahead. ## DIFFERENT SKILL LEVELS **High-Handicap Players:** Focus on finding the fairway with whatever club gives you the most confidence - often a 3-wood or hybrid. Aim for the center of the green regardless of pin position, and prioritize two-putting over aggressive putting. This hole rewards patience and smart course management over heroic shots. **Low-Handicap Players:** You can be more aggressive with driver if you're confident in your accuracy, but still respect the small green on approach. Consider pin position more heavily in your approach strategy, and don't be afraid to attack certain pin positions if you've positioned yourself well from the tee. Use this hole to establish rhythm and confidence for the more challenging holes ahead. The first hole at Blackwolf Run exemplifies Pete Dye's ability to create strategic interest without overwhelming hazards. Success here comes from understanding that even "simple" holes demand respect and thoughtful execution - a lesson that will serve you well throughout your round on this championship-caliber course.
Watch for
- Course conditioning and mapped hazards may affect line selection; confirm from the aerial.
Hole 1 Green Complex & Slope
USGS 3DEP terrain analysis
Green size: 6,970 sq ft
How did Hole 1 play?
How did this hole play today?
Frequently asked questions
Yardage reference: Championship tees · 392 yards.
What's the best strategy off the tee?
↓
For this 392-yard par 4, most players will hit driver to set up a comfortable approach.
How difficult is hole 1?
↓
This hole is a moderate challenge for most golfers. Key challenges include: water in play, heavily bunkered.
How big is the green on hole 1?
↓
The green is fairly large with multiple pin positions. The green is wider than it is deep, rewarding shots that find the correct tier. Lag putting becomes important on longer putts.
Which side of the fairway is safer on hole 1?
↓
Aim for the right side of the fairway when possible. Missing left (water) brings more trouble into play.
What's a good score on hole 1?
↓
This hole is a medium-length test where par is a solid result. A straightforward par 4 where course management pays off.