Hole 2 at Muirfield Village Golf Club
- Par
- 4
- Yardage
- 459 yds
- Stroke index
- 3
- Hazards
- 2 bunkers · Water
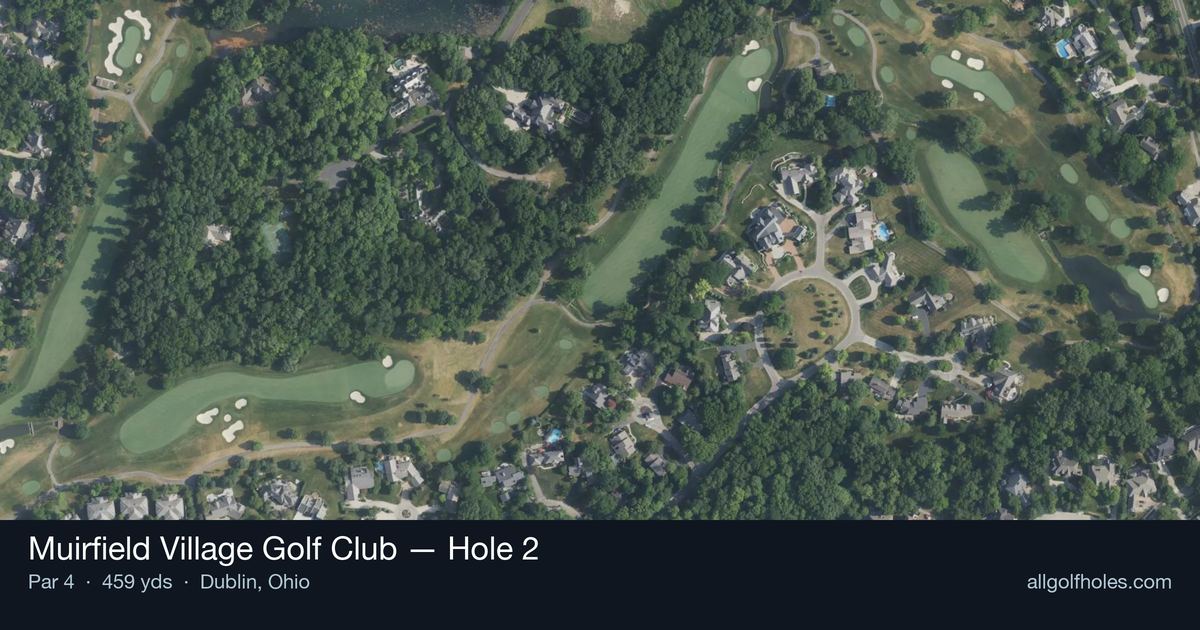
Aerial source not provided
Green size: 32 yds deep × 22 yds wide
Scorecard yardage is for Championship tees. The aerial shows its labeled reference position; distance rings measure to the green.
Championship tees · Par 4 · 459 yards
The plan for No. 2
Muirfield Village Golf Club hole 2 exemplifies Jack Nicklaus's strategic design philosophy at his signature Dublin, Ohio masterpiece. This deceptive 459-yard par 4 demands precision from the championship tees, where the Golden Bear's architectural brilliance becomes immediately apparent. The straight layout may appear straightforward, but the small green complex creates the hole's defining challenge. Players must navigate a generous fairway with their tee shot, setting up a demanding approach to a target that offers little margin for error. The compact putting surface requires pinpoint accuracy with mid-irons, rewarding those who can execute under pressure. This early test at "Jack's Place" sets the tone for the championship-caliber round ahead, showcasing why Muirfield Village has hosted the Memorial Tournament since 1976.
Off the tee
The tee shot strategy centers on finding the optimal position for your approach shot rather than maximizing distance. With a straight layout and no significant hazards, the primary focus should be on hitting the center of the fairway. Most players will benefit from a controlled driver or strong 3-wood, aiming for the middle of the landing zone around 250-280 yards out. The key is avoiding any rough that could complicate club selection and ball striking on the approach. Given the hole's length, maintaining good lie quality is crucial for reaching the small green in regulation.
Approach & recovery
The approach shot represents the hole's greatest challenge, with the small green demanding pinpoint accuracy. Depending on your tee shot position, you'll likely face a mid-iron to long-iron into this target. The key strategic consideration is club selection - it's better to be slightly long than short, as recovery shots from behind the green are typically easier than those from the front. Focus on the center of the green regardless of pin position, as the small target leaves little margin for error. Wind conditions become particularly important here, as they can significantly affect club selection on this longer approach.
On the green
The small green at the 2nd hole requires careful attention to speed control and read accuracy. With limited real estate, lag putting becomes essential - aggressive putting can easily lead to three-putts if the ball rolls off the green surface. Focus on getting your first putt within a comfortable two-putt range rather than hunting pins. The green's smaller size means that subtle breaks can have more pronounced effects on ball movement, so take extra time to read the terrain carefully. ## RISK VS REWARD This hole offers a more subtle risk/reward proposition compared to holes with obvious hazards. The primary decision point comes with tee shot club selection - aggressive drivers may provide shorter approach shots but risk finding rough or difficult lies. The reward for finding the fairway with a controlled tee shot is a clean lie for the crucial approach shot. Conservative play typically yields better scoring opportunities than aggressive tactics on this demanding par 4. ## DIFFERENT SKILL LEVELS **High-Handicap Players:** Focus on two solid shots rather than trying to overpower the hole. Consider a fairway wood or hybrid off the tee to ensure fairway position, then play a conservative approach to the center of the green. Accept bogey as a reasonable score and avoid the big numbers that can come from missed greens and difficult recoveries. **Low-Handicap Players:** This hole rewards precision and course management skills. Use driver confidence to create shorter approach shots, but maintain focus on fairway accuracy. Attack pins only when conditions and lie quality support aggressive play. The small green rewards those who can consistently hit their target lines with mid to long irons. The 2nd hole at Muirfield Village demonstrates why Jack Nicklaus's design philosophy has stood the test of time. Success here comes from strategic thinking, precise execution, and understanding that sometimes the most challenging holes are those that appear straightforward.
Hole 2 Green Complex
Mapped green boundary
Green size: 3,943 sq ft
Course and tournament history
Historical context for the course and venue. Each entry identifies the event or course it describes.
2013 · Jack Nicklaus
(2013) Muirfield Village was the brainchild of Jack Nicklaus, earning its nickname of "Jack's Place"
Source →
Course coverage
Tournament and creator videos about Muirfield Village Golf Club — shared course coverage, not hole-specific clips.
Tournament coverage
The Memorial Tournament highlights
the Memorial Tournament | Final Round Highlights
2025
How did Hole 2 play?
How did this hole play today?
Frequently asked questions
Yardage reference: Championship tees · 459 yards.
What's the best strategy off the tee?
↓
For this 459-yard par 4, most players will hit driver to set up a comfortable approach.
How difficult is hole 2?
↓
This hole is one of the tougher holes on the course for most golfers. Key challenges include: long par 4, water in play, small green.
What hazards should I watch out for on hole 2?
↓
Key hazards include: 2 greenside bunkers; water at 227.5 yards. Plan your shots to avoid these trouble spots.
How big is the green on hole 2?
↓
The green is small and requires precision. Expect challenging pin positions with limited room for error.
What's a good score on hole 2?
↓
This hole is one of the tougher holes where par feels like birdie. A challenging par 4. Accept that bogey happens and avoid big numbers.