Hole 4 at Valhalla Golf Club
- Par
- 4
- Yardage
- 375 yds
- Hazards
- 5 bunkers
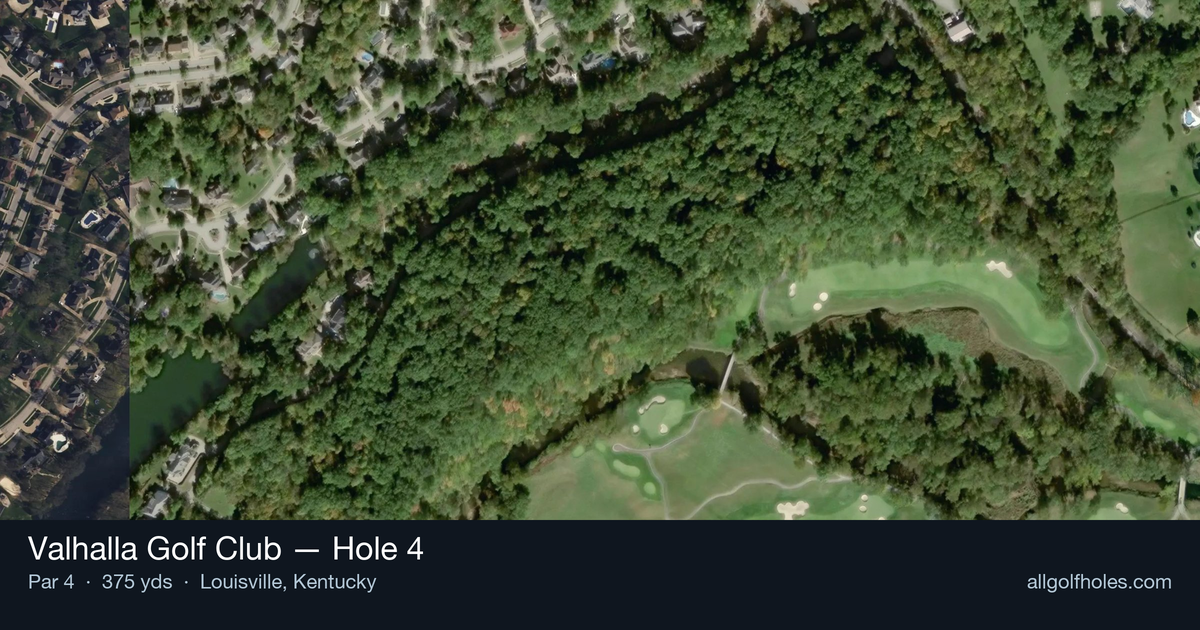
Aerial source not provided
Green size: 31 yds deep × 30 yds wide
Scorecard yardage is for Championship tees. The aerial shows its labeled reference position; distance rings measure to the green.
Championship tees · Par 4 · 375 yards
The plan for No. 4
Valhalla Golf Club hole 4 presents a deceptively challenging 375-yard par 4 that demands both precision and course management from the championship tees. This straight-away layout may appear straightforward, but its status as the #1 handicap hole reveals the true test that awaits. The tee shot requires careful positioning on a generous fairway that gradually narrows toward the landing area, setting up the critical approach shot to a small, well-defended green complex. Without significant water hazards or bunkers dominating the landscape, this hole relies on subtle undulations and strategic pin positions to challenge even the most skilled players. The compact green demands pinpoint accuracy with approach shots, as missing the putting surface often leaves difficult recovery shots. At Valhalla, where major championships have been decided, hole 4 exemplifies how strategic design and precise execution matter more than raw distance, making it a true test of golf strategy and mental fortitude.
Off the tee
Your tee shot strategy should focus on finding the optimal position for your approach rather than maximizing distance. Most players will benefit from a controlled swing with a fairway wood or long iron, targeting the center-left portion of the fairway to open up the best angle to the green. The straight layout allows for aggressive positioning, but resist the urge to overswing - smooth tempo and solid contact will serve you better than extra yards. Consider leaving yourself a full wedge or short iron rather than an awkward half-shot distance.
Approach & recovery
The small green demands pinpoint accuracy on your approach shot. With no major hazards protecting the green, you can be more aggressive with your target line, but the compact putting surface leaves little margin for error. Focus on hitting the center of the green unless the pin position clearly favors one side. A mid-iron to short-iron approach should give you excellent control, allowing you to flight the ball appropriately for the conditions. Pay attention to any subtle slopes or tiers on the green that might affect your ball's reaction upon landing.
On the green
The small green size means every putt becomes crucial for scoring. Study the green carefully during your approach to identify any subtle breaks or slopes that might not be immediately apparent. With limited real estate, lag putting becomes essential - focus on getting your first putt close rather than being overly aggressive. Pin positions near the edges of this compact green can create challenging angles, so adjust your putting strategy accordingly. ## RISK VS REWARD This hole offers excellent birdie opportunities for players who execute solid fundamentals. The absence of major hazards allows for confident, committed swings on both tee shot and approach. However, the small green can punish loose approach shots, potentially leading to difficult up-and-downs. The reward clearly outweighs the risk when you commit to precise execution rather than trying to overpower the hole. ## DIFFERENT SKILL LEVELS **High-Handicap Players:** Focus on finding the fairway with your most reliable club, even if it means hitting a hybrid or long iron off the tee. Leave yourself a comfortable full-swing approach distance rather than trying to get too close. Aim for the center of the green regardless of pin position and prioritize two-putting for par. **Low-Handicap Players:** This hole should be a prime birdie opportunity. Consider driver if you can control it well, as the extra distance will leave a scoring club in your hands. Be more aggressive with pin hunting on your approach, especially when the pin is accessible. Use your short game skills around the green to save par when approach shots miss their mark. The 4th hole at Valhalla exemplifies how shorter par 4s can still challenge golfers through precision requirements rather than length. Smart course management and commitment to your chosen strategy will yield the best results on this scoring opportunity.
Watch for
- Sand 1 (crossing) influences line and recovery options.
- Sand 2 (crossing) influences line and recovery options.
- Sand 3 (greenside) influences line and recovery options.
- Sand 4 (greenside) influences line and recovery options.
- Sand 5 (greenside) influences line and recovery options.
Hole 4 Green Complex
Mapped green boundary
Green size: 4,556 sq ft
Course coverage
Tournament and creator videos about Valhalla Golf Club — shared course coverage, not hole-specific clips.
Featured by these creators
Creator videos about this course
YouTube creators who filmed or featured Valhalla Golf Club. · Stats as of Oct 12, 2026 · 5d ago
Can We Make Cut @ Valhalla?! (2024 PGA Championship)
Ride along while I analyze the front nine of Valhalla for the 2024 PGA Championship
How did Hole 4 play?
How did this hole play today?
Frequently asked questions
Yardage reference: Championship tees · 375 yards.
What's the best strategy off the tee?
↓
For this 375-yard par 4, most players will hit 3-wood or driver to set up a comfortable approach.
How difficult is hole 4?
↓
This hole is a good scoring opportunity for most golfers. Key challenges include: heavily bunkered.
How big is the green on hole 4?
↓
The green is medium-sized with moderate targets. Pay attention to pin placement when selecting your approach club.
What's a good score on hole 4?
↓
This hole is a medium-length test where par is a solid result. A straightforward par 4 where course management pays off.