Hole 14 at Valhalla Golf Club
- Par
- 3
- Yardage
- 220 yds
- Hazards
- 3 bunkers · Water
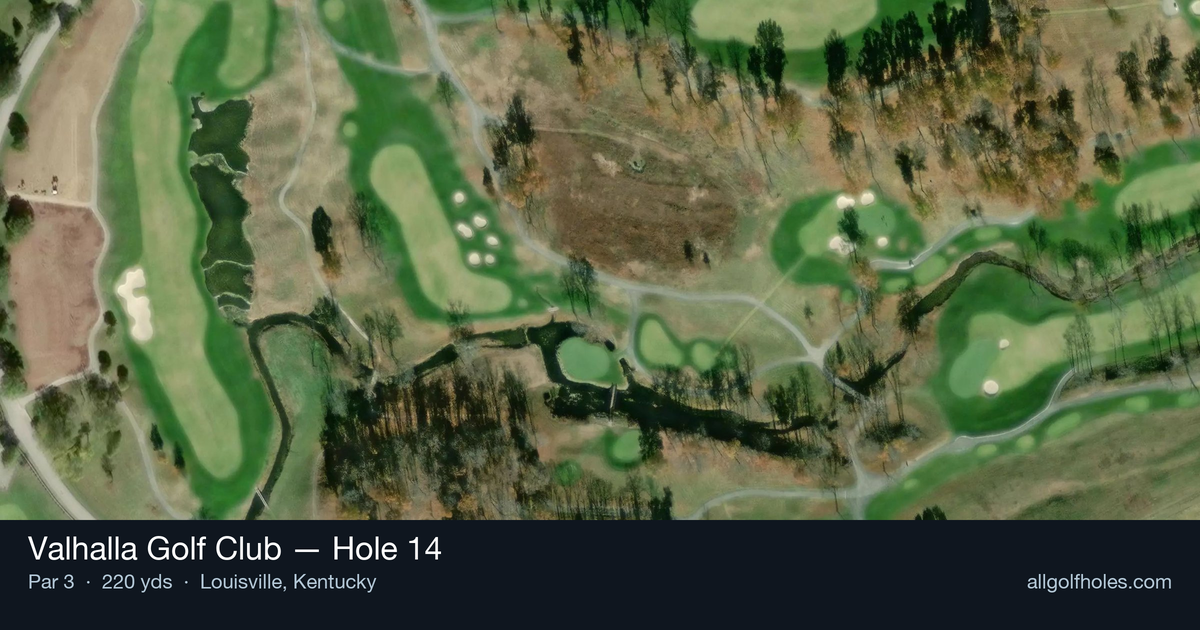
Aerial source not provided
Green size: 34 yds deep × 28 yds wide
Scorecard yardage is for Championship tees. The aerial shows its labeled reference position; distance rings measure to the green.
Championship tees · Par 3 · 220 yards
The plan for No. 14
Valhalla Golf Club hole 14 presents a formidable par 3 challenge at 220 yards, demanding precision and power from the championship tees. This lengthy one-shotter epitomizes the quality design that has made Valhalla a perennial host of major championships, including multiple PGA Championships. The tee shot requires a committed swing with a long iron or hybrid to reach the small, well-protected green complex. Without significant hazards cluttering the landscape, the primary defense lies in the hole's length and the premium it places on distance control to the compact putting surface. The straightforward layout may appear deceptively simple, but the combination of yardage and target size creates a stern test that separates skilled ball-strikers from the field, making par a satisfying achievement.
Off the tee
Your tee shot strategy revolves around club selection and target commitment. In calm conditions, most golfers will need anything from a 4-iron to a hybrid depending on their distance. Factor in wind conditions carefully - this length of shot amplifies any breeze significantly. Aim for the center of the green regardless of pin position, as the small target leaves little margin for error. Take one more club than you think you need and make a smooth, committed swing. The worst miss here is coming up short, so err on the side of taking enough club to reach the back of the green.
Approach & recovery
Since this is a par 3, your tee shot IS your approach shot. The key is reading the conditions properly - wind direction and strength will dramatically affect club selection on a shot this long. Check the flag movement and feel the wind on your face before making your final club decision. With the small green, precision trumps power. Focus on making solid contact and trusting your yardage rather than trying to muscle the ball to the hole. A smooth tempo with proper club selection will serve you better than forcing a shorter iron.
On the green
The small green means you'll likely face longer putts even with good approach shots. Read the green carefully, as subtle breaks become more pronounced over longer distances. Speed control is crucial - getting your first putt close is more important than being aggressive toward the hole. Pay attention to grain direction and any slope, as these factors are magnified on longer putts. When the pin is in a challenging position, aim for the fat part of the green and take your two-putt par. ## RISK VS REWARD This hole offers little in terms of risk/reward decisions - it's purely about execution. The reward comes from making solid contact and finding the green, while the risk lies in any miss that leaves you with a difficult recovery. There's no benefit to being overly aggressive here; par is always a good score on a hole with this difficulty rating. ## DIFFERENT SKILL LEVELS **High-Handicap Players:** Take plenty of club and aim for the center of the green every time. Don't worry about pin positions - just focus on finding the putting surface. A bogey here isn't the end of the world given the hole's difficulty. **Low-Handicap Players:** You can be more aggressive with pin hunting, but still respect the small target. Use your course management skills to identify when to attack certain pin positions versus when to play safe to the center. Your superior ball-striking gives you more options, but discipline remains key. **All Players:** Remember that this is the hardest hole on the course for a reason. Making par here is a victory, and there's no shame in playing conservatively to avoid big numbers. Stay committed to your club selection and trust your swing - indecision is your biggest enemy on demanding par 3s like this one.
Watch for
- Sand 1 (greenside) influences line and recovery options.
- Sand 2 (greenside) influences line and recovery options.
- Sand 3 (greenside) influences line and recovery options.
- Water (tee) influences line and recovery options.
- Woods 1 (greenside) influences line and recovery options.
- Woods 2 (tee) influences line and recovery options.
- Woods 3 (tee) influences line and recovery options.
- Woods 4 (tee) influences line and recovery options.
Hole 14 Green Complex
Mapped green boundary
Green size: 4,257 sq ft
Course coverage
Tournament and creator videos about Valhalla Golf Club — shared course coverage, not hole-specific clips.
Featured by these creators
Creator videos about this course
YouTube creators who filmed or featured Valhalla Golf Club. · Stats as of Oct 12, 2026 · 6d ago
Can We Make Cut @ Valhalla?! (2024 PGA Championship)
Ride along while I analyze the front nine of Valhalla for the 2024 PGA Championship
How did Hole 14 play?
How did this hole play today?
Frequently asked questions
Yardage reference: Championship tees · 220 yards.
What club should I use on this par 3?
↓
At 220 yards, most golfers will need a fairway wood or hybrid to reach this green. Adjust for elevation, wind, and pin position.
How difficult is hole 14?
↓
This hole is one of the tougher holes on the course for most golfers. Key challenges include: long par 3, water in play, small green.
What hazards should I watch out for on hole 14?
↓
Key hazards include: 3 greenside bunkers; water at 42.2 yards. Plan your shots to avoid these trouble spots.
How big is the green on hole 14?
↓
The green is small and requires precision. The green is wider than it is deep, rewarding shots that find the correct tier. Expect challenging pin positions with limited room for error.
What's a good score on hole 14?
↓
This hole is a challenging par where bogey is acceptable. This longer par 3 will test your long iron or hybrid game. Par is a good score.