Hole 7 at Wilshire Country Club
- Par
- 3
- Yardage
- 142 yds
- Stroke index
- 17
- Hazards
- 7 bunkers · Water
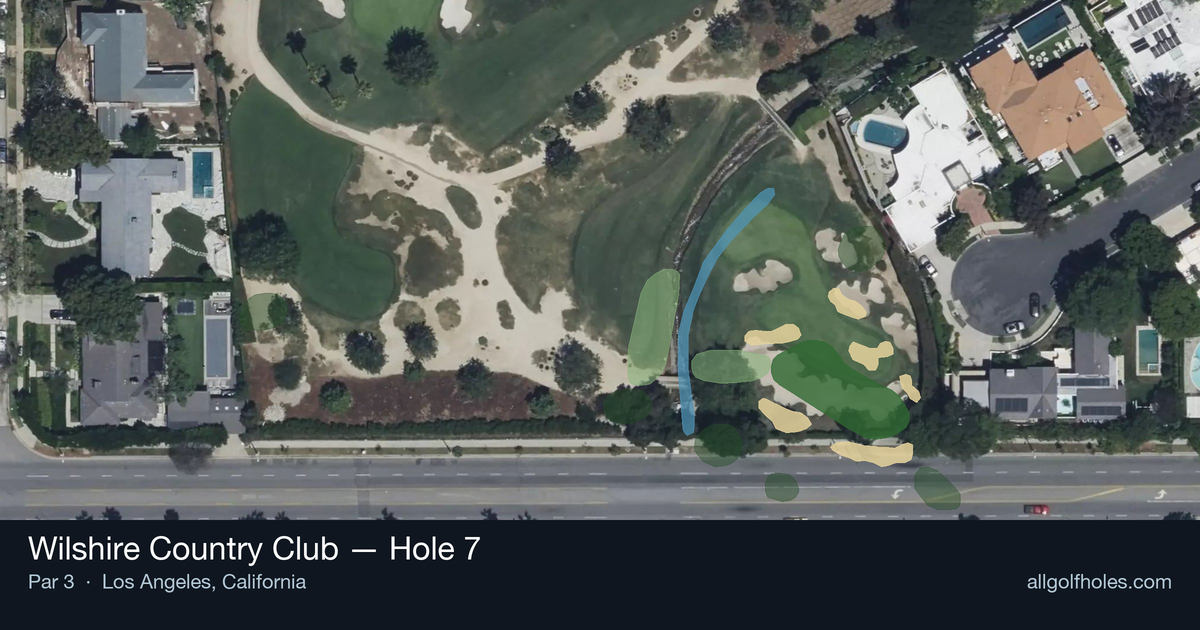
Aerial source not provided
Green size: 34 yds deep × 18 yds wide
Scorecard yardage is for Pro tees. The aerial shows its labeled reference position; distance rings measure to the green.
Pro tees · Par 3 · 142 yards
The plan for No. 7
Wilshire Country Club's 7th hole presents a deceptively challenging par 3 that demands precision over power. At 142 yards, this short iron test features a small, elevated green that rewards accurate tee shots while punishing wayward approaches. The hole's straightforward layout might seem benign, but the compact target requires golfers to commit fully to their club selection and swing. With minimal hazards to distract, the mental challenge becomes paramount—there's nowhere to hide a poorly struck shot. The green's intimate size means even slight misses can leave difficult recovery shots, making this the type of hole where par feels like a victory and birdie opportunities must be seized decisively.
Off the tee
Your primary objective is selecting the correct iron and committing to a smooth, controlled swing. Most players will be choosing between a 7-iron and 9-iron depending on conditions, pin position, and personal carry distances. Aim for the center of the green regardless of pin placement - the small target makes aggressive pin-hunting risky. Take one extra club if there's any doubt, as being long is typically preferable to coming up short on most par 3s. Pay careful attention to wind conditions, as even a slight breeze can significantly affect a mid-iron shot over this distance.
Approach & recovery
Since this is a par 3, your tee shot IS your approach shot. Focus on creating a high, soft landing trajectory that will hold the small green surface. Visualize the ball landing in the center of the green with minimal roll. If the pin is tucked to one side, resist the urge to fire directly at it - instead, play to the fat part of the green and rely on your putting to create birdie opportunities.
On the green
With a small green, most putts will be relatively short, making this an excellent opportunity to be aggressive with your putting stroke. Study the overall slope and grain direction during your approach to the green. Two-putt pars should be routine from anywhere on this surface, while birdie putts will often be makeable. Don't leave birdie attempts short - the hole's handicap ranking suggests that taking advantage of scoring opportunities here is crucial for your overall round. ## RISK VS REWARD The primary risk/reward decision centers on club selection and target choice. The reward of attacking pins close to green edges must be weighed against the penalty of missing the small target entirely. Conservative play to the center offers high percentage pars with birdie potential, while aggressive pin-seeking increases both birdie chances and bogey risk. Given the hole's accessibility, most players should lean toward the aggressive side while maintaining smart course management. ## DIFFERENT SKILL LEVELS **High-Handicap Players:** Focus entirely on finding the green with whatever club gives you confidence. Don't worry about pin positions - aim for the biggest part of the green and celebrate any result on the putting surface. Take an extra club if uncertain, and make a smooth, controlled swing rather than trying to muscle a shorter iron. **Low-Handicap Players:** This hole demands precision and offers a legitimate birdie opportunity. Consider pin position more heavily in your target selection, but remember that the small green punishes misses severely. Use your distance control skills to attack middle pins while respecting edge locations. This is a hole where your short iron accuracy should shine. The key to mastering this hole lies in treating it with the respect that its handicap ranking demands, despite its modest yardage. Smart club selection, committed swings, and realistic target choices will consistently produce scoring opportunities at Wilshire's strategic seventh hole.
Watch for
- Course conditioning and mapped hazards may affect line selection; confirm from the aerial.
Hole 7 Green Complex
Mapped green boundary
Green size: 2,870 sq ft
How did Hole 7 play?
How did this hole play today?
Frequently asked questions
Yardage reference: Pro tees · 142 yards.
What club should I use on this par 3?
↓
At 142 yards, most golfers will need a short iron (9-iron to PW) to reach this green. Adjust for elevation, wind, and pin position.
How difficult is hole 7?
↓
This hole is a moderate challenge for most golfers. Key challenges include: water in play, small green.
What hazards should I watch out for on hole 7?
↓
Key hazards include: water at 110.1 yards. Plan your shots to avoid these trouble spots.
How big is the green on hole 7?
↓
The green is small and requires precision. Expect challenging pin positions with limited room for error.
What's a good score on hole 7?
↓
This hole is a legitimate birdie opportunity for accurate iron players. Most golfers should target par, with birdie chances if you hit the green in regulation.