Hole 6 at Wilshire Country Club
- Par
- 4
- Yardage
- 436 yds
- Stroke index
- 1
- Hazards
- 11 bunkers
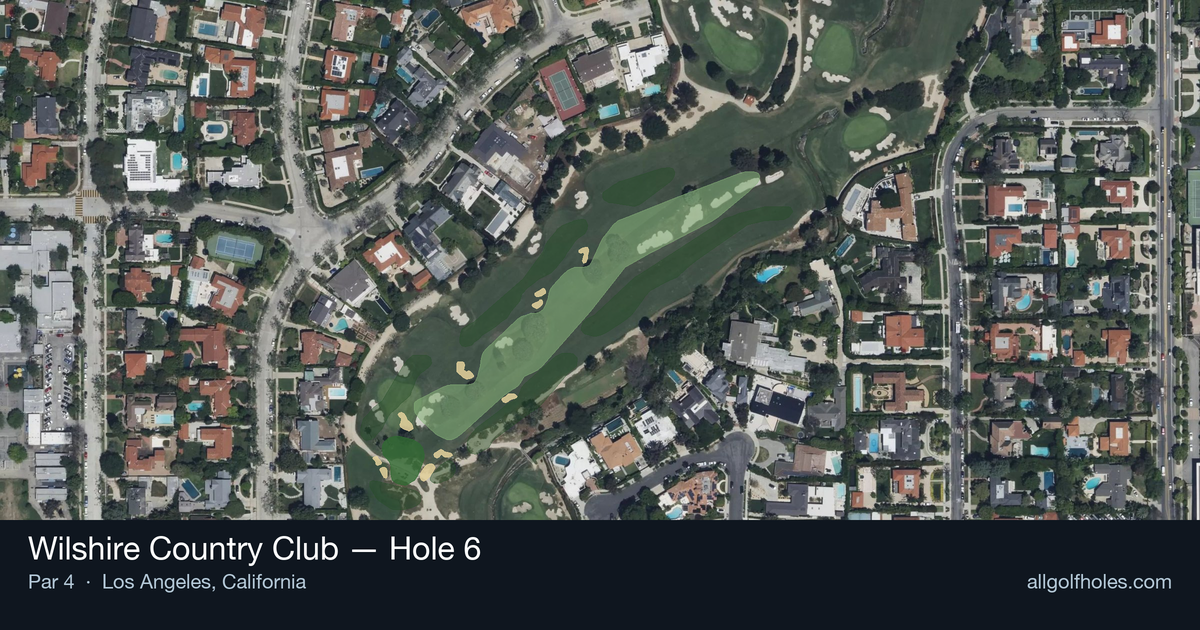
Aerial source not provided
Green size: 31 yds deep × 35 yds wide
Scorecard yardage is for Pro tees. The aerial shows its labeled reference position; distance rings measure to the green.
Pro tees · Par 4 · 436 yards
The plan for No. 6
The signature hole at Wilshire Country Club, this demanding par 4 stretches 436 yards and earns its stroke-one handicap rating through sheer length and precision requirements. The straight layout may appear straightforward, but the absence of significant hazards places a premium on accuracy and distance control. From the elevated tee, golfers face a generous fairway that gradually narrows toward the landing area, demanding a well-struck drive to set up a manageable approach. The small, subtly contoured green requires pinpoint iron play, as missing the putting surface leaves challenging up-and-down opportunities. This hole exemplifies Wilshire's championship pedigree, rewarding bold, confident swings while punishing tentative play with its unforgiving length and compact target.
Off the tee
The tee shot strategy centers on finding the optimal position for your approach shot while avoiding the rough that can make the second shot exponentially more difficult. Target the center-right portion of the fairway, which typically provides the best angle and lie for your approach. Driver may be tempting given the length, but consider a 3-wood or long iron if accuracy is inconsistent - leaving yourself 150-170 yards from the fairway is far superior to 130 yards from the rough. The straight layout means there's no room for error laterally, so commit fully to your target line and swing within yourself.
Approach & recovery
The approach shot is where this hole shows its teeth. With a small green as your target, precision trumps power every time. From the fairway, focus on the center of the green regardless of pin position - the margin for error is simply too small to get aggressive with tucked pins. Take one extra club and swing smoothly rather than forcing a shot. Pay attention to wind conditions, as they're magnified when hitting longer irons or hybrids into a small target. If you're between clubs, always take the longer option and focus on solid contact.
On the green
The small green means that even successful approach shots may leave challenging putts. Expect subtle breaks that can be deceiving given the green's size. The key is speed control - with limited real estate, pace becomes more critical than line on longer putts. Focus on getting your first putt close rather than being aggressive, as three-putts can quickly turn a good hole into a disaster. Study the green carefully during your approach to identify any slopes that might affect your putt. ## RISK VS REWARD This hole offers limited risk/reward opportunities, which is precisely what makes it so challenging. The "reward" comes from playing smart, conservative golf rather than gambling. The biggest risk is trying to overpower the hole - aggressive lines off the tee or forcing approach shots can lead to big numbers quickly. The reward for patience and precision is a well-earned par on one of the course's most demanding holes. ## DIFFERENT SKILL LEVELS **High Handicappers:** Focus on keeping the ball in play above all else. Consider hitting 3-wood or hybrid off the tee to ensure you stay in the fairway. For the approach, aim for the center of the green and don't worry about pin hunting. A bogey here is a solid score given the hole's difficulty. **Low Handicappers:** While you have the skills to be more aggressive, resist the temptation. This hole rewards disciplined course management over heroic shots. Use your accuracy advantage to find the fairway, then trust your iron play to find the green. Par is always a good score here, and the occasional birdie will come from solid execution rather than risky play. The #1 handicap ranking tells you everything you need to know - respect this hole, play smart, and take your par when it's available.
Watch for
- Course conditioning and mapped hazards may affect line selection; confirm from the aerial.
Hole 6 Green Complex
Mapped green boundary
Green size: 5,346 sq ft
How did Hole 6 play?
How did this hole play today?
Frequently asked questions
Yardage reference: Pro tees · 436 yards.
What's the best strategy off the tee?
↓
For this 436-yard par 4, most players will hit driver to set up a comfortable approach.
How difficult is hole 6?
↓
This hole is a good scoring opportunity for most golfers.
How big is the green on hole 6?
↓
The green is medium-sized with moderate targets. Pay attention to pin placement when selecting your approach club.
What's a good score on hole 6?
↓
This hole is a demanding hole where bogey is not unusual. This longer par 4 will test most golfers. Focus on position over distance.