Hole 4 at Wilshire Country Club
- Par
- 3
- Yardage
- 193 yds
- Stroke index
- 15
- Hazards
- 7 bunkers · Water
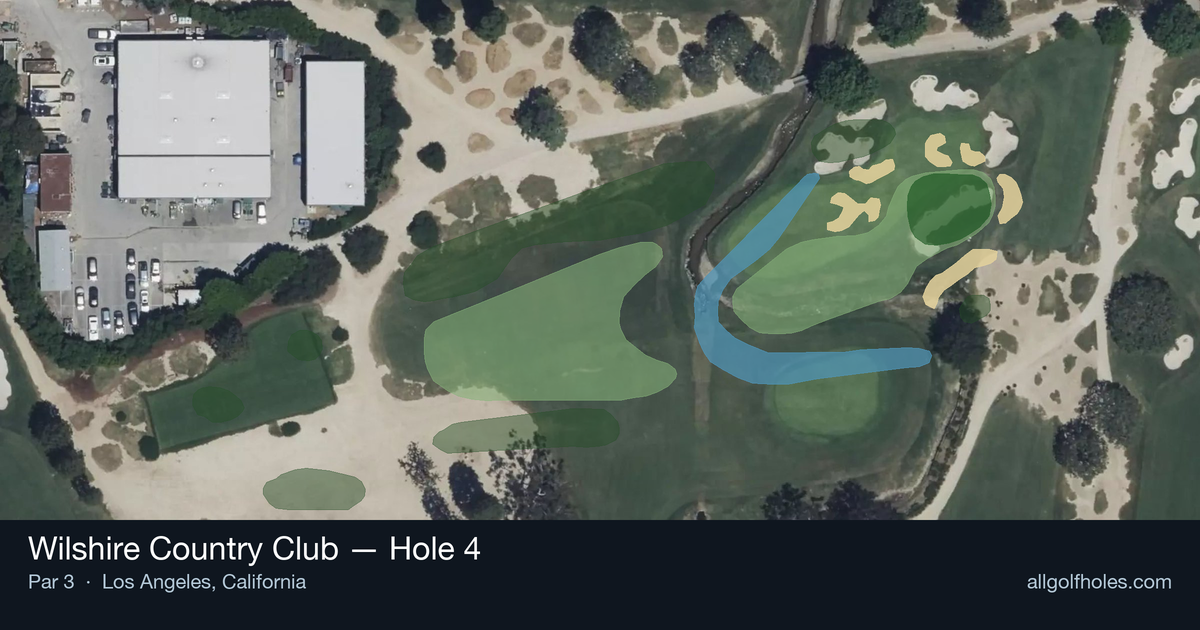
Aerial source not provided
Green size: 20 yds deep × 17 yds wide
Scorecard yardage is for Pro tees. The aerial shows its labeled reference position; distance rings measure to the green.
Pro tees · Par 3 · 193 yards
The plan for No. 4
The fourth hole at Wilshire Country Club presents a deceptively challenging par 3 that demands precision over power. At 193 yards, this straight shot requires golfers to navigate to a small, well-protected green that rewards accuracy above all else. The elevated tee provides excellent visibility of the target, but the compact putting surface leaves little margin for error on the approach shot. Without significant hazards to distract, players must focus entirely on club selection and tempo to find the green. What makes Wilshire Country Club hole 4 memorable is its pure test of iron play—a classic mid-length par 3 that separates confident ball-strikers from those still developing their precision game.
Off the tee
Your tee shot is everything on this hole - there's no recovery shot to bail you out. Club selection should prioritize hitting the center of the green rather than attacking pins. In calm conditions, most players will need anywhere from a 6-iron to a 4-iron depending on their distance. Pay close attention to wind direction and strength, as the elevated nature of most par 3s can make wind effects more pronounced than they appear from the tee. Aim for the heart of the green regardless of pin position. The small green size means even a shot to the center will leave you with a reasonable putt to any pin location. Focus on a smooth, controlled swing rather than trying to muscle the shot - rhythm and balance are crucial for accuracy at this distance.
Approach & recovery
Since this is a par 3, your tee shot serves as your approach. The key is committing fully to your club selection and target line. With the straight layout, there's no dogleg to navigate, allowing you to play directly at your target. Consider the green's firmness when selecting your club and trajectory. A higher, softer shot will hold better on firm conditions, while a lower trajectory might be preferable in soft conditions or with helping wind. The small green means there's little margin for error, so avoid the temptation to get cute with shot shaping unless conditions absolutely demand it.
On the green
The small green size works both for and against you once you're putting. While you're likely to have shorter putts than on larger greens, the limited surface area means putts can break more dramatically due to subtle slopes. Take time to read the green carefully, paying attention to the overall slope and drainage patterns. Speed control becomes critical on smaller greens, as putts that would stop on larger surfaces might roll off here. When in doubt, favor dying the ball into the hole rather than charging past - a short miss leaves an easier comeback putt than one that races well past the pin. ## RISK VS REWARD This hole offers a relatively straightforward risk/reward proposition. The primary reward opportunity comes from aggressive pin-hunting when conditions are favorable and you're confident in your distance control. However, the small green means the penalty for missing your target can be severe, potentially leading to difficult up-and-downs. The conservative play - aiming for the center of the green - offers the highest probability of making par while still providing reasonable birdie opportunities. Given the handicap rating, this approach aligns with the hole's design philosophy of rewarding solid, strategic play over heroic shots. ## DIFFERENT SKILL LEVELS **High-Handicap Players**: Focus entirely on finding the green, regardless of pin position. Use one extra club to ensure you clear any front trouble and reach the putting surface. A bogey from the green is far better than a double or triple from short of the target. Practice your distance control on the range to build confidence in your club selection. **Mid-Handicap Players**: Begin incorporating pin position into your strategy, but remain conservative. When the pin is accessible, you can be slightly more aggressive, but always have a bail-out area in mind. Work on your pre-shot routine to build consistency in your setup and swing. **Low-Handicap Players**: This is where you can truly attack pins and hunt birdies. Use your distance control skills to be more precise with club selection, factoring in conditions like wind, temperature, and green firmness. Consider the pin's position relative to slopes on the green to leave yourself uphill putts when possible. The beauty of this hole lies in its simplicity - it rewards good golf course management and precise execution while punishing loose swings and poor club selection. Master the fundamentals here, and you'll find scoring opportunities throughout your round.
Watch for
- Course conditioning and mapped hazards may affect line selection; confirm from the aerial.
Hole 4 Green Complex
Mapped green boundary
Green size: 1,975 sq ft
How did Hole 4 play?
How did this hole play today?
Frequently asked questions
Yardage reference: Pro tees · 193 yards.
What club should I use on this par 3?
↓
At 193 yards, most golfers will need a long iron or hybrid (5-iron to 6-iron) to reach this green. Adjust for elevation, wind, and pin position.
How difficult is hole 4?
↓
This hole is one of the tougher holes on the course for most golfers. Key challenges include: water in play, small green.
What hazards should I watch out for on hole 4?
↓
Key hazards include: water at 146.5 yards. Plan your shots to avoid these trouble spots.
How big is the green on hole 4?
↓
The green is small and requires precision. Expect challenging pin positions with limited room for error.