Hole 9 at PGA West (TPC Stadium course)
- Par
- 4
- Yardage
- 452 yds
- Stroke index
- 1
- Hazards
- 6 bunkers · Water
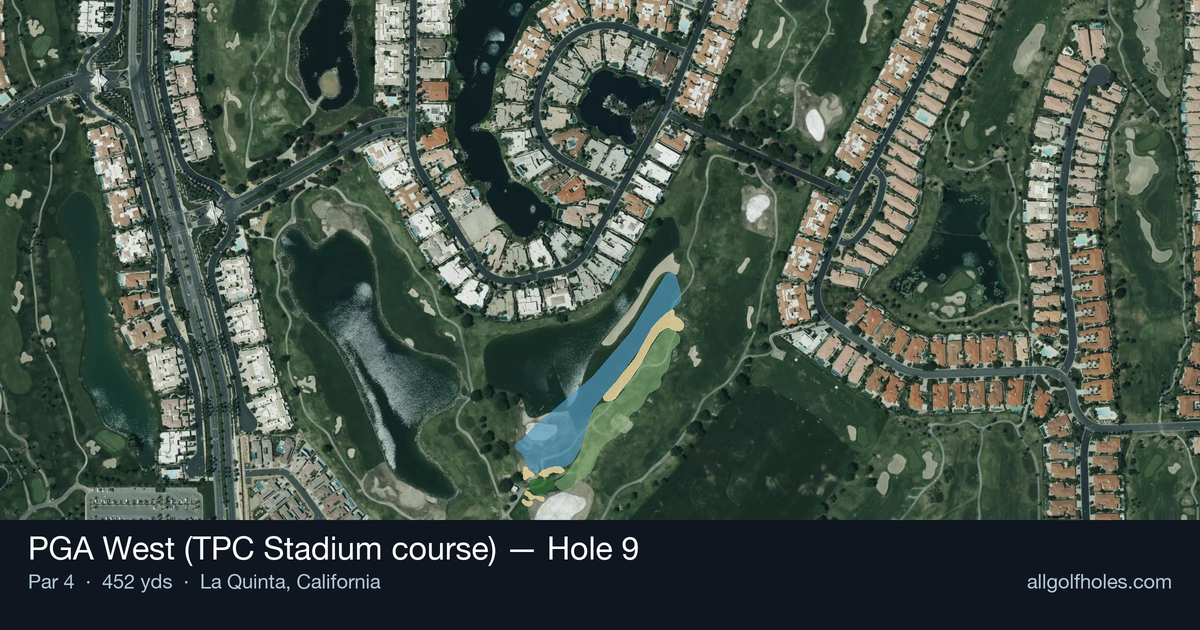
Aerial source not provided
Green size: 27 yds deep × 32 yds wide
Scorecard yardage is for Championship tees. The aerial shows its labeled reference position; distance rings measure to the green.
Championship tees · Par 4 · 452 yards
The plan for No. 9
The ninth hole at PGA West (TPC Stadium course) stands as Pete Dye's ultimate test before the turn, earning its number one handicap rating through pure length and precision demands. This 452-yard par 4 presents a deceptively straightforward challenge that has humbled countless professionals during PGA TOUR Q-School Finals. The tee shot requires both power and accuracy down a generous fairway, but the real examination comes with the approach shot to a small, unforgiving green complex. Without significant hazards to distract, golfers must rely on pure shot-making ability and course management. The hole's strategic brilliance lies in its simplicity – demanding two quality strikes under the desert sun to secure par and build momentum for the back nine's legendary challenges ahead.
Off the tee
The key to conquering this hole begins with a well-positioned tee shot that sets up the optimal approach angle. With the hole playing straight, focus on finding the center of the fairway rather than trying to gain every possible yard. A driver or strong 3-wood should be your weapon of choice, aiming for a landing zone around 250-280 yards out depending on your distance. The target line should favor the center-left portion of the fairway, giving you the best angle into the small green. Avoid the temptation to overcook your drive - accuracy trumps distance on this demanding hole.
Approach & recovery
Your approach shot is where this hole can make or break your score. With a small green as your target, club selection becomes critical. Expect to hit anywhere from a mid-iron to hybrid depending on your tee shot position and pin location. The key is committing to enough club to reach the green comfortably - coming up short on a small green often leads to difficult up-and-down situations. Aim for the center of the green unless you're feeling particularly confident, as Pete Dye greens often feature subtle slopes that can reject aggressive pins shots.
On the green
The small green demands respect with your putter. Focus on getting your first putt close rather than being overly aggressive, as three-putts can quickly turn a good hole into a disaster. Read putts carefully, as Pete Dye greens often feature subtle breaks that aren't immediately apparent. When the pin is tucked in a corner, play to the fat part of the green and take your two-putt par gladly. ## RISK VS REWARD This hole offers limited risk/reward opportunities, instead demanding solid, strategic play. The primary decision point comes with club selection on your approach - taking enough club to comfortably reach the green versus trying to dial in the perfect distance. Given the small target and #1 handicap rating, the smart play is always taking one more club and focusing on the center of the green. ## DIFFERENT SKILL LEVELS **High Handicappers:** Focus on making solid contact and finding the fairway with your tee shot. Don't be afraid to lay up short of the green if you're not confident in your longer irons - a good wedge shot and one-putt can save par. Accept bogey as a reasonable score on this demanding hole. **Low Handicappers:** This hole rewards precision and course management. Trust your yardages and commit fully to your club selections. The small green demands pin-point accuracy, so dial in your approach shot and be aggressive with makeable birdie putts. This is a hole where solid pars keep you in contention. The 9th hole at PGA West exemplifies Pete Dye's design philosophy - rewarding strategic thinking while punishing poor execution. Play smart, stay committed to your game plan, and you'll walk off with a satisfying score on one of the course's most challenging holes.
Hole 9 Green Complex
Mapped green boundary
Green size: 4,122 sq ft
How did Hole 9 play?
How did this hole play today?
Frequently asked questions
Yardage reference: Championship tees · 452 yards.
What's the best strategy off the tee?
↓
For this 452-yard par 4, most players will hit driver to set up a comfortable approach.
How difficult is hole 9?
↓
This hole is one of the tougher holes on the course for most golfers. Key challenges include: long par 4, water in play, small green.
What hazards should I watch out for on hole 9?
↓
Key hazards include: water at 299.2 yards. Plan your shots to avoid these trouble spots.
How big is the green on hole 9?
↓
The green is small and requires precision. The green is wider than it is deep, rewarding shots that find the correct tier. Expect challenging pin positions with limited room for error.
What's a good score on hole 9?
↓
This hole is one of the tougher holes where par feels like birdie. A challenging par 4. Accept that bogey happens and avoid big numbers.