Hole 10 at Aviara Golf Club at Four Seasons Resort
- Par
- 5
- Yardage
- 515 yds
- Stroke index
- 8
- Hazards
- 9 bunkers · Water
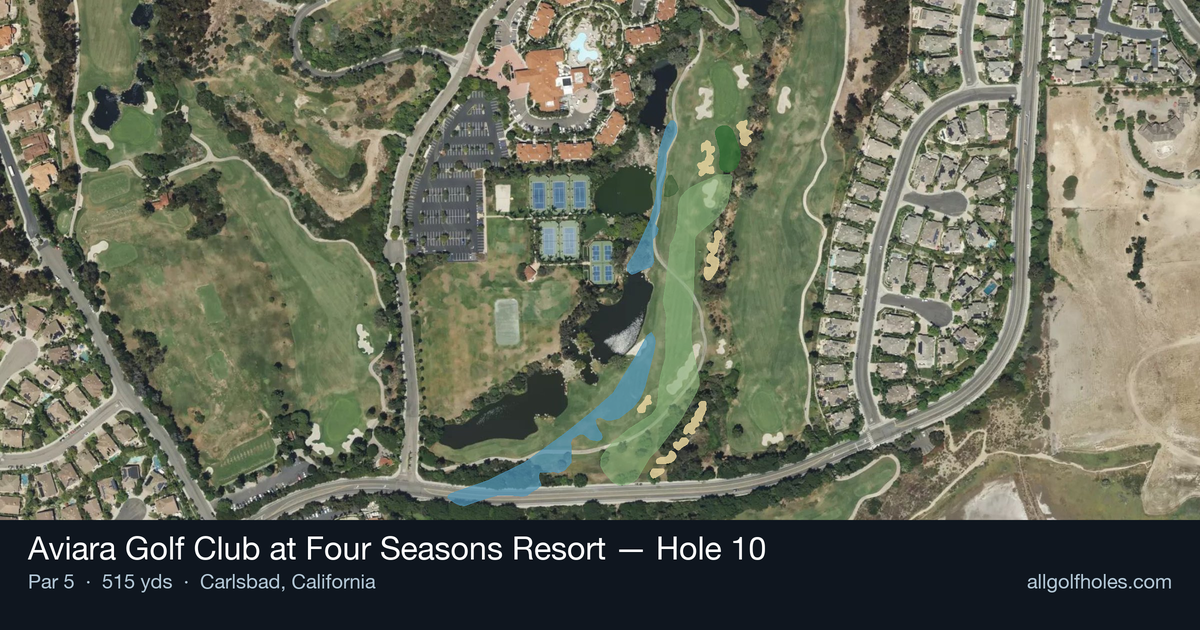
Aerial source not provided
Green size: 38 yds deep × 38 yds wide
Scorecard yardage is for Championship tees. The aerial shows its labeled reference position; distance rings measure to the green.
Championship tees · Par 5 · 515 yards
The plan for No. 10
The 10th hole at Aviara Golf Club at Four Seasons Resort presents a deceptively challenging par 5 that rewards strategic thinking over pure distance. At 515 yards, this straight-away hole may appear straightforward, but its true test lies in the precision required for scoring opportunities. The generous fairway invites an aggressive tee shot, allowing longer hitters to consider reaching this reachable par 5 in two. However, the small green demands pinpoint accuracy on approach shots, particularly when attacking the pin from longer range. With minimal hazards protecting the hole, the primary defense comes from the compact putting surface that severely punishes wayward approaches. Smart course management and crisp iron play separate birdies from bogeys on this strategic gem overlooking the Pacific coastline.
Off the tee
Focus on finding the center of the fairway with your most reliable driver or fairway wood. The straight layout eliminates the need for working the ball, so commit to your natural shot shape and aim down the middle. Longer hitters should resist the urge to bomb driver, as control and position are more valuable than maximum distance. A well-struck 3-wood or hybrid often provides the ideal combination of distance and accuracy, leaving you in perfect position for your second shot.
Approach & recovery
For most golfers, the second shot becomes a strategic layup to set up an optimal angle into the small green. Position your ball approximately 100-130 yards from the pin, favoring the center of the fairway. This distance range allows for precise wedge play on your third shot. Avoid the temptation to go for the green in two unless you're a single-digit handicapper with perfect lie and conditions – the small target makes this a low-percentage play for most golfers.
On the green
The compact putting surface demands pinpoint accuracy with your approach shot. Focus on hitting the center of the green rather than attacking pins, as the small size leaves little margin for error. Once on the green, expect subtle breaks that can be difficult to read. Take extra time studying your putt from multiple angles, as even seemingly straight putts on this green can have more movement than anticipated. ## RISK VS REWARD The primary risk/reward decision comes on the second shot: lay up safely or attempt to reach in two. For scratch golfers and better, going for the green in favorable conditions can yield eagle opportunities, but the small target makes this a high-risk proposition. The smart play rewards patience – a well-executed three-shot strategy consistently produces birdies with minimal risk of big numbers. ## DIFFERENT SKILL LEVELS **High Handicappers:** Play this as a true three-shot hole every time. Use fairway woods or hybrids for your first two shots, keeping the ball in play. Your third shot should be a comfortable wedge to the center of the green, ignoring pin positions. **Mid Handicappers:** Similar conservative approach, but can be slightly more aggressive with pin hunting if you're within 100 yards and have a good lie. Focus on two-putt strategy rather than forcing birdie attempts. **Low Handicappers:** Consider going for the green in two only with perfect conditions and lies. Otherwise, use your short game precision to attack pins from preferred yardages. This hole should be a consistent birdie opportunity with proper execution. The key to mastering this hole lies in recognizing it as a scoring opportunity that rewards patience over power, making it an excellent chance to gain strokes on the field through smart golf strategy and solid course management.
Watch for
- Course conditioning and mapped hazards may affect line selection; confirm from the aerial.
Hole 10 Green Complex
Mapped green boundary
Green size: 5,791 sq ft
How did Hole 10 play?
How did this hole play today?
Frequently asked questions
Yardage reference: Championship tees · 515 yards.
Can this par 5 be reached in two?
↓
At 515 yards, Reachable in two for longer hitters. Consider laying up short of hazards if going for it is risky.
How difficult is hole 10?
↓
This hole is a moderate challenge for most golfers. Key challenges include: water in play.
What hazards should I watch out for on hole 10?
↓
Key hazards include: fairway bunker at 208.5-208.5 yards; water at 359.9 yards. Plan your shots to avoid these trouble spots.
How big is the green on hole 10?
↓
The green is medium-sized with moderate targets. The green is deeper than wide, so club selection is crucial. Pay attention to pin placement when selecting your approach club.
Which side of the fairway is safer on hole 10?
↓
Aim for the left side of the fairway when possible. Missing right brings more trouble into play.
What's a good score on hole 10?
↓
This hole is a solid birdie opportunity with smart layup strategy. Most golfers can reach in three. Position your layup to leave a comfortable wedge.