Hole 4 at Colonial Country Club
- Par
- 3
- Yardage
- 252 yds
- Stroke index
- 13
- Hazards
- 2 bunkers
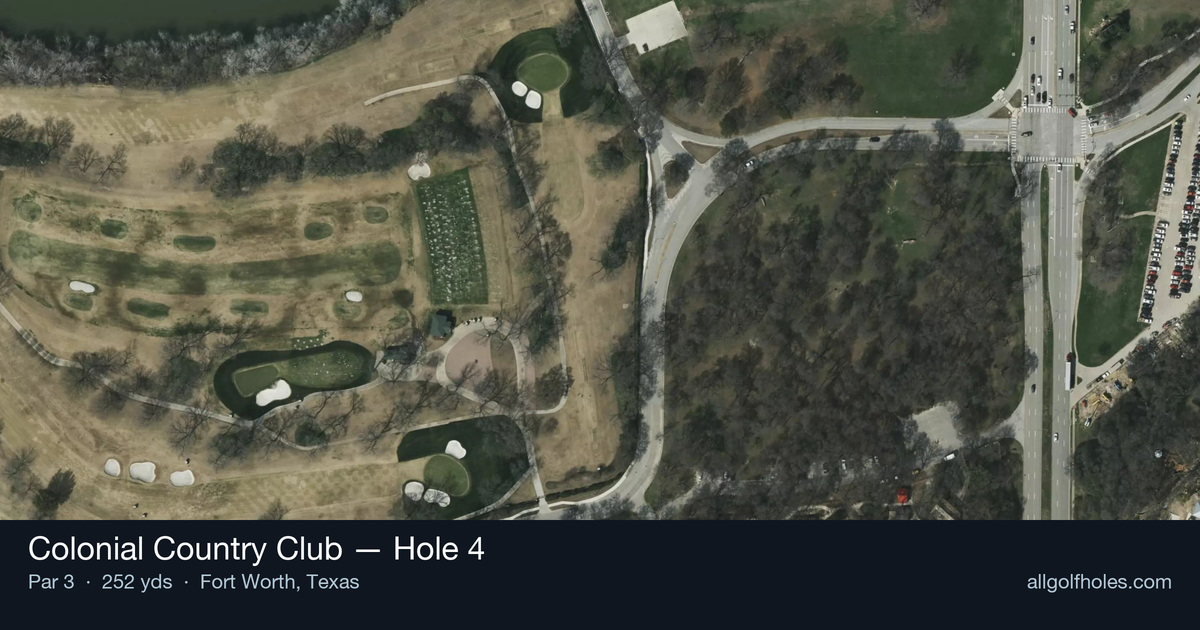
Aerial source not provided
Green size: 25 yds deep × 32 yds wide
Scorecard yardage is for Championship tees. The aerial shows its labeled reference position; distance rings measure to the green.
Championship tees · Par 3 · 252 yards
The plan for No. 4
Colonial Country Club hole 4 serves as a crucial breather following the notorious "Horrible Horseshoe" stretch, yet this 252-yard par 3 demands complete precision from the championship tees. The straightforward layout deceives players into complacency, but the compact green complex requires exact distance control and proper club selection. Wind conditions at Colonial can dramatically affect club choice, making this seemingly simple tee shot a true test of judgment. Tour professionals often struggle with the green's subtle undulations, where even perfectly struck approaches can leave challenging putts. This hole exemplifies Colonial's championship pedigree—no gimmes, just pure golf execution under the Texas sun.
Off the tee
Club selection is paramount on this lengthy par 3. Most golfers will need a long iron, hybrid, or fairway wood depending on conditions and personal distance capabilities. The target line is straightforward down the center, but the real challenge lies in committing fully to your club choice. Take one extra club if you're between selections - missing short on a small green is far more costly than being pin-high with a longer putt. Wind conditions play a crucial role at this length, so factor in any crosswinds or headwinds when making your selection. ## APPROACH Since this is a par 3, your tee shot IS your approach shot. Focus on the center of the green rather than attacking pins, especially when they're tucked near edges. The small green size means even well-struck shots can run off if they're not precisely placed. Aim for the heart of the green and let your putting handle the scoring. If you do miss the green, focus on getting your next shot close rather than trying to hole out from off the putting surface. ## ON THE GREEN The small green size means most putts will be relatively short, but don't underestimate the importance of lag putting here. With limited green real estate, three-putts can happen quickly if you're not careful with speed control. Read the green carefully and focus on getting your first putt close to the hole. The compact size actually works in your favor once you're on the putting surface - just avoid being overly aggressive with longer putts. ## RISK VS REWARD This hole offers limited risk/reward opportunities due to its straightforward design. The primary decision point is club selection - taking enough club to reach the green versus maintaining accuracy. Being conservative with club choice and aiming for the center of the green is typically the percentage play, as the small target punishes aggressive pin-hunting. ## DIFFERENT SKILL LEVELS **High-Handicap Players:** Focus entirely on reaching the green in regulation. Take plenty of club and aim for the largest part of the green. Don't worry about pin position - just get the ball on the putting surface and two-putt for par. If you do miss the green, prioritize getting up and down rather than trying to hole your chip shot. **Low-Handicap Players:** While you can be more aggressive with pin positions, respect the small green size. Consider course management within your round - if you're playing well, the center of the green might be the smart play. When you do attack pins, ensure you have the right club and commit fully to the shot. This hole rewards confident, decisive swings over tentative approaches. The 4th hole exemplifies Colonial's reputation for demanding precision golf. Success here comes from smart club selection, committed swings, and understanding that par is always a good score on this challenging par 3.
Approach & recovery
Since this is a par 3, your tee shot IS your approach shot. Focus on the center of the green rather than attacking pins, especially when they're tucked near edges. The small green size means even well-struck shots can run off if they're not precisely placed. Aim for the heart of the green and let your putting handle the scoring. If you do miss the green, focus on getting your next shot close rather than trying to hole out from off the putting surface. ## ON THE GREEN The small green size means most putts will be relatively short, but don't underestimate the importance of lag putting here. With limited green real estate, three-putts can happen quickly if you're not careful with speed control. Read the green carefully and focus on getting your first putt close to the hole. The compact size actually works in your favor once you're on the putting surface - just avoid being overly aggressive with longer putts. ## RISK VS REWARD This hole offers limited risk/reward opportunities due to its straightforward design. The primary decision point is club selection - taking enough club to reach the green versus maintaining accuracy. Being conservative with club choice and aiming for the center of the green is typically the percentage play, as the small target punishes aggressive pin-hunting. ## DIFFERENT SKILL LEVELS **High-Handicap Players:** Focus entirely on reaching the green in regulation. Take plenty of club and aim for the largest part of the green. Don't worry about pin position - just get the ball on the putting surface and two-putt for par. If you do miss the green, prioritize getting up and down rather than trying to hole your chip shot. **Low-Handicap Players:** While you can be more aggressive with pin positions, respect the small green size. Consider course management within your round - if you're playing well, the center of the green might be the smart play. When you do attack pins, ensure you have the right club and commit fully to the shot. This hole rewards confident, decisive swings over tentative approaches. The 4th hole exemplifies Colonial's reputation for demanding precision golf. Success here comes from smart club selection, committed swings, and understanding that par is always a good score on this challenging par 3.
On the green
The small green size means most putts will be relatively short, but don't underestimate the importance of lag putting here. With limited green real estate, three-putts can happen quickly if you're not careful with speed control. Read the green carefully and focus on getting your first putt close to the hole. The compact size actually works in your favor once you're on the putting surface - just avoid being overly aggressive with longer putts. ## RISK VS REWARD This hole offers limited risk/reward opportunities due to its straightforward design. The primary decision point is club selection - taking enough club to reach the green versus maintaining accuracy. Being conservative with club choice and aiming for the center of the green is typically the percentage play, as the small target punishes aggressive pin-hunting. ## DIFFERENT SKILL LEVELS **High-Handicap Players:** Focus entirely on reaching the green in regulation. Take plenty of club and aim for the largest part of the green. Don't worry about pin position - just get the ball on the putting surface and two-putt for par. If you do miss the green, prioritize getting up and down rather than trying to hole your chip shot. **Low-Handicap Players:** While you can be more aggressive with pin positions, respect the small green size. Consider course management within your round - if you're playing well, the center of the green might be the smart play. When you do attack pins, ensure you have the right club and commit fully to the shot. This hole rewards confident, decisive swings over tentative approaches. The 4th hole exemplifies Colonial's reputation for demanding precision golf. Success here comes from smart club selection, committed swings, and understanding that par is always a good score on this challenging par 3.
Watch for
- Mapped bunkers (2) are in play around the landing areas and green.
Hole 4 Green Complex
Mapped green boundary
Green size: 3,992 sq ft
Course coverage
Tournament and creator videos about Colonial Country Club — shared course coverage, not hole-specific clips.
Tournament coverage
Charles Schwab Challenge highlights
Charles Schwab Challenge | Final Round Highlights
2025
Featured by these creators
Creator videos about this course
YouTube creators who filmed or featured Colonial Country Club. · Stats as of Oct 12, 2026 · 6d ago
Kiz breaks down his week at Colonial, his first PGA Tour event since November. @Chevrolet #Ad
Kevin Kisner breaks down his 2017 Colonial WIN over Jordan Spieth and Jon Rahm 🏆
The 2025 Year in Review, Part 8: Colonial, Memorial, Canada, & the U.S. Open | The Shotgun Start
Latest from LIV Korea, Rainy Thursday at Colonial, & Golf Advice | The Shotgun Start
Can Scottie win 10 majors, Sr. PGA hits Congressional, & the olds take Colonial | The Shotgun Start
How did Hole 4 play?
How did this hole play today?
Frequently asked questions
Yardage reference: Championship tees · 252 yards.
What club should I use on this par 3?
↓
At 252 yards, most golfers will need a fairway wood or hybrid to reach this green. Adjust for elevation, wind, and pin position.
How difficult is hole 4?
↓
This hole is a moderate challenge for most golfers. Key challenges include: long par 3, small green.
What hazards should I watch out for on hole 4?
↓
Key hazards include: 2 greenside bunkers. Plan your shots to avoid these trouble spots.
How big is the green on hole 4?
↓
The green is small and requires precision. Expect challenging pin positions with limited room for error.
What's a good score on hole 4?
↓
This hole is a challenging par where bogey is acceptable. This longer par 3 will test your long iron or hybrid game. Par is a good score.