Hole 9 at Oakmont Country Club
- Par
- 4
- Yardage
- 477 yds
- Stroke index
- 15
- Hazards
- 8 bunkers
Aerial source not provided
Green size: 69 yds deep × 48 yds wide
Scorecard yardage is for Championship tees. The aerial shows its labeled reference position; distance rings measure to the green.
Championship tees · Par 4 · 477 yards
The plan for No. 9
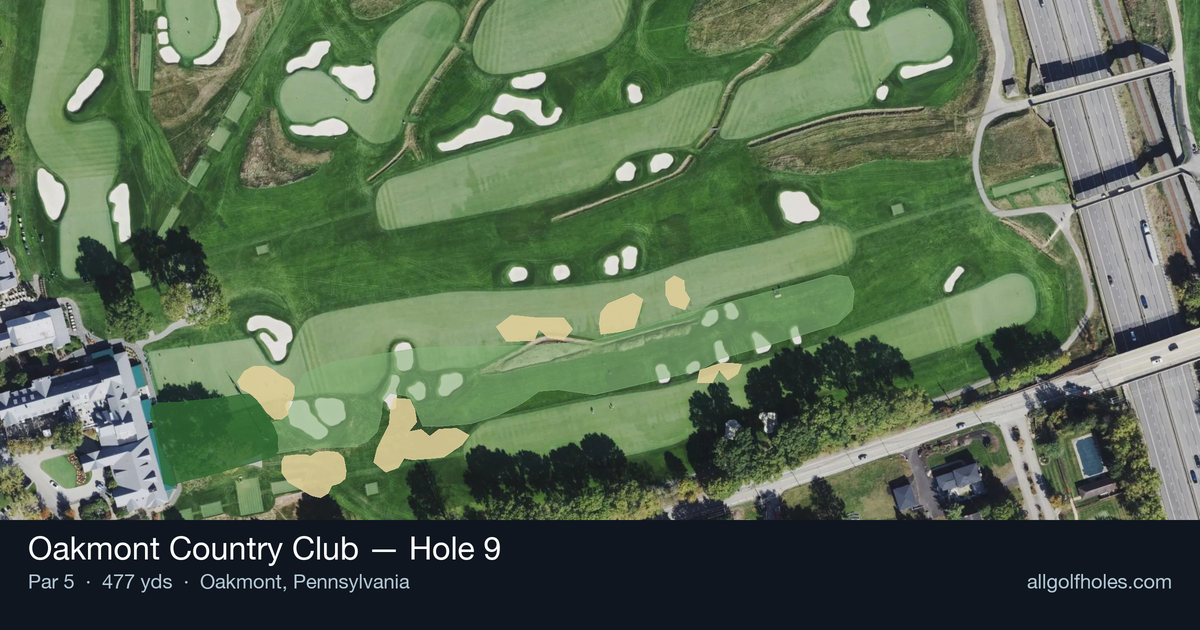
The ninth hole at Oakmont Country Club serves as a strategic par 5 that demands precision over power at 477 yards. This straight layout may appear deceptively simple, but the absence of major hazards places premium emphasis on course management and approach shot accuracy. The relatively short length for a par 5 creates an enticing risk-reward scenario, with longer hitters potentially reaching in two while shorter players must navigate a careful three-shot strategy. The small green complex becomes the hole's defining challenge, requiring pinpoint accuracy on the final approach. At Oakmont, where precision has crowned champions for over a century, this finishing hole to the front nine perfectly embodies the course's philosophy that strategic thinking trumps raw distance.
Off the tee
The tee shot strategy centers on finding the optimal position for your second shot. Longer hitters should consider taking less than driver to ensure they stay in the ideal landing zone, typically around 250-270 yards out. This leaves a manageable approach distance while avoiding any potential trouble further down the fairway. Focus on the center-left portion of the fairway, which provides the best angle for the approach shot. The straight layout means accuracy is more important than maximum distance off the tee.
Approach & recovery
The second shot is crucial for setting up a birdie opportunity. Most players will face a mid to long-iron into the green, making club selection critical. With a small green as the target, precision trumps power. Aim for the center of the green regardless of pin position - the compact size means you'll rarely be more than 20-30 feet from any pin. Take one extra club to ensure you clear any front-edge trouble and commit to a smooth, controlled swing. This is not the time for a heroic shot.
On the green
Oakmont's greens are notoriously challenging, and even this smaller putting surface demands respect. The key is leaving yourself below the hole whenever possible, as downhill putts on Oakmont's lightning-fast greens can quickly get away from you. Focus on lag putting to ensure you don't leave yourself a treacherous comeback putt. Speed control is absolutely critical - it's better to be short and putting uphill than long and facing a slippery downhill attempt. ## RISK VS REWARD This hole offers a classic risk/reward scenario for your second shot. Aggressive players might attempt to get home in two, but the small green makes this a low-percentage play. The smarter approach is to lay up to your favorite wedge distance, typically 80-120 yards, ensuring a full swing into the green. This conservative strategy often leads to more birdies than the aggressive approach, especially given the difficulty of Oakmont's greens. ## DIFFERENT SKILL LEVELS **Higher Handicappers**: Play this as a three-shot hole from start to finish. Use a fairway wood or hybrid off the tee for accuracy, then advance the ball with a comfortable iron, leaving a short iron or wedge to the green. Don't get greedy with distance - steady progress leads to better scores. **Lower Handicappers**: Consider the two-shot opportunity if conditions are favorable, but respect the small green. If laying up, be precise with your positioning to leave the ideal approach distance. Use your course management skills to avoid the temptation of forcing a low-percentage shot when a simple approach offers better scoring odds. The 9th hole rewards patience and precision over power, making it an excellent opportunity to finish the front nine with momentum heading to the back.
Watch for
- Crossing center
Hole 9 Green Complex
Mapped green boundary
Green size: 21,767 sq ft
Course coverage
Tournament and creator videos about Oakmont Country Club — shared course coverage, not hole-specific clips.
Featured by these creators
Creator videos about this course
YouTube creators who filmed or featured Oakmont Country Club. · Stats as of Oct 12, 2026 · 6d ago
The World's Hardest Golf Course: Oakmont Country Club
Deep Dive: Oakmont Country Club | Designing Golf
The Architecture of Oakmont Country Club | 2025 U.S. Open Preview
How did Hole 9 play?
How did this hole play today?
Frequently asked questions
Yardage reference: Championship tees · 477 yards.
How difficult is hole 9?
↓
This hole is a good scoring opportunity for most golfers. Key challenges include: large green requiring good lag putting.
How big is the green on hole 9?
↓
The green is large and can play quite long. The green is wider than it is deep, rewarding shots that find the correct tier. Three-putt territory if you don't manage your approach distance well.