Hole 8 at Oakmont Country Club
- Par
- 3
- Yardage
- 288 yds
- Stroke index
- 5
- Hazards
- 6 bunkers
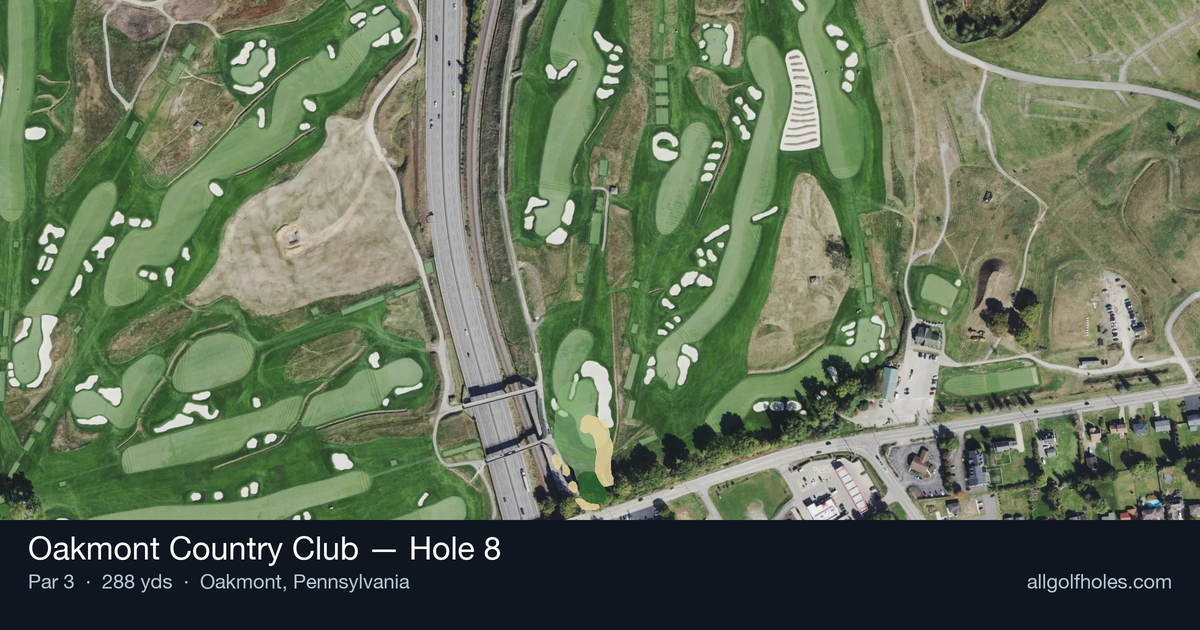
Aerial source not provided
Green size: 34 yds deep × 33 yds wide
Scorecard yardage is for Championship tees. The aerial shows its labeled reference position; distance rings measure to the green.
Championship tees · Par 3 · 288 yards
The plan for No. 8
The eighth hole at Oakmont Country Club stands as a formidable par 3 that epitomizes the course's legendary difficulty. At 288 yards, this lengthy one-shotter demands precision and power from an elevated tee, with the small green serving as an unforgiving target that has humbled countless professionals during U.S. Opens. The straight flight path offers no reprieve, requiring golfers to commit fully to their club selection while navigating Oakmont's notorious putting surfaces. What makes this hole particularly memorable is how it captures the essence of Oakmont's championship pedigree – rewarding bold, accurate play while severely punishing anything less than perfection on one of golf's most storied venues.
Off the tee
Club selection is paramount on this lengthy par 3. Most golfers will need anything from a 3-iron to a hybrid or fairway wood, depending on wind conditions and pin position. Focus on committing fully to your club choice rather than trying to force a shorter iron. Aim for the center of the green as your primary target, as the small putting surface punishes anything less than solid contact. Take one extra club if there's any doubt, as coming up short on Oakmont's firm greens often leaves difficult recovery shots.
Approach & recovery
Since this is a par 3, your tee shot IS your approach. The key is managing trajectory and spin to hold the green. Consider the pin position when selecting your target - with a small green, even a well-struck shot to the wrong portion can leave a challenging putt. Pay close attention to wind direction and strength, as the length of this hole amplifies any crosswind effects. The firm conditions at Oakmont mean you'll need to land the ball with enough spin to stop it quickly.
On the green
Oakmont's greens are legendary for their speed and subtle breaks. Even on this small green, putting requires careful attention to grain direction and slope. Take time to read the green from multiple angles, as seemingly straight putts often have more break than expected. Lag putting is crucial - getting your first putt close is more important than being aggressive from long range. The small size means most putts will be makeable if you can get proper speed control. ## RISK VS REWARD The primary risk/reward decision involves club selection and aggression level. Playing conservatively to the center of the green ensures you'll be putting for birdie, while attacking specific pin positions increases both birdie chances and the risk of missing the green entirely. Given the small target and length of the shot, most players should favor the conservative approach and take their chances with a longer putt rather than risk a difficult recovery shot. ## DIFFERENT SKILL LEVELS **High Handicappers:** Focus entirely on reaching the green with your most reliable long iron or hybrid. Don't worry about pin hunting - aim for the center and be satisfied with a two-putt par. Consider playing to the front edge of the green if the pin is back, as a long putt is preferable to a short-sided chip shot. **Low Handicappers:** You can be more aggressive with pin hunting, especially when the flag is in the middle or front portions of the green. Use course management skills to identify when conditions favor attacking versus playing safe. Your superior distance control allows for more precise club selection, but respect the small target and Oakmont's demanding conditions. The 8th hole rewards patient, strategic golf over aggressive play, making it a perfect example of Oakmont's philosophy that precision trumps power.
Watch for
- Crossing center
Hole 8 Green Complex
Mapped green boundary
Green size: 6,343 sq ft
Course coverage
Tournament and creator videos about Oakmont Country Club — shared course coverage, not hole-specific clips.
Featured by these creators
Creator videos about this course
YouTube creators who filmed or featured Oakmont Country Club. · Stats as of Oct 12, 2026 · 5d ago
The World's Hardest Golf Course: Oakmont Country Club
Deep Dive: Oakmont Country Club | Designing Golf
The Architecture of Oakmont Country Club | 2025 U.S. Open Preview
How did Hole 8 play?
How did this hole play today?
Frequently asked questions
Yardage reference: Championship tees · 288 yards.
What club should I use on this par 3?
↓
At 288 yards, most golfers will need a fairway wood or hybrid to reach this green. Adjust for elevation, wind, and pin position.
How difficult is hole 8?
↓
This hole is a moderate challenge for most golfers. Key challenges include: long par 3.
How big is the green on hole 8?
↓
The green is fairly large with multiple pin positions. Lag putting becomes important on longer putts.
What's a good score on hole 8?
↓
This hole is a challenging par where bogey is acceptable. This longer par 3 will test your long iron or hybrid game. Par is a good score.