Hole 11 of 18 · Bloomfield Hills, Michigan

Hole 11 at Oakland Hills Country Club (South Course)

Par
4
Yards
423
Bunkers
7
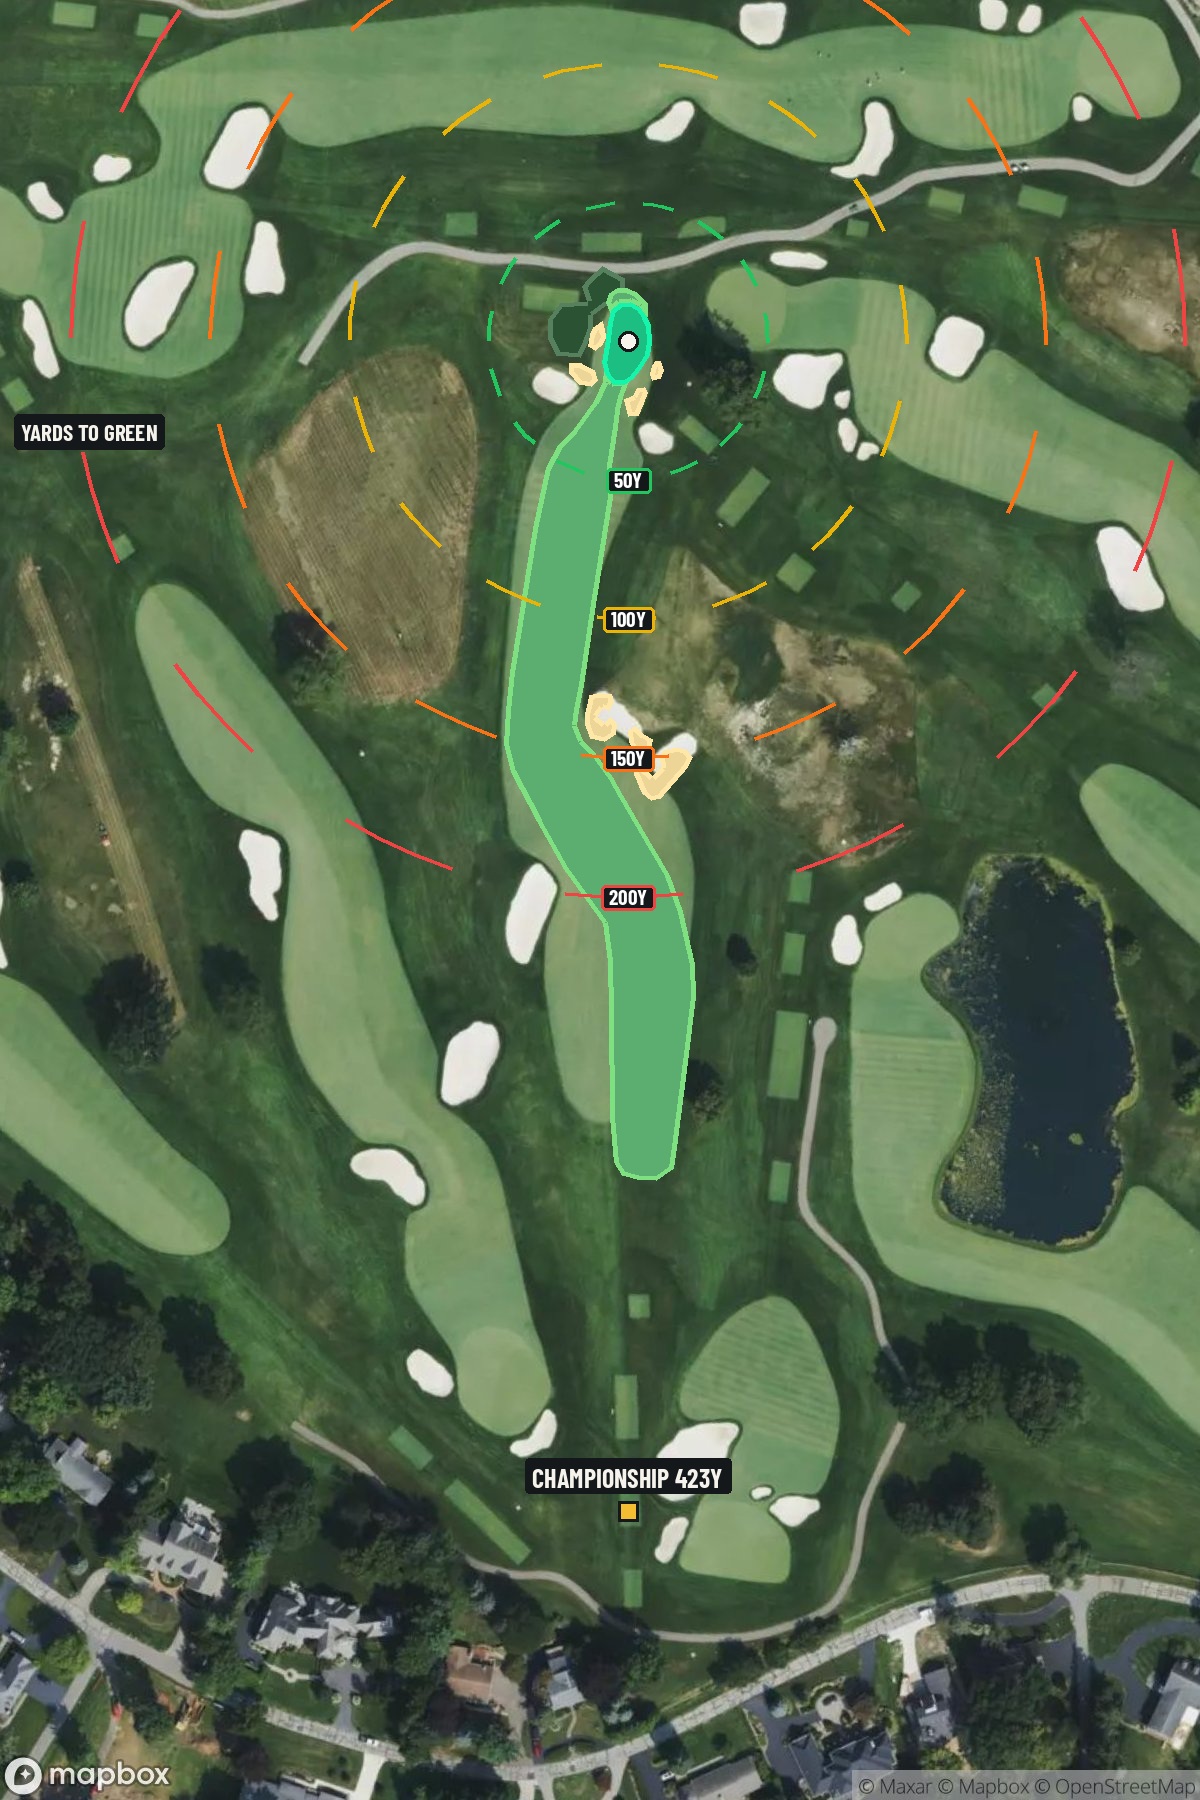
Hole 11 aerial at Oakland Hills Country Club (South Course)
Map distances from Championship tee · 423 yds

The map's printed distances are measured from the Championship tee to the green; they do not move when you change tees.

Green size: 30 yds deep × 18 yds wide

Mapbox Satellite composite · capture date not provided. Green at the top.

Where this map comes from

Satellite photo
Date not published
Mapbox satellite
Green contours
2017 survey
USGS lidar survey
Report a map problem
100%
Hole 11 aerial at Oakland Hills Country Club (South Course)

The plan for No. 11

The play: Oakland Hills Country Club's 11th hole stands as one of the most visually striking par 4s on "The Monster," the legendary South Course that has tested champions like Ben Hogan and Jack Nicklaus. This 423-yard beauty begins with an elevated tee shot that plunges into a dramatic valley, where a large hill bisects the fairway into two distinct landing areas. The strategic challenge intensifies with three deep bunkers guarding the right side, forcing players to carefully consider their line of attack. The divided fairway creates fascinating risk-reward decisions, as each landing zone offers different angles into the small green complex. This architectural masterpiece perfectly embodies the strategic brilliance that makes Oakland Hills one of golf's most revered championship venues.

Shot by shot

  1. Off the tee

    From the elevated tee, players face a critical decision point where the fairway splits around a central hill. The preferred target line is the left side of the fairway, which offers a cleaner approach angle to the green. However, this requires carrying the hill and committing to an aggressive line. More conservative players should favor a 3-wood or long iron aimed at the right landing area, staying well clear of the three deep bunkers that guard this side. The elevation provides extra carry, so club down accordingly - what normally plays as a driver might only need a 3-wood to reach the optimal landing zone.

  2. Approach & recovery

    The approach shot strategy depends entirely on your tee shot placement. From the left side of the fairway, you'll have a more direct angle to attack the small green with a mid-iron to short-iron. Players who found the right landing area face a more challenging angle but shouldn't despair - focus on the center of the green rather than chasing pins. The small green size demands precision, so take one extra club to ensure you clear any front protection and give yourself the best chance for a two-putt par.

  3. On the green

    The small green at the 11th rewards accurate approach shots and punishes those who miss the target. With limited real estate to work with, lag putting becomes crucial - getting your first putt close is more important than being aggressive toward the hole. The green's compact size means most putts will have manageable breaks, but the premium is on distance control rather than reading complex slopes. ## RISK VS REWARD The primary risk/reward decision comes on the tee shot. Aggressive players can challenge the left side of the fairway for the better approach angle, but this brings the hill and potential trouble into play. The safer play to the right side of the split fairway guarantees a clear lie but creates a more difficult approach angle. Given the small green, the reward for taking the riskier line may not justify the potential penalty for missing. ## DIFFERENT SKILL LEVELS **High Handicappers:** Focus on finding the fairway first, preferably on the right side where the landing area is more forgiving. Use a 3-wood or hybrid off the tee to ensure you stay in play, then take plenty of club on the approach and aim for the center of the green. Par is an excellent score here. **Low Handicappers:** Consider the aggressive line to the left side of the fairway if conditions are favorable, but have a clear bail-out plan. The elevated tee shot plays shorter than the yardage suggests, so trust your club selection. With the small green, precision trumps power - a smooth swing with proper club selection beats trying to overpower the hole. This hole exemplifies why Oakland Hills earned its "Monster" reputation - it looks manageable but punishes poor decisions and rewards strategic thinking and precise execution.

  4. Watch for

    • Course conditioning and mapped hazards may affect line selection; confirm from the aerial.

The green on No. 11

Mapped boundary
Wide × deepyards
18×30
Areasq ft
3,264

Gear for Hole 11

We may earn a commission when you buy through these links.

Course and tournament history

Historical context for the course and venue. Each entry identifies the event or course it describes.

  • Jack Nicklaus

    Jack Nicklaus, Gary Player, and Ben Hogan have competed and won on the famed South Course, also known as "The Monster"

    Source →

Course coverage

Tournament and creator videos about Oakland Hills Country Club (South Course) — shared course coverage, not hole-specific clips.

Official & tour

Tour & network videos

Official coverage mentioning Oakland Hills Country Club (South Course).

My U.S. Open: Andy North Relives His 1985 U.S. Open Victory at Oakland Hills

Featured by these creators

Creator videos about this course

YouTube creators who filmed or featured Oakland Hills Country Club (South Course). · Stats as of Nov 16, 2026 · 6d ago

Explore golf creators →

Alum Shares Internship Program at Oakland Hills

Golfer feedback

How did Hole 11 play?

⚡ Quick Golfer Pulse

How did this hole play today?

1-tap anonymous vote

Frequently asked questions

Yardage reference: Championship tees · 423 yards.

What's the best strategy off the tee?

↓

For this 423-yard par 4, most players will hit driver to set up a comfortable approach.

How difficult is hole 11?

↓

This hole is a moderate challenge for most golfers. Key challenges include: heavily bunkered, small green.

How big is the green on hole 11?

↓

The green is small and requires precision. The green is deeper than wide, so club selection is crucial. Expect challenging pin positions with limited room for error.