Hole 2 at Standard Country Club, The
- Par
- 4
- Yardage
- 351 yds
- Stroke index
- 9
- Hazards
- 5 bunkers
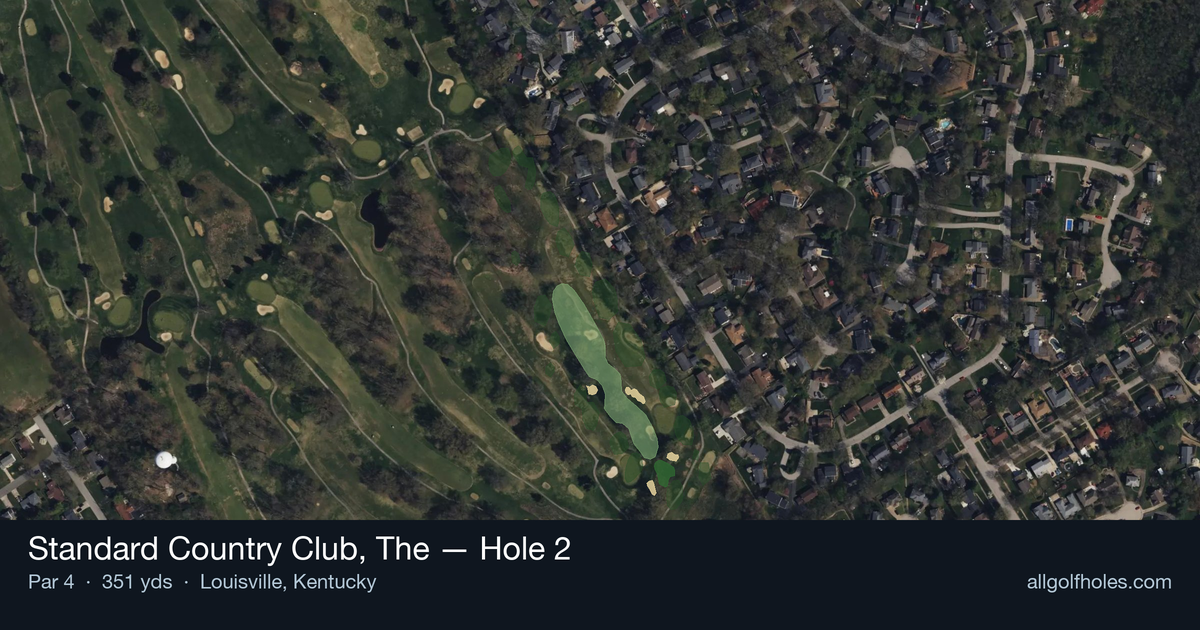
Aerial source not provided
Green size: 29 yds deep × 22 yds wide
Scorecard yardage is for Championship tees. The aerial shows its labeled reference position; distance rings measure to the green.
Championship tees · Par 4 · 351 yards
The plan for No. 2
The second hole at Standard Country Club, The presents a deceptively straightforward par 4 that rewards precision over power. At 351 yards, this straight-away layout invites aggressive play from the tee, but the small green demands surgical accuracy on the approach shot. The generous fairway allows golfers to find their rhythm early in the round, making it an ideal confidence-builder after the opening hole. Without significant hazards protecting the hole, success hinges entirely on distance control and green-reading skills. The compact putting surface punishes wayward approach shots, turning what appears to be a scoring opportunity into a test of short-game finesse. This hole exemplifies strategic golf design where simplicity creates its own challenge.
Off the tee
The straight layout allows you to be aggressive off the tee without fear of major trouble. Focus your target line down the center of the fairway, giving yourself the best angle into the small green. Most players can confidently hit driver here, as the 351-yard length provides plenty of room even for longer hitters. The key is finding the sweet spot in the landing zone - ideally leaving yourself between 100-130 yards for your approach. Avoid the temptation to grip it and rip it; instead, make a controlled, confident swing that prioritizes accuracy over maximum distance.
Approach & recovery
This is where the hole's teeth show. The small green demands precision with your approach shot, making club selection critical. With a good drive, you'll likely have a wedge or short iron in your hands - perfect clubs for attacking a small target. Aim for the center of the green regardless of pin position, as the small surface area makes going flag-hunting risky. Pay attention to wind conditions, as they can significantly affect shorter irons. A smooth, controlled swing with good tempo will serve you better than trying to muscle a shot close to a tucked pin.
On the green
The small green size means you won't face extremely long putts if you've hit a quality approach shot. Focus on reading the overall slope and getting your first putt close rather than being overly aggressive. Two-putting from anywhere on this green should be very manageable with good pace control. Be especially careful with downhill putts, as the smaller surface area leaves little room for error if you get too aggressive. ## RISK VS REWARD This hole offers a classic risk/reward scenario for your approach shot. The reward of getting close to the pin for a birdie opportunity is significant, but the risk of missing the small green entirely can lead to difficult up-and-downs. The smart play is typically aiming for the center of the green and accepting a 20-30 foot putt rather than firing at pins near the edges. However, if you're in a match situation or need to make up ground, the short approach distance makes this one of the better holes to take calculated risks. ## DIFFERENT SKILL LEVELS **High Handicappers:** Focus on hitting two solid, conservative shots. Use a club off the tee that you're confident with - even if it's a 3-wood or hybrid. For the approach, take one more club than you think you need and swing smoothly to the center of the green. Par is an excellent score here. **Low Handicappers:** This hole screams birdie opportunity. Be aggressive with driver to get as close as possible, then attack with a precise wedge or short iron. You have the skills to go at pins, but respect the small green size. This is a hole where you should expect to make birdie and be disappointed with anything worse than par. The beauty of this hole lies in its simplicity - no tricks, no hidden dangers, just pure golf execution. Make two good swings and you'll walk away with a score that helps your round.
Watch for
- Course conditioning and mapped hazards may affect line selection; confirm from the aerial.
Hole 2 Green Complex
Mapped green boundary
Green size: 3,126 sq ft
How did Hole 2 play?
How did this hole play today?
Frequently asked questions
Yardage reference: Championship tees · 351 yards.
What's the best strategy off the tee?
↓
For this 351-yard par 4, most players will hit 3-wood or driver to set up a comfortable approach.
How difficult is hole 2?
↓
This hole is a good scoring opportunity for most golfers. Key challenges include: small green.
How big is the green on hole 2?
↓
The green is small and requires precision. Expect challenging pin positions with limited room for error.
What's a good score on hole 2?
↓
This hole is a medium-length test where par is a solid result. A straightforward par 4 where course management pays off.