Spyglass Hill Golf Course Hole by Hole - 11th Hole
Spyglass Hill Golf Course, California
Submit a tipThere are no reviews for this hole yet
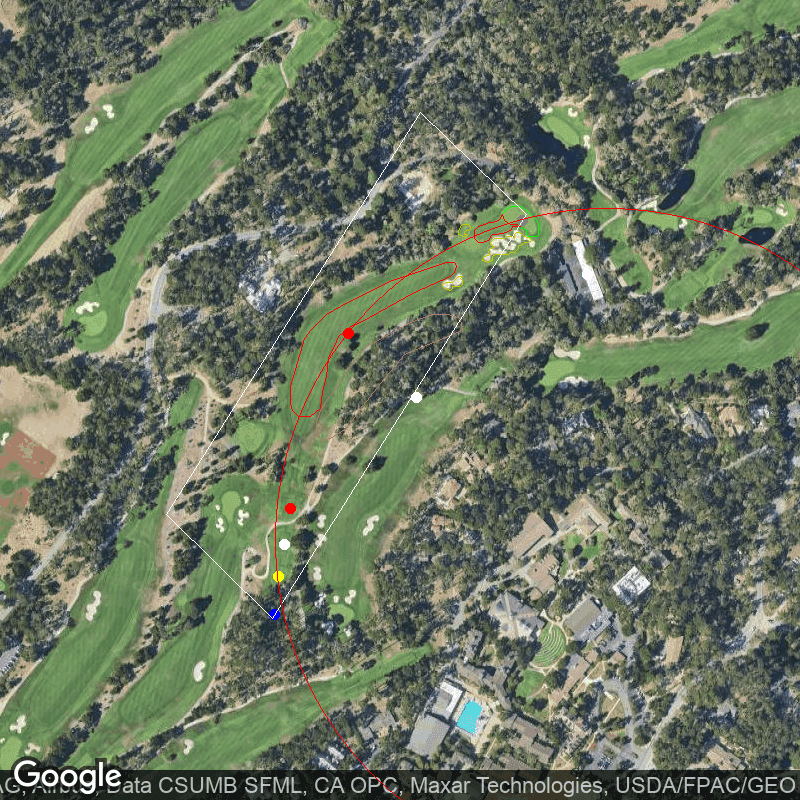
Welcome to the 11th hole at Spyglass Hill Golf Course, a challenging par 5 that requires strategic thinking and precise execution. Located in Pebble Beach, California, this course is known for its stunning views and challenging layout.
From the championship tees, this hole measures 528 yards with a handicap of 10. This makes it one of the more difficult holes on the course, but don't let that intimidate you. With some careful planning and smart shot selection, you can conquer this hole like a pro.
As you stand on the tee box, take note of the slight dogleg right and fairway width of approximately 32 yards. The curvature of this hole will require you to shape your shots accordingly in order to avoid any hazards or obstacles.
Speaking of hazards, there are three bunkers strategically placed along the fairway and around the green. However, as they only make up less than 1% of total bunker coverage on this hole (greenside bunkers as a % of total), they should not be too much cause for concern.
In terms of club selection off the tee box, our recommendation would be to use your driver (217 yards). This will give you enough distance while also keeping you out of trouble from any potential hazards.
As for your approach shot towards the green area measuring at an impressive 9673 sq ft., we suggest using either your 7 iron (140 yards) or pitching wedge (120 yards) depending on how far away from the green you are positioned. Keep in mind that altitude and weather conditions may impact ball flight so adjust accordingly.
Overall, Hole #11 at Spyglass Hill Golf Course is sure to test both your physical abilities as well as mental fortitude. But with proper strategy and execution, it can also be one where birdies or even eagles are possible if played smartly!
Teebox type:
Championship
Par:
5
Distance:
528 yards
Handicap:
10
Green Area:
9673
Approx Fairway Width:
32
Has Water:
False
Curvature:
Slight dogleg
Percent Bunkers Near green:
0
Bunker Count:
3
Bunkers:
Some fairway bunkers, with the majority (51%) strategically placed around the area.
Club Recommendations
1. Use a driver off the tee to get enough distance and avoid any potential hazards.
2. Take note of the slight dogleg right and shape your shots accordingly to stay on the fairway.
3. Be aware of the three strategically placed bunkers along the fairway and around the green, but don't let them intimidate you as they only make up less than 1% of total bunker coverage on this hole.
4. Consider using a 7 iron or pitching wedge for your approach shot towards the large green area, depending on your position and weather conditions.
5. Keep in mind that proper strategy and execution can lead to birdies or even eagles on this challenging par 5 hole at Spyglass Hill Golf Course.
"The most important shot in golf is the next one."
- Ben Hogan
Only signed in users can add reviews.
Sign inThere are no reviews for this hole yet