Hole 13 at La Costa Resort and Spa (South course)
- Par
- 4
- Yardage
- 448 yds
- Hazards
- 8 bunkers
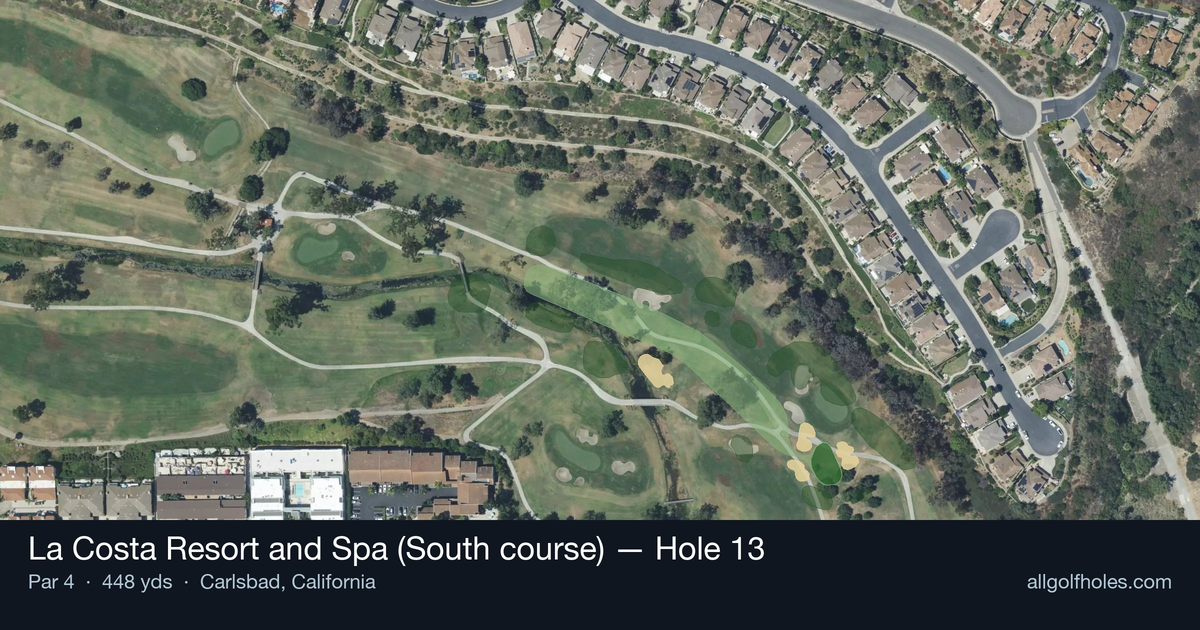
Aerial source not provided
Green size: 24 yds deep × 25 yds wide
Scorecard yardage is for Championship tees. The aerial shows its labeled reference position; distance rings measure to the green.
Championship tees · Par 4 · 448 yards
The plan for No. 13
La Costa Resort and Spa (South course) hole 13 presents a formidable test as the number one handicap hole, demanding precision and power over its 448 yards. This straight par 4 stretches through the rolling terrain of Carlsbad's coastal foothills, where the Pacific breeze can significantly influence club selection. The tee shot requires accuracy to find the optimal position for attacking the small, well-guarded green complex. With minimal hazards cluttering the landscape, this hole's defense lies in its length and the challenge of hitting and holding a compact putting surface. The approach shot becomes the critical moment, where course management and precise iron play separate good scores from great ones on this championship-caliber test.
Off the tee
The tee shot strategy centers on maximizing distance while maintaining accuracy down the center of the fairway. With 448 yards to cover, most players will need every yard they can safely achieve off the tee. Driver is typically the right choice here, aimed down the center-left portion of the fairway to account for natural draw or to set up the best angle for your typical shot shape. Focus on a smooth, controlled swing rather than trying to overpower the shot. The straight layout rewards consistency over heroics. Players who struggle with driver accuracy might consider a strong 3-wood, accepting the longer approach in exchange for finding the fairway. Position is less critical than distance on this hole, making the center of the fairway your primary target.
Approach & recovery
The approach shot represents the hole's primary defense, with the small green demanding pinpoint accuracy. After a solid drive, expect to have a mid to long iron remaining, depending on conditions and tee position. The compact green size means club selection must be precise – taking enough club to reach the putting surface while avoiding flying the green entirely. Aim for the center of the green regardless of pin position, as the small target leaves little room for aggressive pin-hunting. A two-putt from anywhere on this green should be considered a victory. Pay attention to wind conditions, which can significantly impact club selection on this longer approach shot. When in doubt, favor taking one more club rather than coming up short.
On the green
The small green creates interesting putting challenges, as even successful approach shots can leave longer putts than expected. Focus on lag putting to ensure your first putt finishes within comfortable two-putt range. The green's compact size means slopes and breaks will be more pronounced, so take time to read the terrain carefully. Given the difficulty of the approach shot, many players will face longer putts, making distance control more important than perfect line reading. Practice your pace putting before the round, as three-putts can quickly turn a hard-earned par opportunity into a damaging bogey or worse. ## RISK VS REWARD This hole offers limited risk/reward opportunities, instead demanding solid execution on both primary shots. The main decision point comes with tee shot club selection – the reward of additional distance with driver versus the safety of a more controlled fairway wood. Given the hole's length, most players will find that the risk of driver is justified by the significantly easier approach shot it provides. The approach shot offers no real risk/reward scenarios due to the small green size. Conservative play targeting the center of the green represents the highest percentage strategy for scoring well. ## DIFFERENT SKILL LEVELS **Higher Handicap Players:** Focus on finding the fairway with your most reliable tee shot, even if it means using a 3-wood or hybrid. Accept that this will likely be a bogey hole and play for that score. On the approach, take plenty of club and aim for the center of the green, prioritizing getting on the putting surface over getting close to the pin. **Lower Handicap Players:** This hole demands your A-game with driver to set up a manageable approach. Be aggressive off the tee while maintaining accuracy, then commit fully to your approach shot club selection. The small green rewards confident, committed swings over tentative shots. Consider this a potential birdie opportunity only when conditions are perfect and you've executed a superior tee shot. The key for all skill levels is accepting the hole's difficulty and playing within your capabilities rather than forcing shots that exceed your comfort zone.
Watch for
- Course conditioning and mapped hazards may affect line selection; confirm from the aerial.
Hole 13 Green Complex
Mapped green boundary
Green size: 2,932 sq ft
How did Hole 13 play?
How did this hole play today?
Frequently asked questions
Yardage reference: Championship tees · 448 yards.
What's the best strategy off the tee?
↓
For this 448-yard par 4, most players will hit driver to set up a comfortable approach.
How difficult is hole 13?
↓
This hole is a good scoring opportunity for most golfers.
What's a good score on hole 13?
↓
This hole is a demanding hole where bogey is not unusual. This longer par 4 will test most golfers. Focus on position over distance.