Hole 3 at TPC San Antonio (Oaks Course)
- Par
- 3
- Yardage
- 213 yds
- Stroke index
- 13
- Hazards
- 2 bunkers · Water
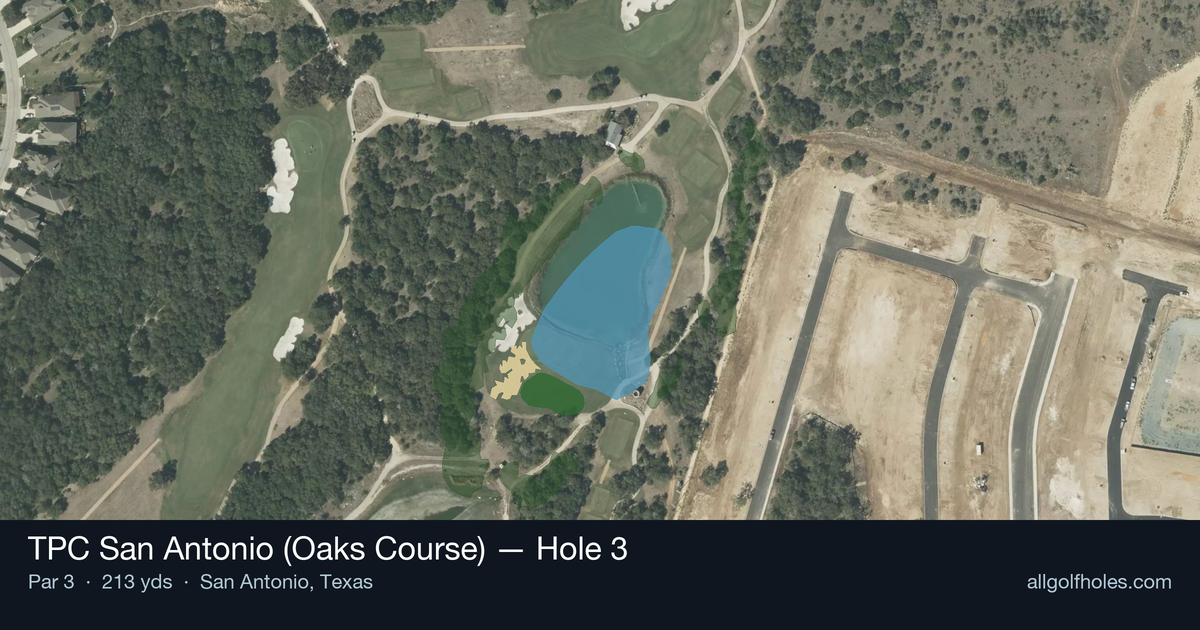
Aerial source not provided
Green size: 27 yds deep × 43 yds wide
Scorecard yardage is for Championship tees. The aerial shows its labeled reference position; distance rings measure to the green.
Championship tees · Par 3 · 213 yards
The plan for No. 3
The third hole at TPC San Antonio's Oaks Course presents a deceptively straightforward par 3 that demands precision over power. At 213 yards, this straight shot challenges golfers to navigate to a small, well-protected green that refuses to forgive wayward approaches. The absence of major hazards might suggest an easier proposition, but the compact target and strategic bunkering around the green complex create their own intimidation factor. Club selection becomes paramount on this mid-length par 3, where the difference between a confident mid-iron and a forced long iron can determine success. TPC San Antonio hole 3 rewards accurate tee shots while punishing those who underestimate its subtle demands, making it a memorable test of precision in the heart of Texas golf country.
Off the tee
Your tee shot is your approach shot on this par-3, making club selection absolutely critical. Take time to assess wind conditions and pin position before committing to your club. Most players will be looking at anything from a 6-iron to a 4-iron depending on conditions and personal distances. Aim for the center of the green rather than chasing pins, especially early in the round when you're still finding your rhythm. Focus on a smooth, balanced swing rather than trying to muscle the shot – tempo and solid contact are your best friends here.
Approach & recovery
Since this is a par-3, your approach strategy centers on green-reading and understanding how the ball will react upon landing. With a small green, there's little margin for error, so prioritize hitting the putting surface over getting close to the pin. Study the green's slope and grain during your pre-shot routine. If the pin is tucked in a difficult position, don't hesitate to aim for the fat part of the green and rely on your putting to get up and down.
On the green
The small green size means most putts will be relatively manageable in length, but don't underestimate the importance of reading the subtle breaks correctly. Pay attention to the overall slope of the green and how putts from different areas will behave. Since you're likely hitting a mid-iron into this green, expect some spin and plan for how your ball will check up or release. Leave yourself uphill putts when possible by favoring the lower side of pin positions. ## RISK VS REWARD This hole's risk/reward equation is refreshingly simple: there's minimal reward for aggressive play, so the smart strategy is conservative execution. The main risk comes from missing the green entirely with the small target, leading to difficult up-and-down situations. The reward for finding the green is a legitimate birdie chance, but pars should be readily accepted. Avoid the temptation to fire at tucked pins unless you're feeling particularly confident with your iron play. ## DIFFERENT SKILL LEVELS **High-Handicap Players:** Focus entirely on finding the green with your most reliable mid-iron. Don't worry about pin position – aim for the center and be thrilled with any putt for birdie. Take one extra club if you're between selections, as coming up short is typically worse than being long. Practice your pre-shot routine on par-3s like this to build confidence. **Low-Handicap Players:** This is a hole where you can be more aggressive with pin-seeking, especially if you're confident in your distance control. Use the straightforward nature of the hole to dial in your iron distances for later in the round. Consider how this hole fits into your overall round strategy – it's an excellent scoring opportunity that shouldn't be wasted with poor execution or unnecessary risks.
Watch for
- Course conditioning and mapped hazards may affect line selection; confirm from the aerial.
Hole 3 Green Complex
Mapped green boundary
Green size: 5,945 sq ft
Course coverage
Tournament and creator videos about TPC San Antonio (Oaks Course) — shared course coverage, not hole-specific clips.
Tournament coverage
Valero Texas Open highlights
Valero Texas Open | Final Round Highlights
2025
How did Hole 3 play?
How did this hole play today?
Frequently asked questions
Yardage reference: Championship tees · 213 yards.
What club should I use on this par 3?
↓
At 213 yards, most golfers will need a fairway wood or hybrid to reach this green. Adjust for elevation, wind, and pin position.
How difficult is hole 3?
↓
This hole is one of the tougher holes on the course for most golfers. Key challenges include: long par 3, water in play.
What hazards should I watch out for on hole 3?
↓
Key hazards include: water at 110.7 yards. Plan your shots to avoid these trouble spots.
How big is the green on hole 3?
↓
The green is medium-sized with moderate targets. The green is wider than it is deep, rewarding shots that find the correct tier. Pay attention to pin placement when selecting your approach club.
What's a good score on hole 3?
↓
This hole is a challenging par where bogey is acceptable. This longer par 3 will test your long iron or hybrid game. Par is a good score.