Hole 1 at Oakmont Country Club
- Par
- 4
- Yardage
- 482 yds
- Stroke index
- 3
- Hazards
- 11 bunkers
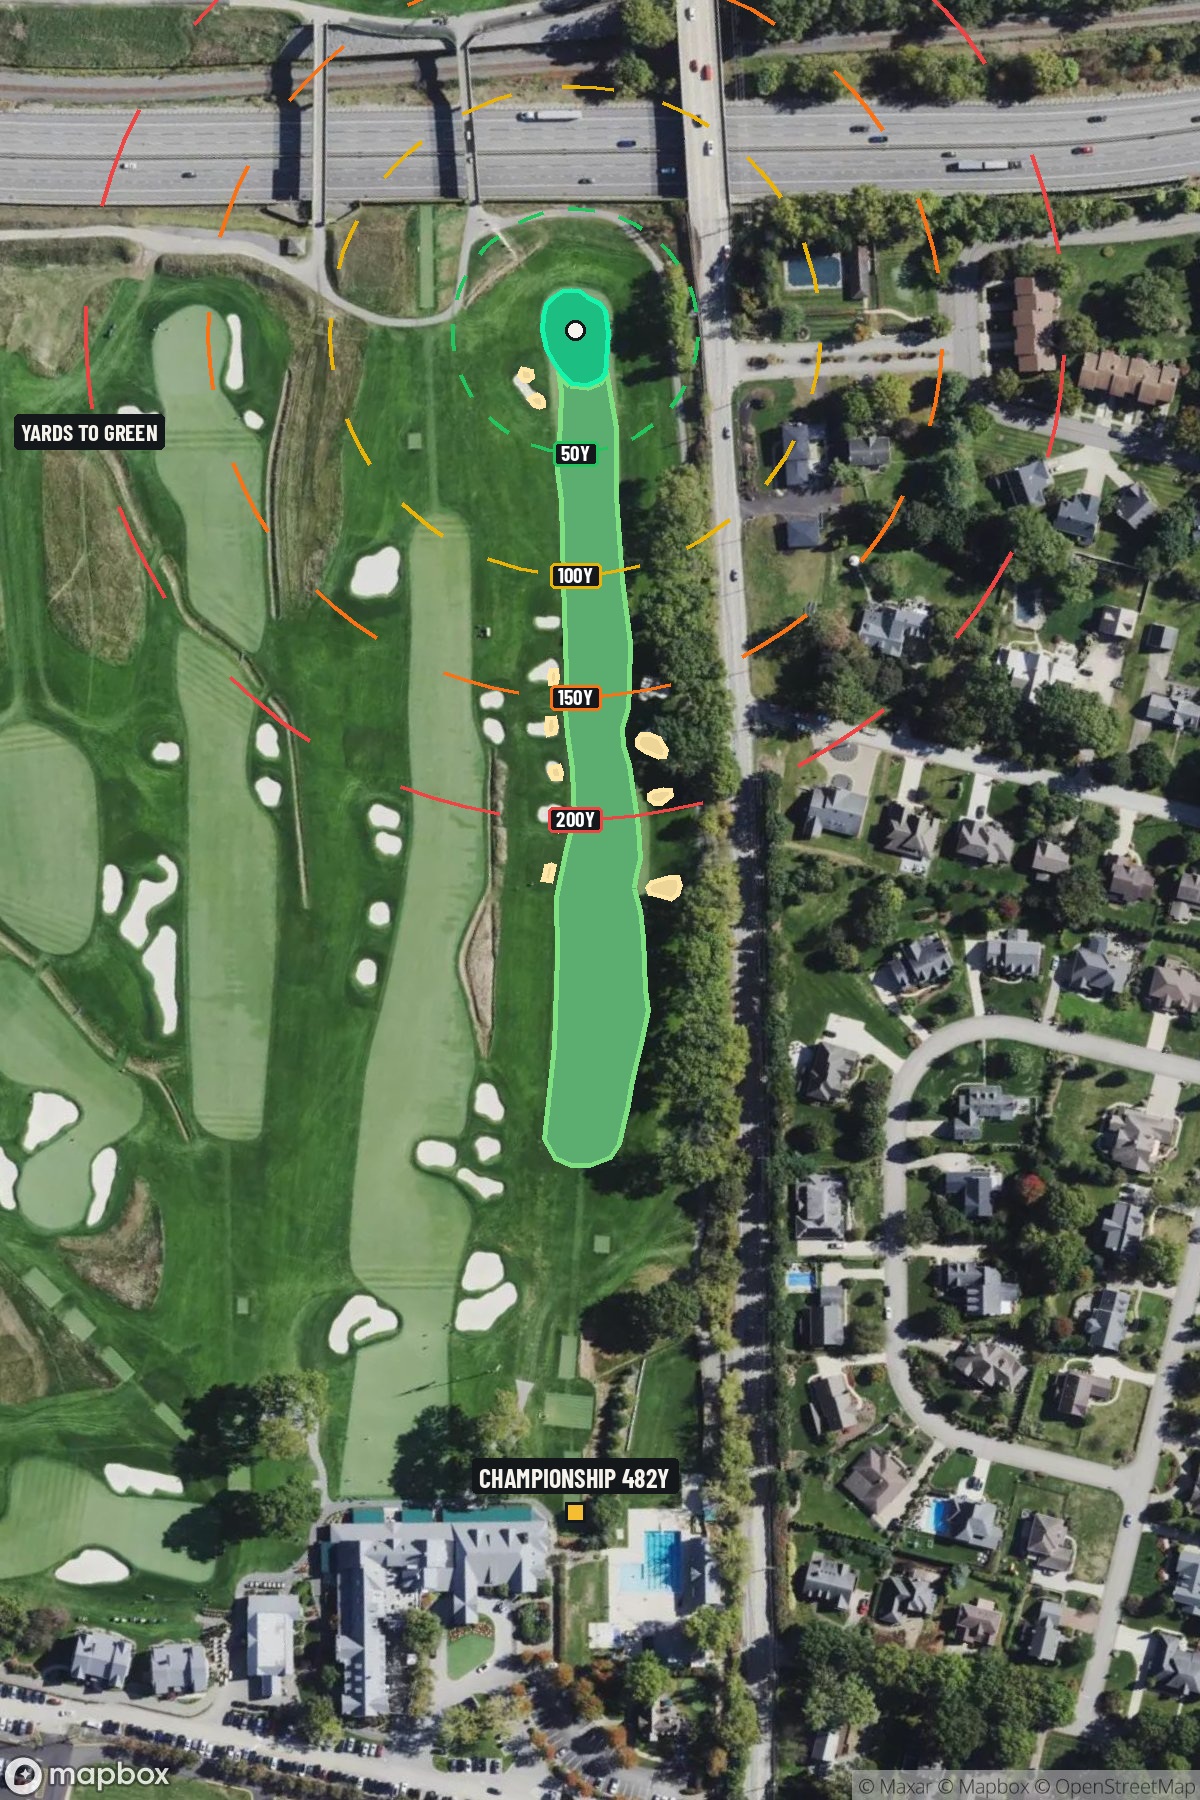 Hole 1 map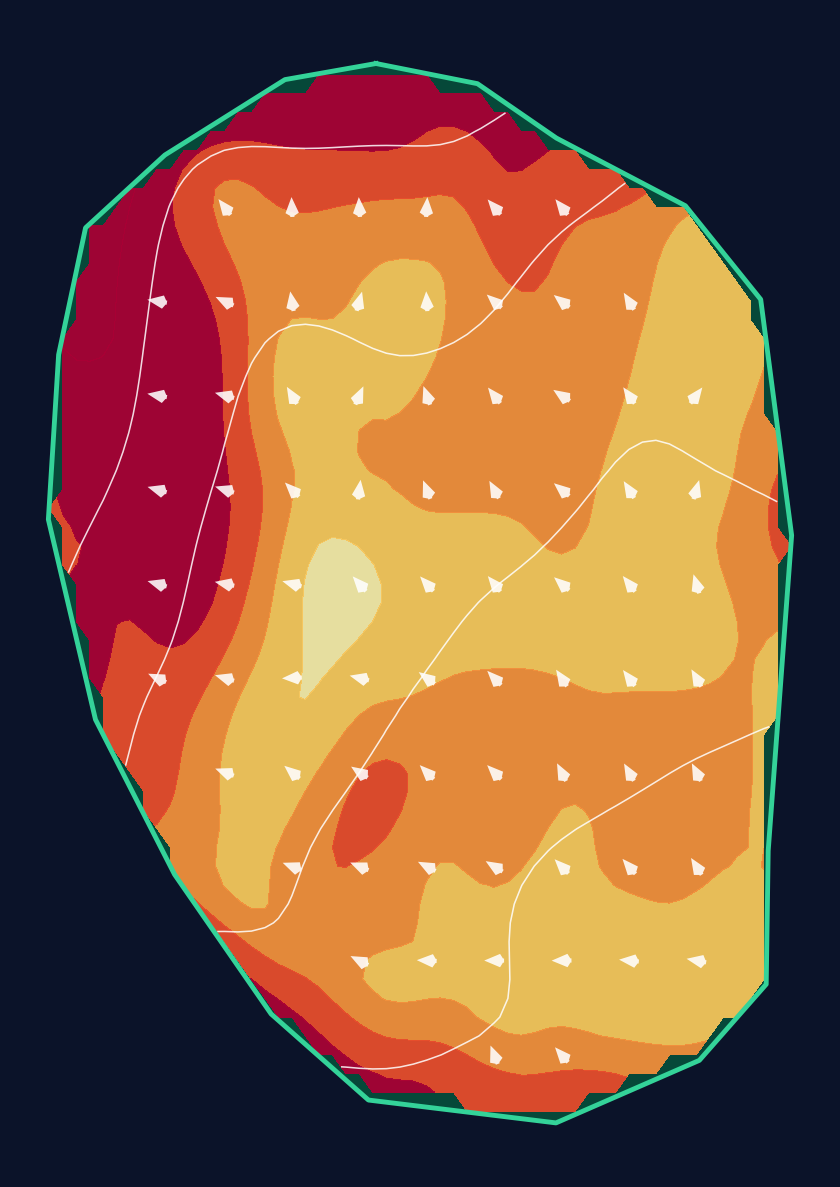
29 yd wide × 41 yd deep · 4.8 ft total elevation range
Light = gentler slope · Red = steeper slope
White lines: 1 foot of elevation. Arrows: downhill. General terrain, not a pin read.
Approach from bottom
Contour source
USGS 1 Meter 17 x59y449 PA_WesternPA_2019_D20 · collection 2019–2020
Map source & reference
Mapbox Satellite composite · capture date not provided. Green at the top; the labeled map reference is below.
Scorecard yardage is for Championship tees. The aerial shows its labeled reference position; distance rings measure to the green.
Championship tees · Par 4 · 482 yards
The plan for No. 1
Oakmont Country Club's opening hole immediately announces the championship pedigree that has hosted nine U.S. Opens. This demanding 482-yard par 4 presents a deceptively straightforward challenge that sets the tone for one of America's most revered tests of golf. The straight layout demands precision from the tee, where players must navigate to an optimal position for their approach to a small, well-guarded green complex. Despite the absence of major hazards, Oakmont's legendary conditioning and subtle undulations create plenty of difficulty. The green's compact size places a premium on accurate iron play, rewarding those who can dial in their distance control. This opening hole epitomizes Oakmont's philosophy: no tricks, just pure golf execution under pressure.
Off the tee
The tee shot strategy revolves around maximizing distance while maintaining control. Given the 482-yard length, most players will need their driver to have any realistic chance of reaching the green in regulation. Focus on the center of the fairway as your target line - Oakmont's fairways are generous enough to reward center-cut drives, but the rough is punishing enough to make accuracy paramount. For longer hitters, an aggressive driver aimed at the heart of the landing zone offers the best chance to set up a manageable approach. Mid-handicap players should resist the urge to overswing; a smooth, controlled driver swing that finds the fairway is far more valuable than extra distance that ends up in Oakmont's notorious rough.
Approach & recovery
The approach shot to Oakmont's first green requires precision above all else. With a small green as your target, club selection becomes critical - take enough club to ensure you reach the putting surface, as short approaches into Oakmont's collection areas are scoring killers. Most players will face a mid-iron to long-iron approach, depending on their tee shot success and pin position. The key is committing to your club selection and making solid contact. Oakmont's greens are known for their firmness, so plan for some roll upon landing. Favor the center of the green regardless of pin position - the small target makes going for pins a low-percentage play for most golfers.
On the green
Oakmont's greens are legendary for their speed and subtle breaks. On the first hole, focus on getting your first putt close rather than trying to hole everything. The small green size means most putts will be relatively straight, but don't underestimate the grain and subtle slopes that can affect ball roll. Pay attention to your approach angle when reading putts - balls coming from different directions can break differently on these lightning-fast surfaces. Above all, avoid three-putts at all costs. A solid two-putt par is an excellent start to any Oakmont round. ## RISK VS REWARD The primary risk/reward decision comes with tee shot aggressiveness. Bombing a driver down the middle sets up the best approach angle and distance, but wayward drives into Oakmont's rough can quickly turn par into bogey or worse. The reward for finding the fairway with good distance is a manageable mid-iron approach; the penalty for missing is often a difficult recovery shot and a likely bogey. There's limited reward for going at pins on the approach given the small green size. The smart play is always center of the green, making this more about course management than aggressive scoring. ## DIFFERENT SKILL LEVELS **Low Handicappers** should play aggressively off the tee with driver, aiming for maximum distance while maintaining fairway accuracy. They can afford to be more precise with approach shots and should focus on leaving putts below the hole when possible. **High Handicappers** might consider a fairway wood or hybrid off the tee if driver accuracy is inconsistent. The priority is avoiding big numbers - finding the fairway with the tee shot and the green with the approach, regardless of distance from the pin. Accept that this is a difficult hole where par is a great score. **Mid Handicappers** should stick with driver but focus on tempo and control rather than maximum distance. Take plenty of club on the approach and aim for the fat part of the green. This hole rewards patience and smart course management over heroic shots.
Watch for
- Crossing center
Hole 1 Green Complex & Slope
USGS 3DEP terrain analysis
Green size: 7,293 sq ft
Course coverage
Tournament and creator videos about Oakmont Country Club — shared course coverage, not hole-specific clips.
Featured by these creators
Creator videos about this course
YouTube creators who filmed or featured Oakmont Country Club. · Stats as of Oct 12, 2026 · 5d ago
The World's Hardest Golf Course: Oakmont Country Club
Deep Dive: Oakmont Country Club | Designing Golf
The Architecture of Oakmont Country Club | 2025 U.S. Open Preview
How did Hole 1 play?
How did this hole play today?
Frequently asked questions
Yardage reference: Championship tees · 482 yards.
What's the best strategy off the tee?
↓
For this 482-yard par 4, most players will hit driver to set up a comfortable approach.
How difficult is hole 1?
↓
This hole is a moderate challenge for most golfers. Key challenges include: long par 4, large green requiring good lag putting.
How big is the green on hole 1?
↓
The green is fairly large with multiple pin positions. Lag putting becomes important on longer putts.
What's a good score on hole 1?
↓
This hole is one of the tougher holes where par feels like birdie. A challenging par 4. Accept that bogey happens and avoid big numbers.