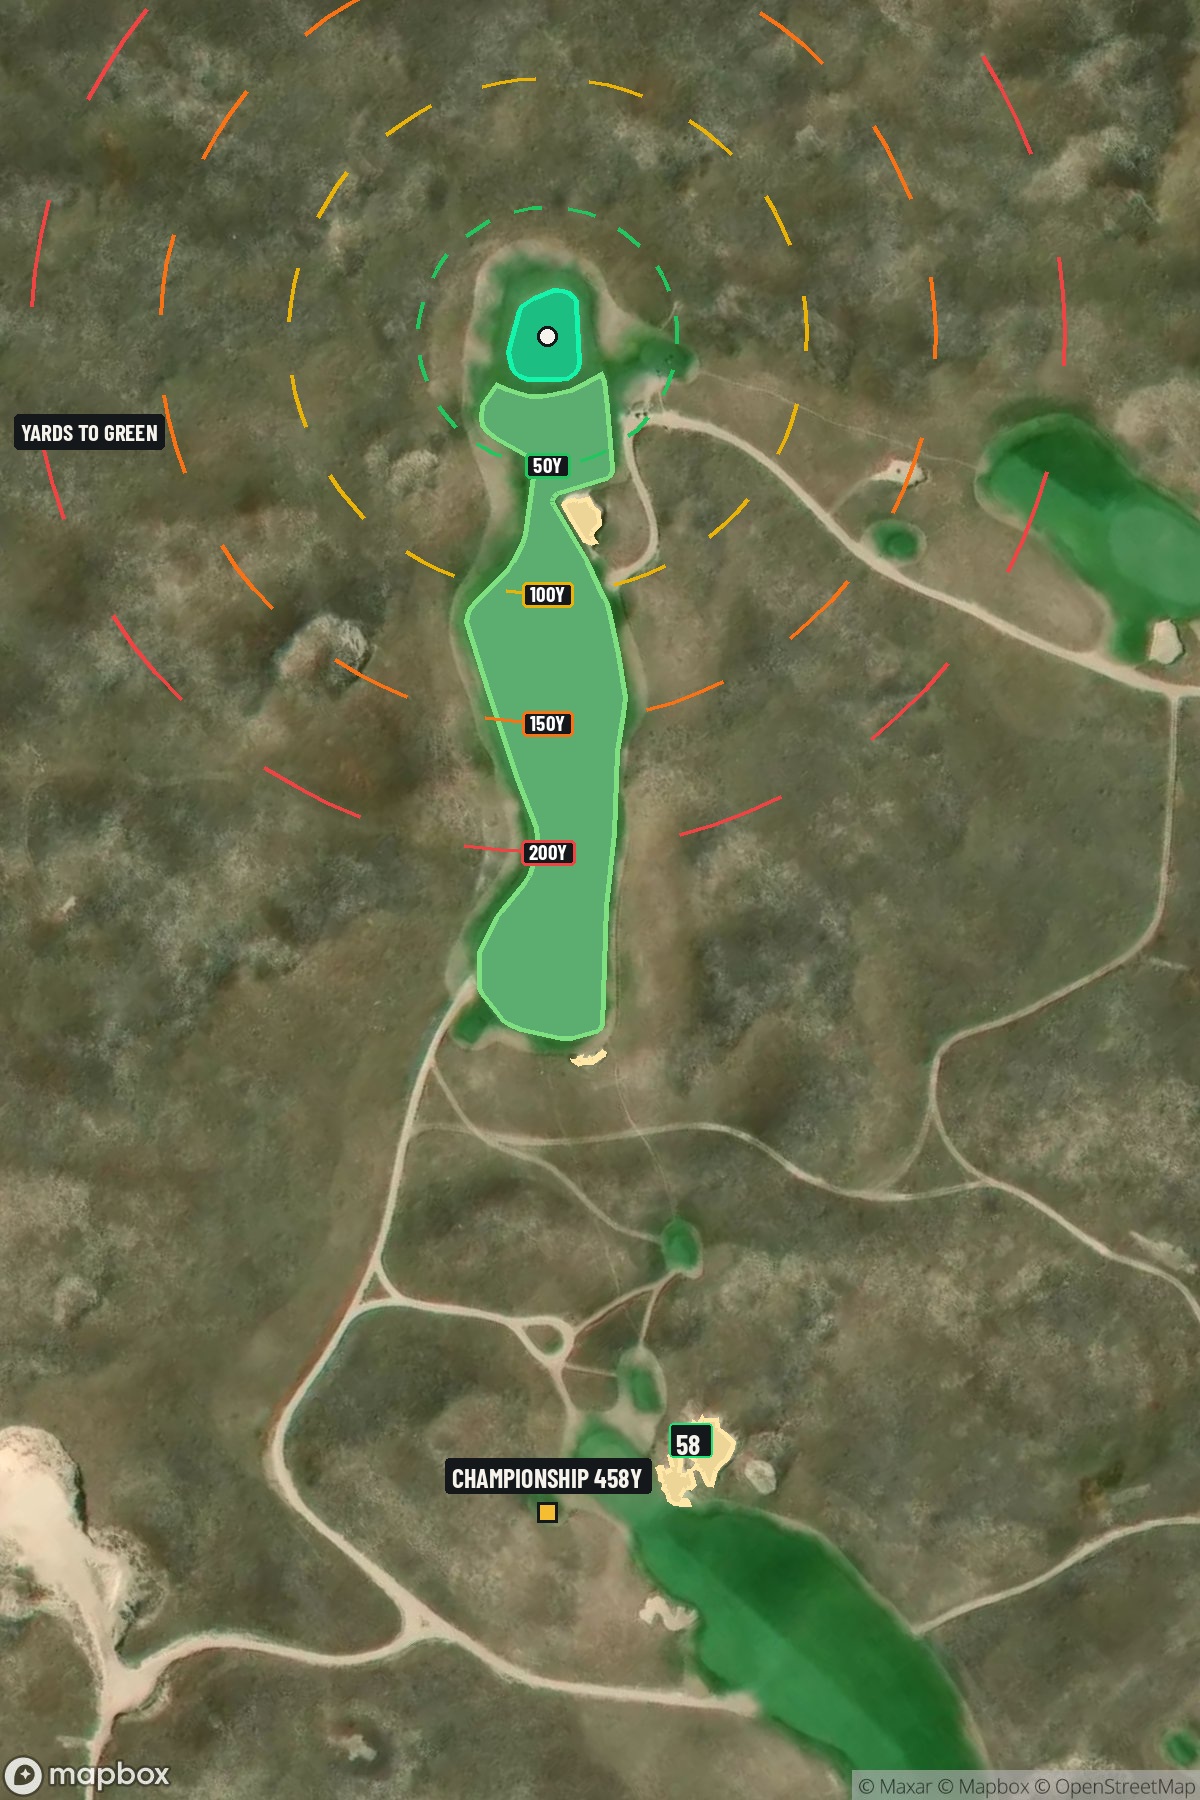
Hole 2 of 18 · Mullen, Nebraska

Hole 2 at Sand Hills Golf Club

Par
4
Yards
458
Handicap
10
Bunkers
4
Hole 2 aerial at Sand Hills Golf Club
Map distances from Championship tee · 458 yds

The map's printed distances are measured from the Championship tee to the green; they do not move when you change tees.

Green size: 36 yds deep × 29 yds wide

Mapbox Satellite composite · capture date not provided. Green at the top.

Where this map comes from

Satellite photo
Date not published
Mapbox satellite
Green contours
2023–2024 survey
USGS lidar survey
Report a map problem
100%
Hole 2 aerial at Sand Hills Golf Club

The plan for No. 2

The play: The second hole at Sand Hills Golf Club presents a deceptively challenging par 4 that epitomizes the course's minimalist philosophy in Nebraska's stunning Sandhills region. This 458-yard straight-away demands precision over power, with the tee shot requiring careful placement to set up an optimal approach to the small, subtly contoured green. The absence of traditional hazards doesn't diminish the strategic complexity—instead, the natural undulations and firm playing conditions characteristic of Sand Hills create their own challenges. The compact green rewards accurate iron play while severely punishing wayward approaches that must navigate the surrounding native grasses. This hole perfectly captures Sand Hills' reputation for strategic golf where every shot matters, making it a memorable test that embodies the course's world-renowned design principles.

Shot by shot

  1. Off the tee

    Your tee shot strategy should prioritize finding the optimal distance for your approach shot. Most players will benefit from a controlled driver or strong 3-wood, aiming to leave themselves with a comfortable mid-iron into the green. The key target line runs straight down the middle of the fairway, giving you the best angle into that small green. Longer hitters might consider throttling back slightly to ensure they stay in their preferred yardage range for approach shots. The straight layout means there's no advantage to working the ball either direction - commit to your most reliable shot shape and execute with confidence.

  2. Approach & recovery

    The approach shot is where this hole reveals its teeth. That small green becomes an increasingly difficult target as the pin position changes throughout the round. Focus on the center of the green regardless of pin position, as the margin for error is minimal. A mid-iron to long-iron will typically be required, depending on your tee shot and conditions. Club selection becomes critical here - it's better to be slightly long than short, as you'll have more green to work with for recovery shots. Take one extra club if you're between selections, and commit to a smooth, controlled swing rather than trying to muscle a shorter iron.

  3. On the green

    The small putting surface means every approach shot that finds the green puts you in excellent position for birdie. However, this also means that lag putting becomes crucial - three-putts can quickly turn a scoring opportunity into a bogey. Focus on speed control above all else, as the compact green won't give you much room to work with on longer putts. Most putts will be relatively straight given the green's size, but pay attention to the overall slope and grain direction to read the subtleties correctly. ## RISK VS REWARD This hole presents a subtle risk/reward scenario. The reward comes from aggressive play into that small green when you have a good lie and comfortable yardage. The risk is in forcing shots when conditions aren't ideal - the small target punishes anything less than precise execution. The biggest reward opportunity comes from a perfectly executed tee shot that leaves you with your favorite approach distance. From there, an aggressive line at the pin can set up birdie chances, but only when you're fully committed to the shot. ## DIFFERENT SKILL LEVELS **High-handicap players** should treat this as a par hole from the start. Focus on keeping the ball in play off the tee with your most reliable club, even if it means hitting less than driver. On the approach, aim for the center of the green regardless of pin position, and take plenty of club to ensure you reach the putting surface. **Low-handicap players** can be more aggressive with their target selection, especially when pin positions favor their preferred shot shape. These players should use their distance control to dial in specific yardages off the tee, setting up optimal approach angles. With precise iron play, this hole offers legitimate birdie opportunities for skilled players who execute their game plan. The key for all skill levels is recognizing that while this hole lacks dramatic hazards, it rewards precision and punishes carelessness through its compact green and demanding approach shots.

  4. Watch for

    • Course conditioning and mapped hazards may affect line selection; confirm from the aerial.

The green on No. 2

Mapped boundary
Wide × deepyards
29×36
Areasq ft
7,072

Gear for Hole 2

We may earn a commission when you buy through these links.

Course coverage

Tournament and creator videos about Sand Hills Golf Club — shared course coverage, not hole-specific clips.

Featured by these creators

Creator videos about this course

YouTube creators who filmed or featured Sand Hills Golf Club. · Stats as of Nov 16, 2026 · 6d ago

Explore golf creators →

The Story of Sand Hills | Designing Golf

Kapalua, Sand Hills, & 35 Years at Skokie Country Club | The Fried Egg Golf Podcast

Golfer feedback

How did Hole 2 play?

⚡ Quick Golfer Pulse

How did this hole play today?

1-tap anonymous vote

Frequently asked questions

Yardage reference: Championship tees · 458 yards.

What's the best strategy off the tee?

↓

For this 458-yard par 4, most players will hit driver to set up a comfortable approach. Be mindful of the bunker at 58.2 yards if you hit driver.

How difficult is hole 2?

↓

This hole is a moderate challenge for most golfers. Key challenges include: long par 4, large green requiring good lag putting.

What hazards should I watch out for on hole 2?

↓

Key hazards include: fairway bunker at 58.2-58.2 yards. Plan your shots to avoid these trouble spots.

How big is the green on hole 2?

↓

The green is fairly large with multiple pin positions. Lag putting becomes important on longer putts.

Which side of the fairway is safer on hole 2?

↓

Aim for the left side of the fairway when possible. Missing right brings more trouble into play.

What's a good score on hole 2?

↓

This hole is one of the tougher holes where par feels like birdie. A challenging par 4. Accept that bogey happens and avoid big numbers.