Hole 11 of 18 · Mullen, Nebraska

Hole 11 at Sand Hills Golf Club

Par
4
Yards
408
Handicap
9
Bunkers
8
Hole 11 aerial at Sand Hills Golf Club
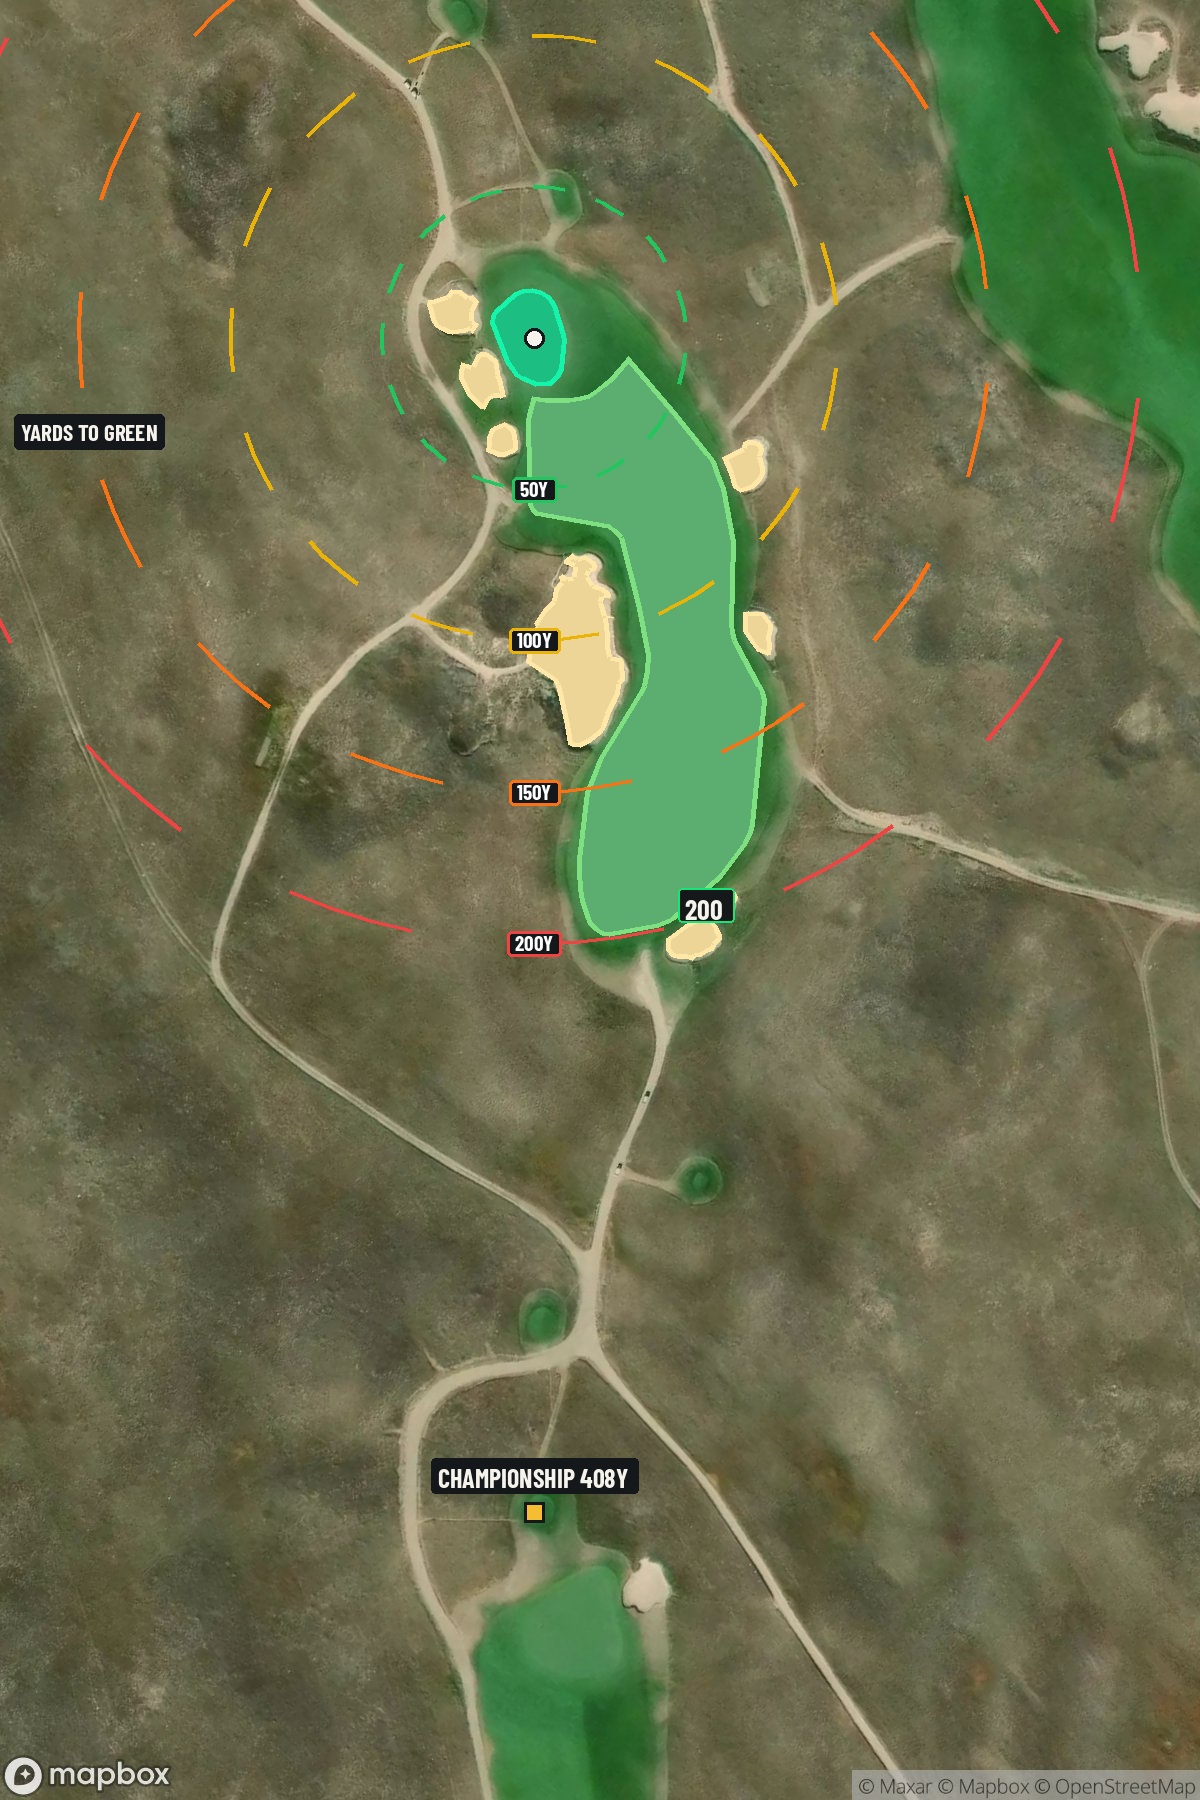
Map distances from Championship tee · 408 yds

The map's printed distances are measured from the Championship tee to the green; they do not move when you change tees.

Green size: 33 yds deep × 25 yds wide

Mapbox Satellite composite · capture date not provided. Green at the top.

Where this map comes from

Satellite photo
Date not published
Mapbox satellite
Green contours
2023–2024 survey
USGS lidar survey
Report a map problem
100%
Hole 11 aerial at Sand Hills Golf Club

The plan for No. 11

The play: Sand Hills Golf Club hole 11 presents a deceptively straightforward par 4 that embodies the minimalist elegance this renowned Nebraska links is famous for. At 408 yards, this straight hole appears simple from the elevated tee, but the absence of traditional hazards places premium emphasis on precision and course management. The rolling fairway flows naturally through the Sandhills terrain, demanding an accurate tee shot to set up the optimal approach angle. The small green complex requires a deft touch, as its subtle contours can easily reject wayward approach shots. What makes this hole memorable is how it strips golf down to its purest elements—no bunkers or water, just you versus the timeless landscape that has made Sand Hills a pilgrimage destination for golfers worldwide.

Shot by shot

  1. Off the tee

    The tee shot strategy centers on finding the ideal position in the landing zone to set up your approach. With no major hazards to navigate, focus on driving to your preferred yardage for the approach shot. Most players should aim for the center-left portion of the fairway, which typically provides the best angle to the green. A drive of 250-270 yards will leave a comfortable short to mid-iron approach. Avoid the temptation to overpower the tee shot - accuracy trumps distance here, as even a well-struck drive that finds the rough can complicate your approach to the small green.

  2. Approach & recovery

    The approach shot is where this hole reveals its teeth. The small green demands pinpoint accuracy, making club selection critical. Take one extra club to ensure you carry any front-edge trouble and give yourself margin for error. Aim for the center of the green regardless of pin position - the compact size means you'll rarely be more than 20-30 feet from any hole location. Pay close attention to wind direction, as it can easily turn a well-struck mid-iron into a short or long miss. If the pin is tucked, resist the urge to fire directly at it; the small target makes aggressive play unnecessarily risky.

  3. On the green

    The putting surface, while small, can present subtle breaks that aren't immediately apparent. Take time to read the green from multiple angles, as the compact size can create optical illusions about slope direction. Generally, putts will break toward the surrounding natural drainage patterns. Focus on lag putting to the correct level, as the small green means most birdie attempts will be from relatively short range. Avoid leaving yourself above the hole when possible, as downhill putts on this green can be tricky to judge. ## RISK VS REWARD This hole offers a classic risk/reward scenario disguised as a straightforward par 4. The reward is clear - a well-positioned drive and accurate approach can yield birdie opportunities. However, the risk lies in the precision required for the approach shot. The small green punishes anything less than committed, accurate iron play. The smart play is conservative aggression: be decisive with your target lines but choose targets that provide margin for error. ## DIFFERENT SKILL LEVELS **High-Handicap Players:** Focus on finding the fairway with your most reliable club off the tee, even if it means hitting less than driver. From the fairway, prioritize hitting the green over getting close to the pin. Aim for the center of the green with whatever club gets you there comfortably, and be content with two-putt pars. **Low-Handicap Players:** Use this hole as a scoring opportunity by being aggressive with your target lines while respecting the small green. Consider the wind carefully in club selection and don't be afraid to take an extra club to ensure you hold the green. Attack pins that are accessible, but play to fat parts of the green when pins are tucked in corners. The beauty of Sand Hills' 11th hole lies in its honest challenge - there are no tricks or hidden dangers, just the fundamental golf test of hitting your ball to increasingly smaller targets. Success here comes from disciplined course management and committed execution.

  4. Watch for

    • Course conditioning and mapped hazards may affect line selection; confirm from the aerial.

The green on No. 11

Mapped boundary
Wide × deepyards
25×33
Areasq ft
4,917

Gear for Hole 11

We may earn a commission when you buy through these links.

Course coverage

Tournament and creator videos about Sand Hills Golf Club — shared course coverage, not hole-specific clips.

Featured by these creators

Creator videos about this course

YouTube creators who filmed or featured Sand Hills Golf Club. · Stats as of Nov 16, 2026 · 5d ago

Explore golf creators →

The Story of Sand Hills | Designing Golf

Kapalua, Sand Hills, & 35 Years at Skokie Country Club | The Fried Egg Golf Podcast

Golfer feedback

How did Hole 11 play?

⚡ Quick Golfer Pulse

How did this hole play today?

1-tap anonymous vote

Frequently asked questions

Yardage reference: Championship tees · 408 yards.

What's the best strategy off the tee?

↓

For this 408-yard par 4, most players will hit driver to set up a comfortable approach.

How difficult is hole 11?

↓

This hole is a good scoring opportunity for most golfers.

How big is the green on hole 11?

↓

The green is medium-sized with moderate targets. Pay attention to pin placement when selecting your approach club.