Hole 6 at Olympia Fields Country Club (North Course)
- Par
- 3
- Yardage
- 178 yds
- Stroke index
- 17
- Hazards
- 4 bunkers · Water
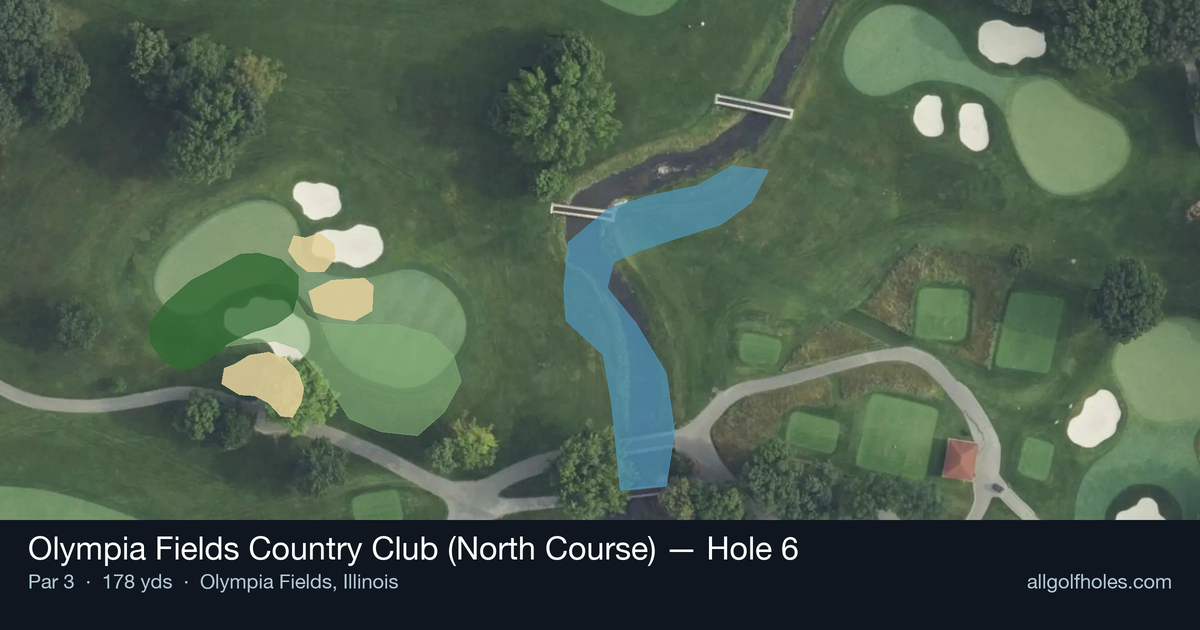
Aerial source not provided
Green size: 32 yds deep × 28 yds wide
Scorecard yardage is for Championship tees. The aerial shows its labeled reference position; distance rings measure to the green.
Championship tees · Par 3 · 178 yards
The plan for No. 6
The shortest hole at Olympia Fields Country Club (North Course) hole 6 demands precision over power from its elevated tee. At 178 yards, this deceptively challenging par 3 presents a classic target golf scenario where club selection and accuracy reign supreme. The small green sits invitingly below, but its compact dimensions leave little room for error on approach shots. Without significant hazards to intimidate, the hole's primary defense lies in its unforgiving green complex that punishes wayward tee shots with difficult recovery situations. As the 17th handicap hole, it may appear straightforward, but the premium on finding the putting surface makes this a true test of iron play. Smart course management and committed swings separate good scores from missed opportunities on this elegant short hole.
Off the tee
Club selection is absolutely critical on this hole. Most players will be looking at anything from a 6-iron to a hybrid depending on conditions and pin position. Take one extra club and swing smoothly rather than forcing a shorter iron - the small green rewards center-of-green strategy over aggressive pin-hunting. Aim for the heart of the green regardless of pin position, as the compact target makes getting close to any flag position a challenge. Pay close attention to wind conditions, as they can significantly impact club selection on this length of shot.
Approach & recovery
Since this is a par 3, your tee shot IS your approach shot. Focus on a smooth, balanced swing that prioritizes accuracy over distance. The straight layout means you can commit fully to your target line without worrying about doglegs or hidden trouble. However, the small green demands precision - treat this like a dart throw rather than a power shot. A shot that lands anywhere on the putting surface should be considered a success.
On the green
The small green likely features subtle breaks that can be tricky to read. Take extra time studying your putt, as the compact surface means even minor slopes will affect ball movement significantly. Focus on solid contact and smooth pace rather than trying to be overly aggressive with birdie attempts. Two-putting from anywhere on this green is an excellent result that keeps your round moving in the right direction. ## RISK VS REWARD The primary risk/reward decision comes with club selection and target choice. The conservative play is taking plenty of club and aiming for the center of the green, virtually guaranteeing a par opportunity. More aggressive players might try to attack pins, but the small green size makes this a low-percentage play with significant penalty potential. The smart money is on playing for the middle and taking your par. ## DIFFERENT SKILL LEVELS **High Handicappers:** Take at least one extra club and aim for the absolute center of the green. Don't worry about pin position - your goal is simply to find the putting surface. A bogey here isn't devastating given the hole's difficulty rating, so avoid the temptation to force a risky shot. **Low Handicappers:** You can be slightly more aggressive with pin positions, but respect the small target. Consider course management in the context of your overall round - if you're playing well, par is perfectly acceptable here. This hole's handicap ranking suggests it's designed to challenge even skilled players, so don't let ego override smart strategy. The key to conquering this hole is embracing its challenge while maintaining realistic expectations. Solid course management and precise execution will serve you far better than trying to overpower what appears to be a straightforward par 3.
Watch for
- Course conditioning and mapped hazards may affect line selection; confirm from the aerial.
Hole 6 Green Complex
Mapped green boundary
Green size: 4,344 sq ft
How did Hole 6 play?
How did this hole play today?
Frequently asked questions
Yardage reference: Championship tees · 178 yards.
What club should I use on this par 3?
↓
At 178 yards, most golfers will need a mid-iron (7-iron to 8-iron) to reach this green. Adjust for elevation, wind, and pin position.
How difficult is hole 6?
↓
This hole is one of the tougher holes on the course for most golfers. Key challenges include: water in play, small green.
What hazards should I watch out for on hole 6?
↓
Key hazards include: water at 86.6 yards. Plan your shots to avoid these trouble spots.
How big is the green on hole 6?
↓
The green is small and requires precision. Expect challenging pin positions with limited room for error.
What's a good score on hole 6?
↓
This hole is a solid par with birdie chances for precise approach shots. Making par is a good result here. Focus on hitting the green and avoiding three-putts.