Hole 9 at Seminole Golf Club
- Par
- 5
- Yardage
- 494 yds
- Hazards
- 9 bunkers · Water
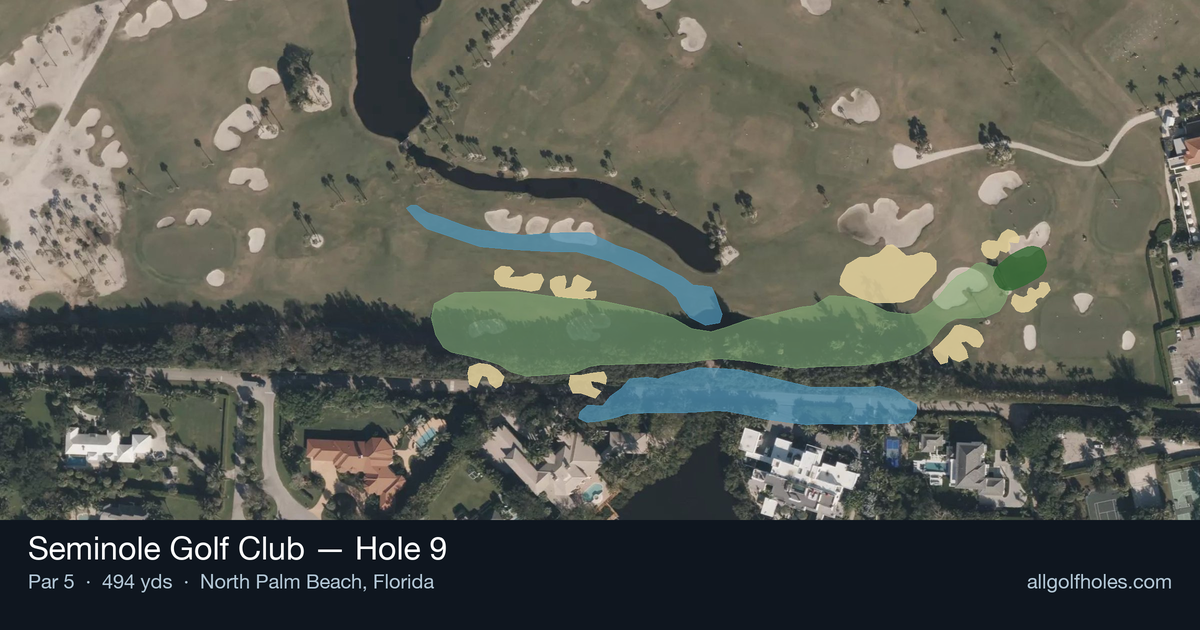
Aerial source not provided
Green size: 31 yds deep × 23 yds wide
Scorecard yardage is for Championship tees. The aerial shows its labeled reference position; distance rings measure to the green.
Championship tees · Par 5 · 494 yards
The plan for No. 9
The closing hole of Seminole Golf Club's front nine presents a strategic par 5 at 494 yards that epitomizes the understated elegance of this legendary North Palm Beach layout. Donald Ross's design philosophy shines through this deceptively straightforward hole, where the absence of obvious hazards masks subtle challenges that have tested champions since 1929. The straight layout invites aggressive play, but the small green demands precision on the approach, rewarding those who can thread the needle with their second or third shot. Ben Hogan famously honed his skills on these fairways, and this hole exemplifies why Seminole remains a pilgrimage site for golf purists seeking authentic strategic design.
Off the tee
Focus on finding the fairway with your most reliable driver or 3-wood. The straight layout gives you a clear target line down the center, allowing you to commit fully to your swing. Since there are no significant hazards threatening the landing area, you can be aggressive with your tee shot to set up the shortest possible approach. Favor the center-right portion of the fairway if possible, as this typically provides the best angle for your second shot. Length is valuable here, but accuracy remains paramount - a well-positioned drive in the fairway trumps extra distance in the rough.
Approach & recovery
Your strategy for the second shot depends heavily on your tee shot quality and personal capabilities. Longer hitters may have the opportunity to reach the green in two, but the small target makes this a high-risk proposition. Most players should focus on positioning their second shot in the ideal wedge range, typically leaving 80-120 yards to the pin. Aim for the center of the fairway with your layup, giving yourself the best angle and lie for your approach. If you do choose to go for the green in two, favor the center of the putting surface rather than attacking pins - the small green leaves little margin for error.
On the green
The small green size makes precision essential on your approach shot. Focus on hitting to the center of the green regardless of pin position, as the compact surface means you're never too far from any hole location. Take extra time reading putts, as subtle breaks can be magnified on smaller greens. Speed control becomes critical - hitting putts too firmly on a small green often leads to challenging comeback putts. When the pin is tucked near an edge, resist the urge to be overly aggressive and instead lag putts to the fat part of the green. ## RISK VS REWARD The main risk/reward decision comes on the second shot. Going for the green in two offers obvious birdie potential but brings bogey into play if you miss the small target. The safer layup strategy virtually guarantees a wedge in your hands for the third shot, making par very achievable with birdie still possible. Weather conditions should heavily influence this decision - calm conditions favor aggression, while wind makes the conservative play more attractive. Consider your current round momentum and overall scoring goals when making this choice. ## DIFFERENT SKILL LEVELS **High-Handicap Players:** Play this hole as a three-shot par 5 without exception. Use your most reliable clubs off the tee and for your layup, prioritizing position over distance. Aim for the center of the green with your approach and focus on two-putting for par. This conservative strategy eliminates big numbers while still providing birdie opportunities. **Low-Handicap Players:** Evaluate going for the green in two based on your lie, distance remaining, and pin position. When conditions favor aggression and you have a good lie with a mid-iron or less, the small green becomes a manageable target. However, don't force the shot - if you're between clubs or the lie is questionable, take your medicine with a layup and rely on your short game to create scoring opportunities. The beauty of this hole lies in its strategic flexibility, rewarding both conservative course management and calculated aggression when executed properly.
Watch for
- Mapped sand (greenside) roughly 480 yards from the tee reference.
- Mapped sand (greenside) roughly 494 yards from the tee reference.
- Mapped sand (crossing) roughly 417 yards from the tee reference.
- Mapped sand (crossing) roughly 452 yards from the tee reference.
- Mapped sand (crossing forced carry) roughly 246 yards from the tee reference.
Hole 9 Green Complex
Mapped green boundary
Green size: 3,360 sq ft
Course coverage
Tournament and creator videos about Seminole Golf Club — shared course coverage, not hole-specific clips.
Featured by these creators
Creator videos about this course
YouTube creators who filmed or featured Seminole Golf Club. · Stats as of Oct 12, 2026 · 5d ago
Restoring Donald Ross's Seminole Golf Club
How did Hole 9 play?
How did this hole play today?
Frequently asked questions
Yardage reference: Championship tees · 494 yards.
Can this par 5 be reached in two?
↓
At 494 yards, Reachable in two for longer hitters. Consider laying up short of hazards if going for it is risky.
How difficult is hole 9?
↓
This hole is a moderate challenge for most golfers. Key challenges include: water in play, small green.
What hazards should I watch out for on hole 9?
↓
Key hazards include: water at 327.2 yards. Plan your shots to avoid these trouble spots.
How big is the green on hole 9?
↓
The green is small and requires precision. Expect challenging pin positions with limited room for error.
What's a good score on hole 9?
↓
This hole is a reachable par 5 with eagle chances for longer hitters. Birdie is very much in play here if you can set up a good approach.