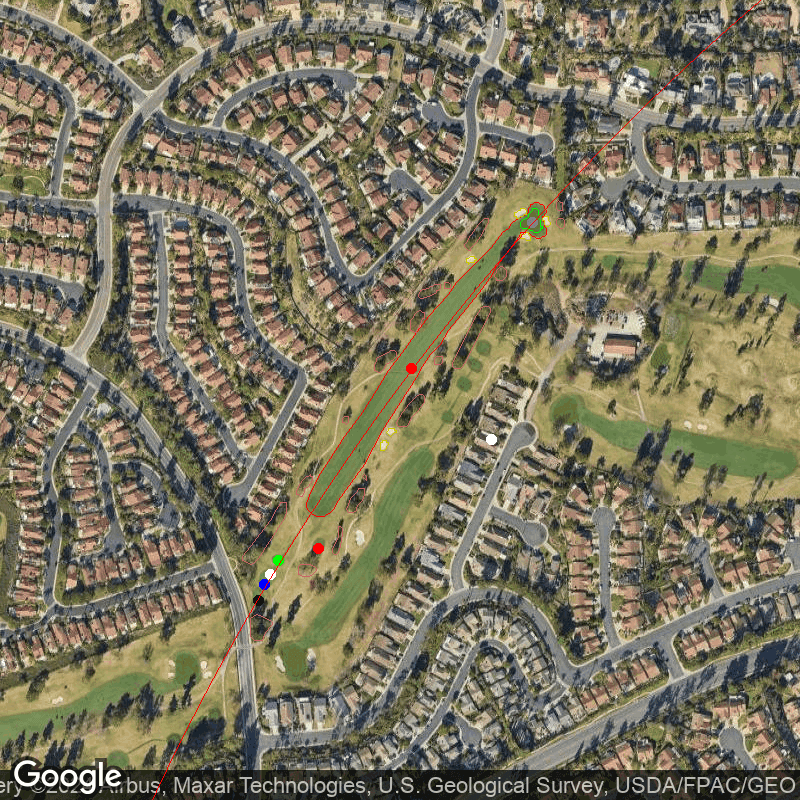
Shadowridge Golf Club Hole by Hole - 17th Hole
Shadowridge Golf Club, California
Submit a tipThere are no reviews for this hole yet
Hole 17 at Shadowridge Golf Club is a challenging par 5 that requires strategic planning and precise execution. Located in Vista, California, this championship course offers stunning views of the surrounding landscape and varying weather conditions throughout the year.
Measuring at 520 yards from the championship tees, this hole has a handicap of 4 which reflects its difficulty for even skilled golfers. The slight dogleg right design adds an extra layer of challenge as players must navigate their way around strategically placed bunkers and trees to reach the green.
For your tee shot, I recommend using a driver with an average distance of 217 yards. This will give you a good position on the fairway while avoiding any potential hazards such as water or bunkers. Keep in mind that altitude and wind can greatly impact ball flight conditions here, so be sure to adjust your club accordingly.
As you approach the green, take note of its size - measuring at only 4759 sq ft, it's one of the smaller greens on this course. However, only about 2% of it is covered by greenside bunkers so don't let that intimidate you too much. A well-placed iron shot should get you close enough for an easy putt with your pitching wedge (average distance:120 yards).
It's important to mention that during certain seasons (such as spring), there may be more moisture on this hole due to nearby water features or rain showers. In these cases, I recommend taking extra precautions when hitting out of roughs or approaching wet areas near the green.
Overall, Hole 17 at Shadowridge Golf Club is a true test for any golfer looking to improve their skills and lower their scorecard. With careful planning and confident shots off both tee box and fairway alike - success awaits!
Teebox type:
Championship
Par:
5
Distance:
520 yards
Handicap:
4
Green Area:
4759
Approx Fairway Width:
32
Has Water:
False
Curvature:
Slight dogleg
Percent Bunkers Near green:
2
Bunker Count:
6
Bunkers:
Some fairway bunkers, with the majority (51%) strategically placed around the area.
Club Recommendations
1. Use a driver for your tee shot to get a good position on the fairway.
2. Adjust your club selection based on altitude and wind conditions.
3. Be aware of potential hazards such as water or bunkers.
4. Take note of the small size of the green, but don't let it intimidate you.
5. Aim for an iron shot to get close enough for an easy putt with your pitching wedge.
6. Pay attention to moisture levels during certain seasons and take extra precautions when hitting out of roughs or approaching wet areas near the green.
7. Plan strategically before each shot and have confidence in your execution to successfully navigate this challenging par 5 hole.
8. Practice precise shots off both tee box and fairway in order to improve skills and lower scorecard on this difficult hole at Shadowridge Golf Club.
"The most important shot in golf is the next one."
- Ben Hogan
Only signed in users can add reviews.
Sign inThere are no reviews for this hole yet